What is it
Form Fields in contractuo are dynamic elements akin to Smart Fields. They can be embedded within forms to collect specific data from users and serve as conditional references, making them essential for creating dynamic documents. To streamline data collection and enable conditional logic in your forms, you must create and configure these Form Fields. Both default and customized Form Fields can be created to perfectly suit your needs. They can be embedded within Text Blocks as Smart Fields.
Different types of Form Fields exist, each with its unique properties. ‘Short Answer’ and ‘Long Answer’ fields are typically used as placeholders for user input text.
The ‘Address’ field allows users to enter a complete address across three input fields and select an associated country.
‘Number’ fields enable numerical entries, and you can also assign a range to these fields.
‘Email’ fields are designated for entering valid email addresses.
Among the most utilized by our partners are the ‘Dropdown’ fields. Since Form Fields are used as references in forms, this field can be included for users to choose from multiple options. It is recommended to use complete sentences as field names and to include a question mark for queries.
‘Checkbox’ fields let users affirm or deny a statement and are commonly used as conditional references, determining whether information is included based on whether the box is checked or not.
The ‘Date’ field offers different rendering styles and the option to select a range for date entry.
The ‘Contact’ field allows users to reference an existing contact within the platform, and the system will automatically populate the complete contact information into the document.
A ‘Table’ field, when included in a form or text block, grants users the ability to input information into table cells and add additional rows and columns as needed.
Including a ‘Text Block’ field enables users to select and add a pre-existing Text Block at a specific location in the document.
The ‘Product’ field similarly allows users to incorporate an existing Product into their current document.
Lastly, the ‘Editor’ field provides users with a popup editor for adding additional text, with the option to preset content similar to Text Blocks.
Who is it for
Form Fields are designed for Administrators and content Creators who are responsible for creating the underlying structures of financial products, documents, or contracts. They enable a level of automation and consistency that is crucial for users like Financial Managers and Administrative Staff who generate and fill out these documents.
Why to use Form Fields?
Form Fields are essential to contractuo’s system for several reasons, they serve as references for conditional workflow, and they also act as dynamic smart placeholders and information collection. You can use them in templates, text blocks, and forms.
Requirements to be able to use the Form Fields:
Access to the Prospect module.
Administrative permissions in contractuo.
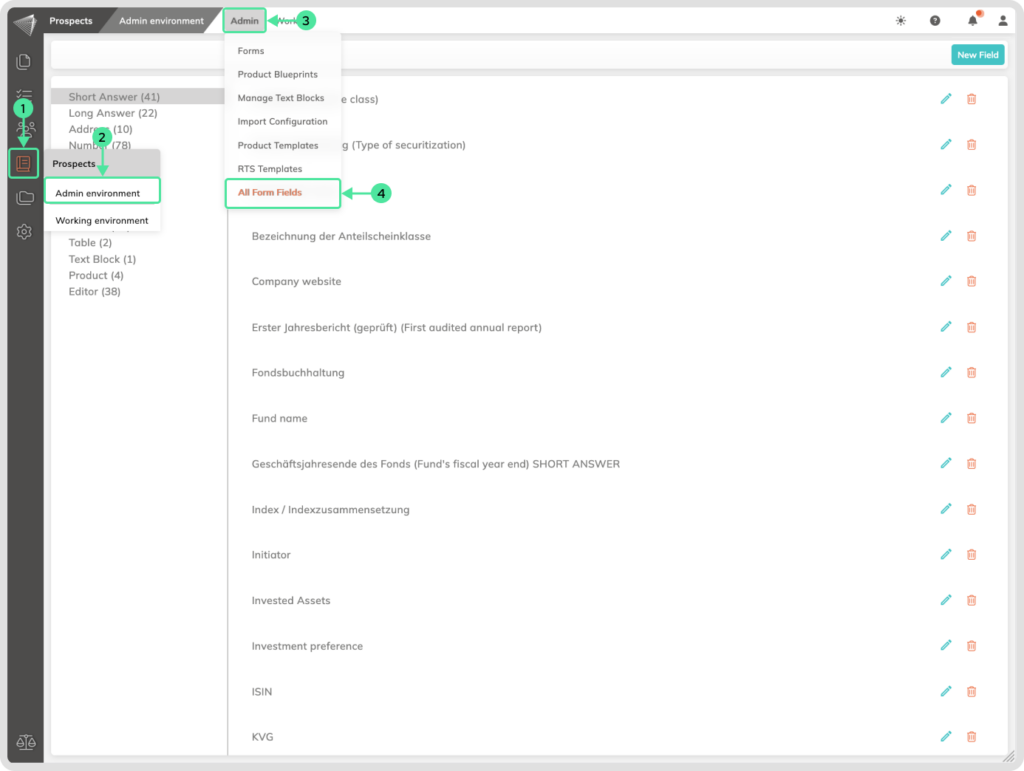
How to find the Form Fields?
- Go to the Prospect Module.
- Select the Admin Environment.
- Click on the Admin menu.
- Select the All Form Fields menu.
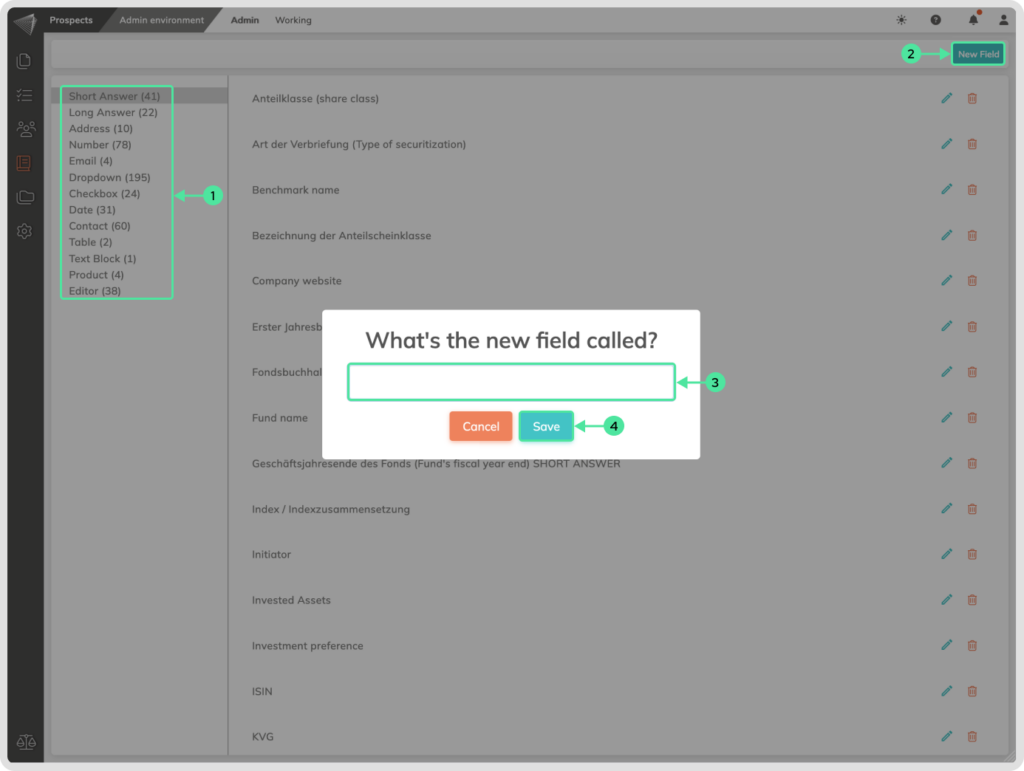
How to create a new Form Field?
Go to the Prospect Module and select the Admin Environment. Click on the Admin menu and Select the All Form Fields menu. On the left side, you will see the list of the Form Field types.
- Click on the category under which you wish to create a new field.
- Click the ‘New Field’ button, located at the top right corner.
- Insert a descriptive name to your new field in the ‘Field Name’ input area
- Click the ‘Save’ button to preserve your new field.
Possible settings for each Form Field:
Short Answer Field
When creating or editing this field, you can perform the following actions:
- You can add a unique descriptive name to the field.
- You can implement a proper placeholder that will be displayed when filling out the product.
- You can determine the maximum length of user input; the default maximum value can be up to 200 characters.
- You can set a default value for the field. This means that this value will be suggested and can be modified by the user’s input.
- You can add a suffix and/or a prefix. This means that a predefined value/text will always be included in the front or back of the text accordingly.
- You can specify if the field is mandatory to be filled out. When the user doesn’t complete it, they can’t finalize the product.
- Click the Save button after editing the field properties.

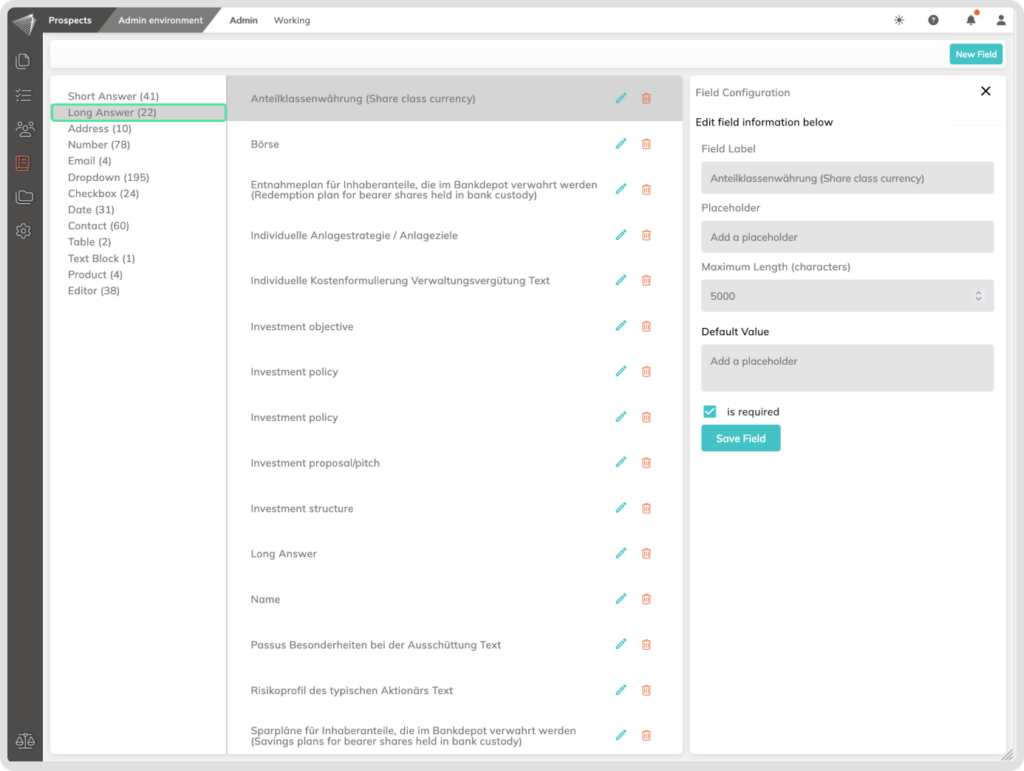
Long Answer Field
Similar to Short Answer, but allows for a lengthier response (up to 5000 characters).
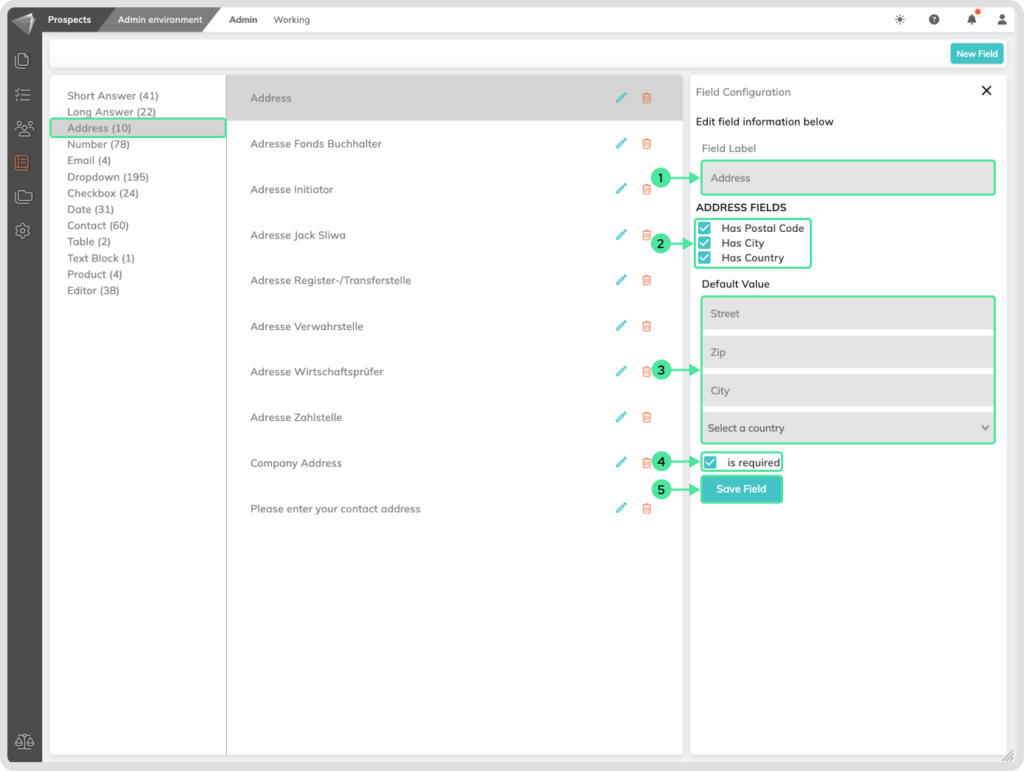
Address Field
When creating or editing this field, you can perform the following actions
- You can add a unique descriptive name to the field.
- You can select by clicking on the checkboxes if the related input fields should be listed or not. (Has Postal Code, Has City, and Has Country)
- You can implement default values that will be displayed when filling out the product. (Street, Zip, City, and Country from the dropdown list.)
- You can specify if the field is mandatory to be filled out. When the user doesn’t complete it, they can’t finalize the product.
- Click the ‘Save’ button after editing the field properties.
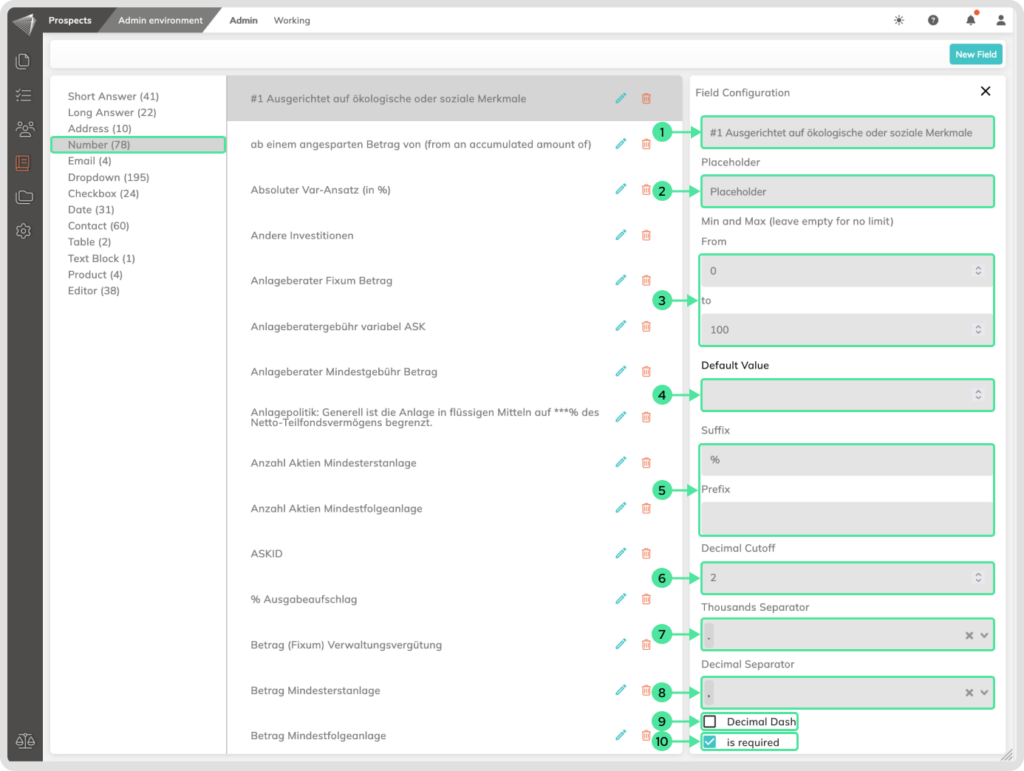
Number Field
When creating or editing this field, you can perform the following actions
- You can add a unique descriptive name to the field.
- You can implement a proper placeholder that will be displayed when filling out the product.
- You can determine a Form To value. Allowing the user to input a number just in that range.
- You can set a default value for the field. This means that this value will be suggested and can be modified by the user’s input.
- You can add a suffix and/or a prefix. This means that a predefined value/text will always be included in the front or back of the text.
- You can implement a Decimal cutoff. That means that the numbers are going to be rounded to the requirements set by you.
- You can also what default Thousand separators should be implemented in the final output.
- You can also what default Decimal separators should be implemented in the final output.
- You can also set a Decimal Dash by clicking on the Checkbox.
- You can specify if the field is mandatory to be filled out. When the user doesn’t complete it, they can’t finalize the product. Save your settings after editing the field properties.
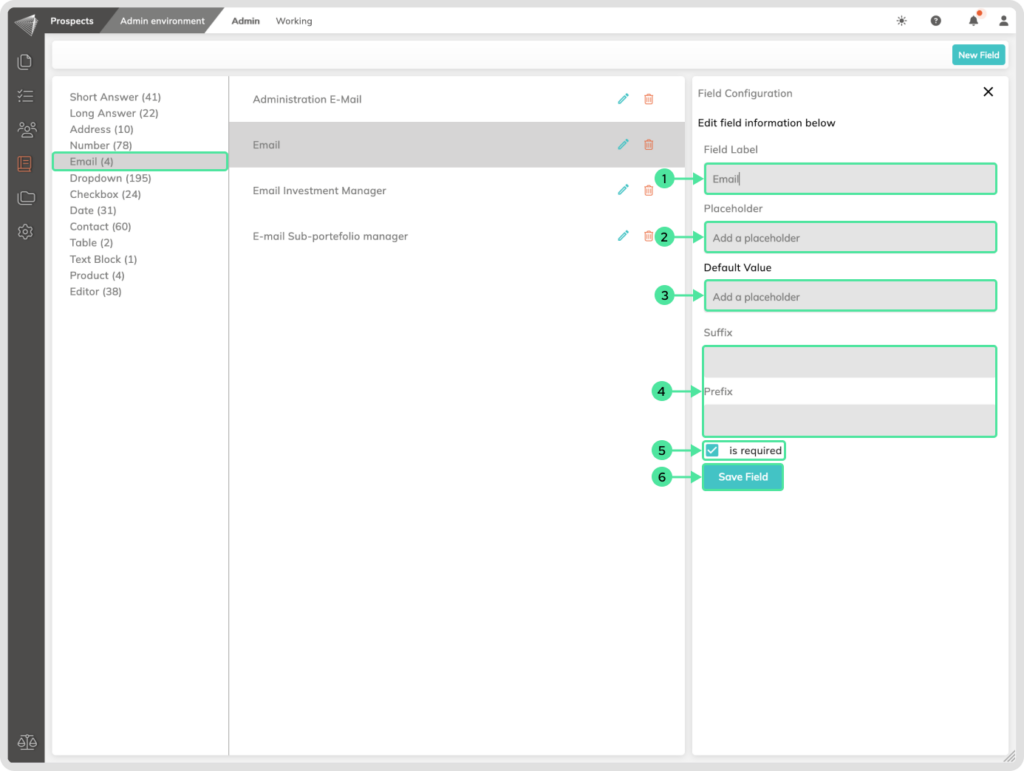
Email Field
When creating or editing this field, you can perform the following actions
- You can add a unique descriptive name to the field. e.g., “Manager Email.”
- You can implement a proper placeholder that will be displayed when filling out the product. e.g., “[email protected].”
- You can set a default value for the field. This means that this value will be suggested and can be modified by the user’s input.
- You can add a suffix and/or a prefix. This means that a predefined value/text will always be included in the front or back of the text.
- You can specify if the field is mandatory to be filled out. When the user doesn’t complete it, they can’t finalize the product.
- Click the Save button after editing the field properties
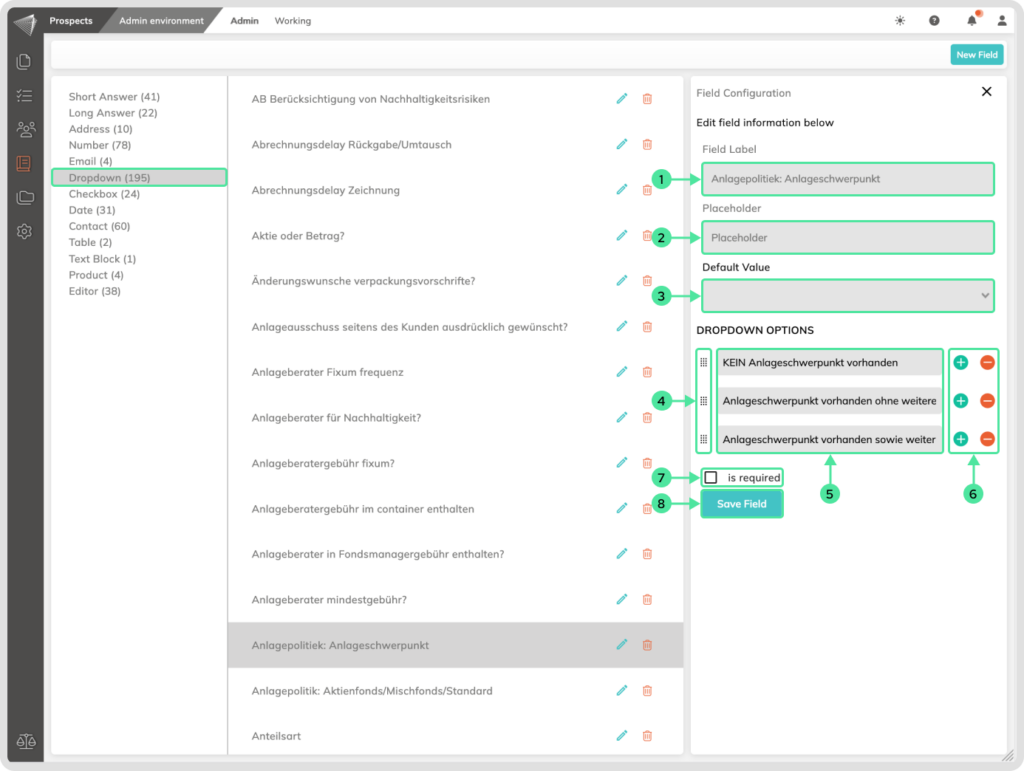
Dropdown Field
When creating or editing this field, you can perform the following actions
- You can add a unique descriptive name to the field. Ideally, it should be a complete sentence as a name.
- You can implement a proper placeholder that will be displayed when filling out the product.
- You can set a default value for the field from the dropdown. This means that this value will be suggested and can be modified by the user’s input.
- You can also drag and drop the options by clicking and holding the field and moving it to the desired order position.
- You can modify the default option names with proper naming. Ideally, they should be complete sentences.
- You can add additional option fields by clicking on the + icon or delete options by clicking on the – icon.
- You can specify if the field is mandatory to be filled out. When the user doesn’t complete it, they can’t finalize the product.
- Click the Save button after editing the field properties.
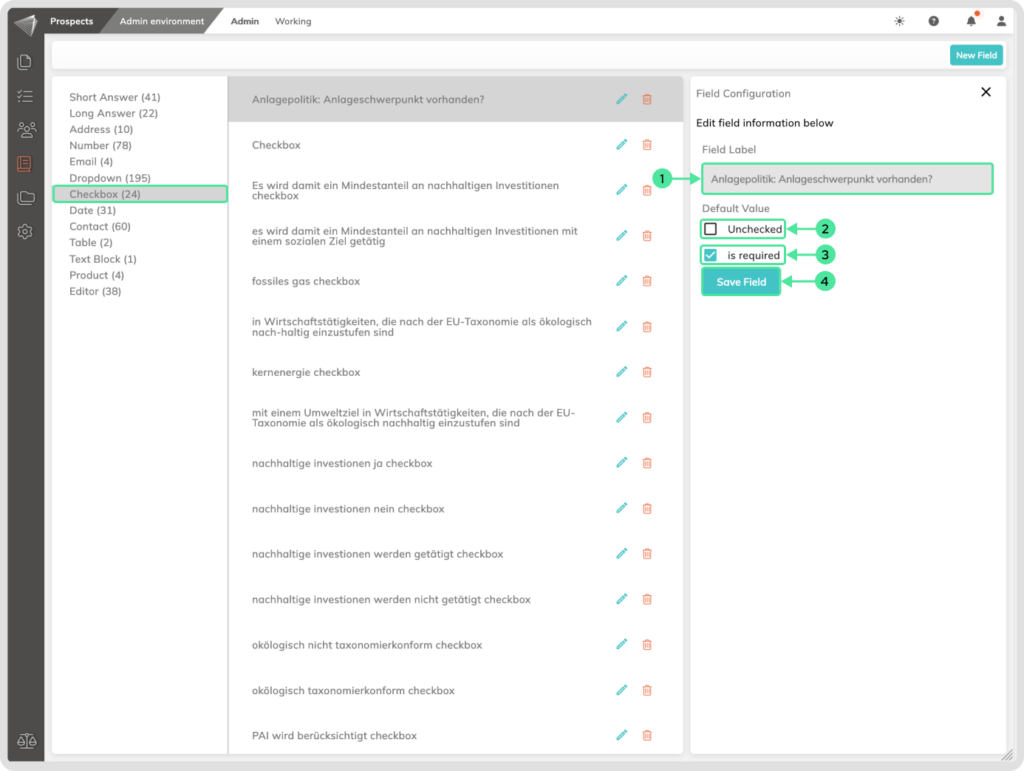
Checkbox Field
When creating or editing this field, you can perform the following actions
- You can add a unique descriptive name to the field.
- You can determine if the checkbox should be by default Unchecked or checked.
- You can specify if the field is mandatory to be filled out.
- Click the Save button after editing the field properties.
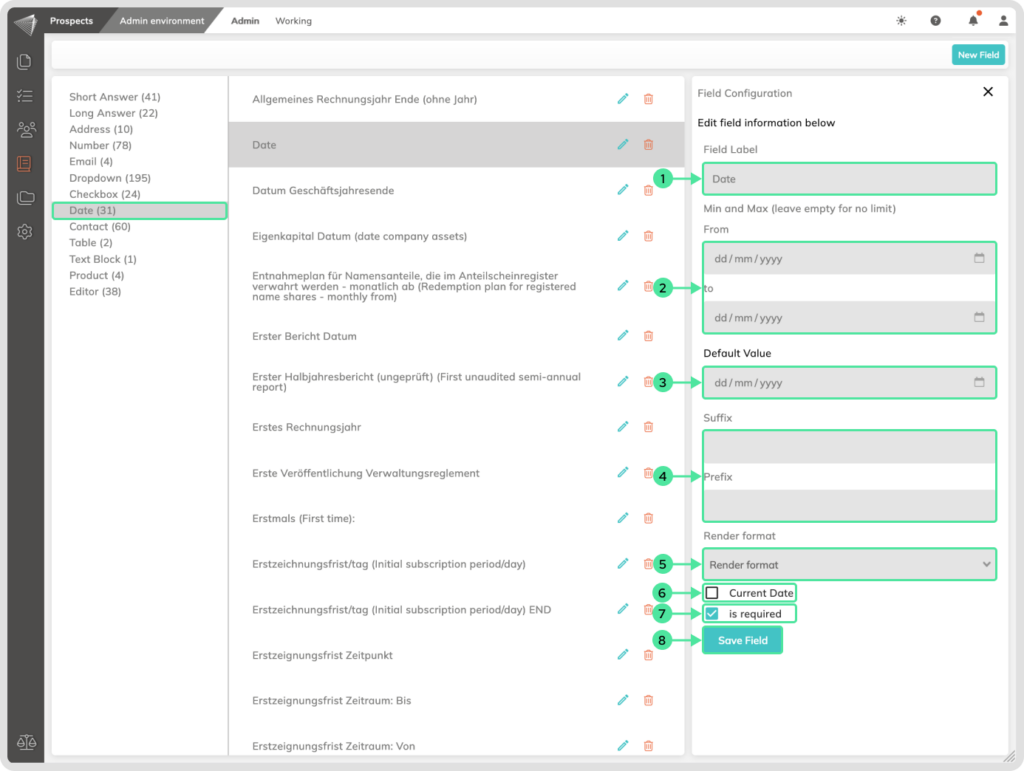
Date Field
When creating or editing this field, you can perform the following actions
- You can assign a unique descriptive name to the field, such as “Start Date.”
- You can implement a “From to Date” option, allowing the end user to select a date within a specified range.
- You can set a default value for the field, which will be suggested to the user and can be modified according to their input.
- You have the option to add a suffix and/or a prefix, meaning that a predefined value or text can be automatically added either before or after the user’s input.
- You can specify whether the field is mandatory, and if so, users must complete it before finalizing the product.
- You can choose from a variety of date formats for how the date should appear in the document, such as “DD/MM/YYYY.”
- You also have the option to automatically populate the field with the current date as a default value.
- Don’t forget to click the “Save” button after editing the field properties.
Contact
When creating or editing this field, you can perform the following actions
- You can give the field a unique, descriptive name, like “Investor.”
- You can add a custom placeholder that will appear when you fill out the product.
- Select ‘Individual’ or ‘Organization’ from the dropdown to define the contact type for this field, which determines the displayed Contact Properties.
- From the Contact Properties dropdown list, you can select which information to include in the product and the order in which it appears. We recommend starting with the Title or Name but feel free to adjust it to your needs. In this section, you can add various common display details typically found in a business environment.
- As a special feature, you can choose to add Additional Fields from the dropdown. These fields are created within the Contact menu when creating or editing a contact. They serve as placeholders that need to be filled in when creating the product.
- To further customize this field for specific situations, you can link it to a Contact Tag. This means the field will only appear when the associated tag is selected. This is important when creating or editing a contact. If you don’t select the same tag, this field won’t be displayed in the Contacts menu.
- You can specify whether the field is mandatory. If it is, users must complete it before finalizing the product.
- Don’t forget to click the Save button after editing the field properties.
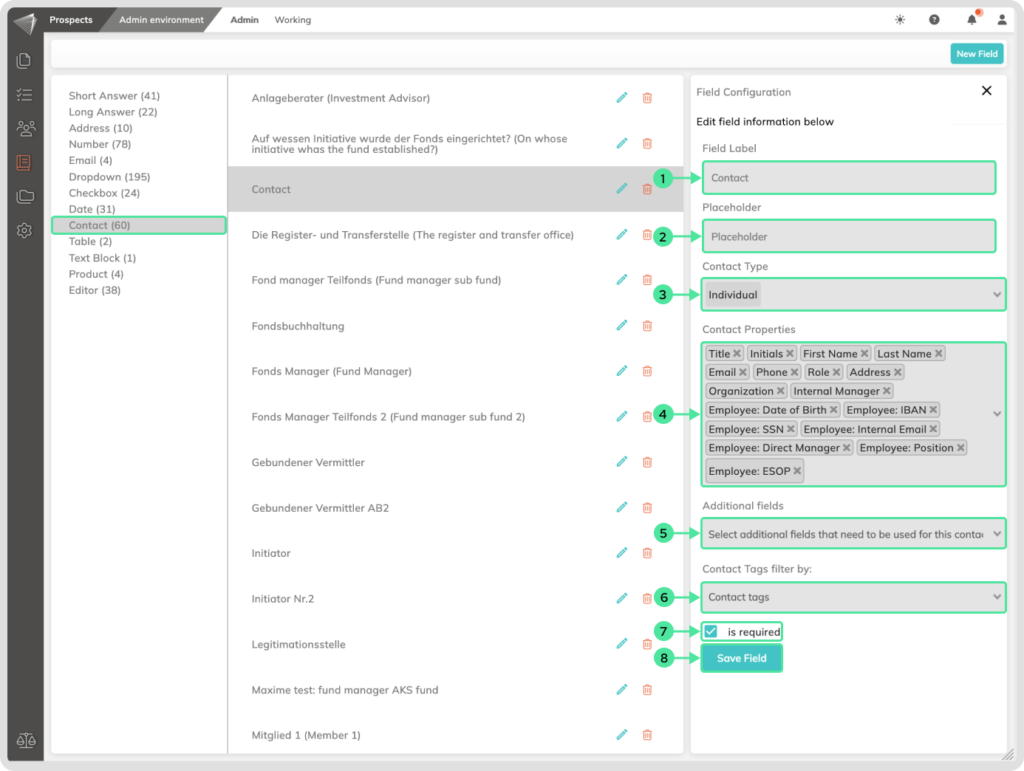
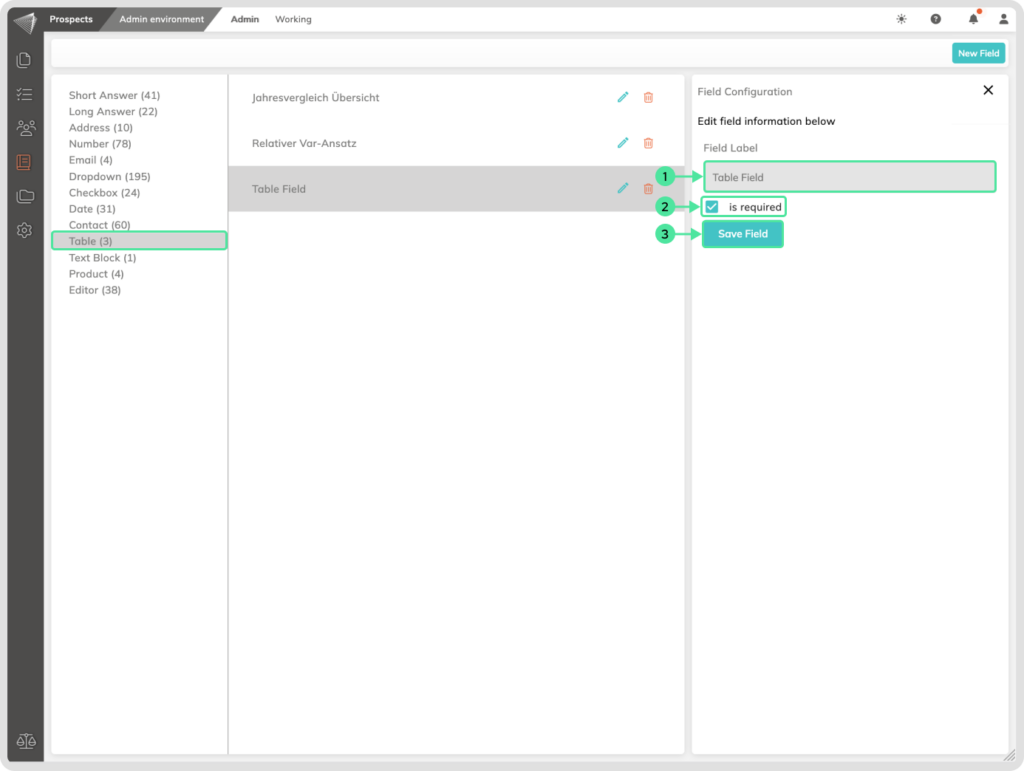
Table Field
When creating or editing this field, you can perform the following actions
- You can add a unique descriptive name to the field.
- You can specify if the field is mandatory to be filled out. When the user doesn’t complete it, they can’t finalize the product.
- Click the Save button after editing the field properties.
Text Block Field
When creating or editing this field, you can perform the following actions
- You can add a unique descriptive name to the field.
- You can specify if the field is mandatory to be filled out. When the user doesn’t complete it, they can’t finalize the product.
- Click the Save button after editing the field properties.

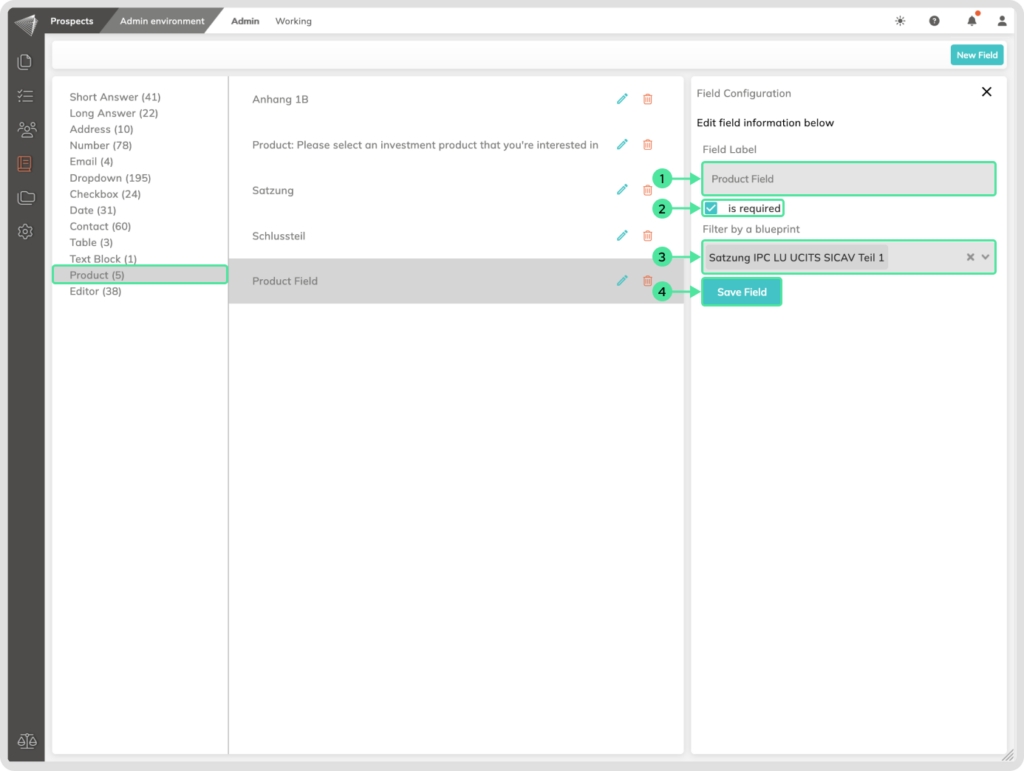
Product Field
When creating or editing this field, you have the following options
- You can assign a unique, descriptive name to the field.
- You can specify whether the field is mandatory to be filled out. If the user doesn’t complete it, they won’t be able to finalize the product.
- You can also choose to list this field only in certain blueprints by adding a filtering selection referring to an existing blueprint where this field should be displayed.
- Don’t forget to click the Save button after editing the field properties.
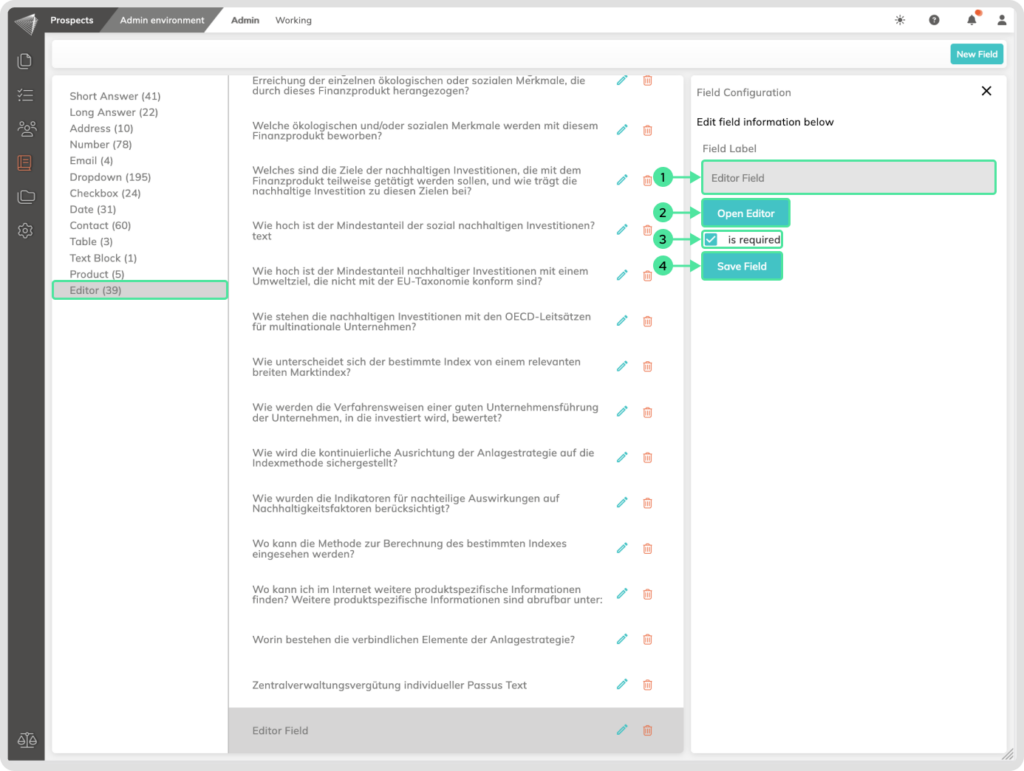
Editor Field
When creating or editing this field, you can take the following actions
- You can give the field a unique, descriptive name.
- You can open the Editor and insert text, utilizing all the Editor functionalities. Please note that this field does not support editing or changes from other dynamic smart fields. Additionally, it’s not possible to apply conditions on top of text or smart fields within this Editor. After including the text inside the Editor, click the X icon to close the Editor window.
- You can specify whether the field is mandatory to fill out. If the user doesn’t complete it, they won’t be able to finalize the product.
- Don’t forget to click the Save button after editing the field properties.
Example how the editor can look like if you click on the open editor button and insert text
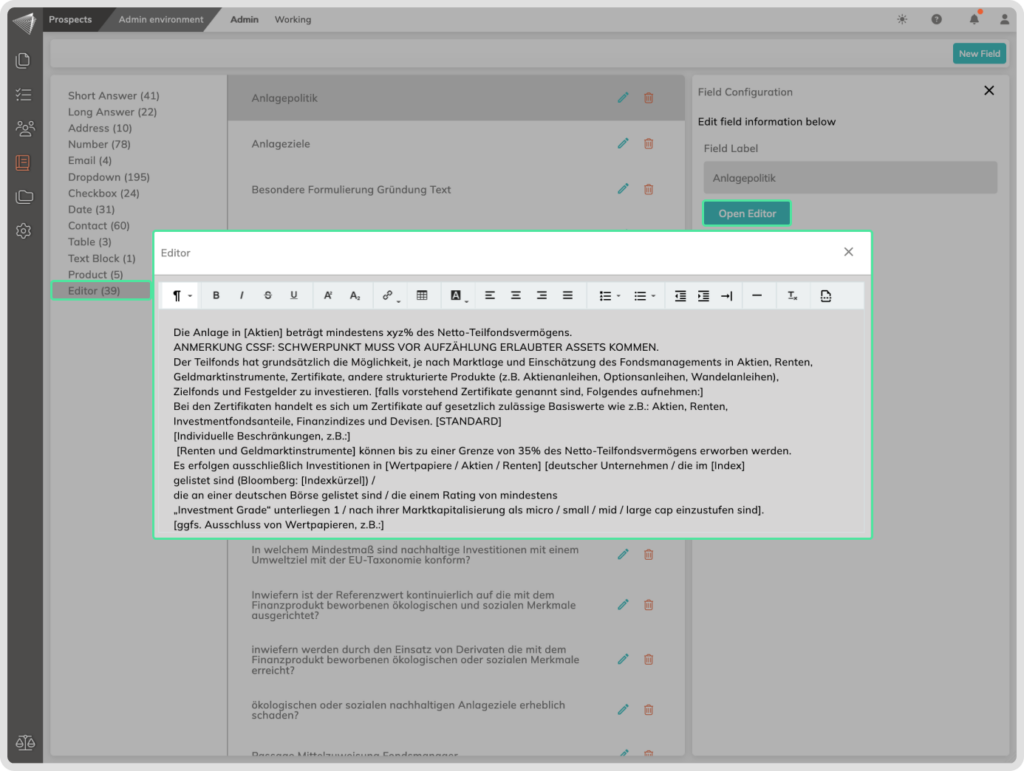
Here you can change the text style and properties, but keep in mind that you cannot insert dynamic smart fields or signature fields here. You can do this in the text blocks themselves.