Smart Fields are the dynamic building blocks of contractuo, allowing you to create adaptable and interactive content. They can be used within the Documents, Contacts, and Prospects menus.
How to access and manage Smart Fields:
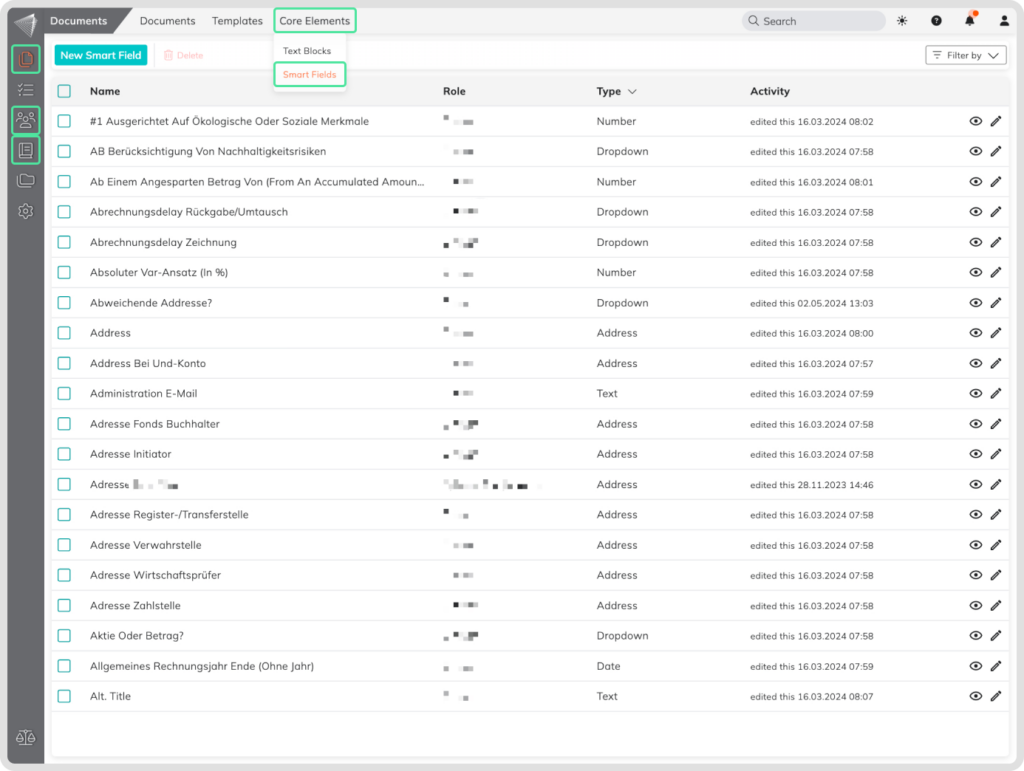
- Navigate to one of the main menus: Documents, Contacts, or Prospects.
- Within the chosen menu, locate the submenu titled Core Elements.
- Under Core Elements, you’ll find the Smart Fields.
Here, you’ll be able to create and manage these versatile tools to enhance your document and product creation process.
Smart Fields offer exceptional flexibility. You can utilize them across all designated menus (Documents, Contacts, Prospects) for a truly dynamic experience. Alternatively, leverage the ‘Restriction to Modules’ function to dedicate Smart Fields to specific menus.
Let’s get started!
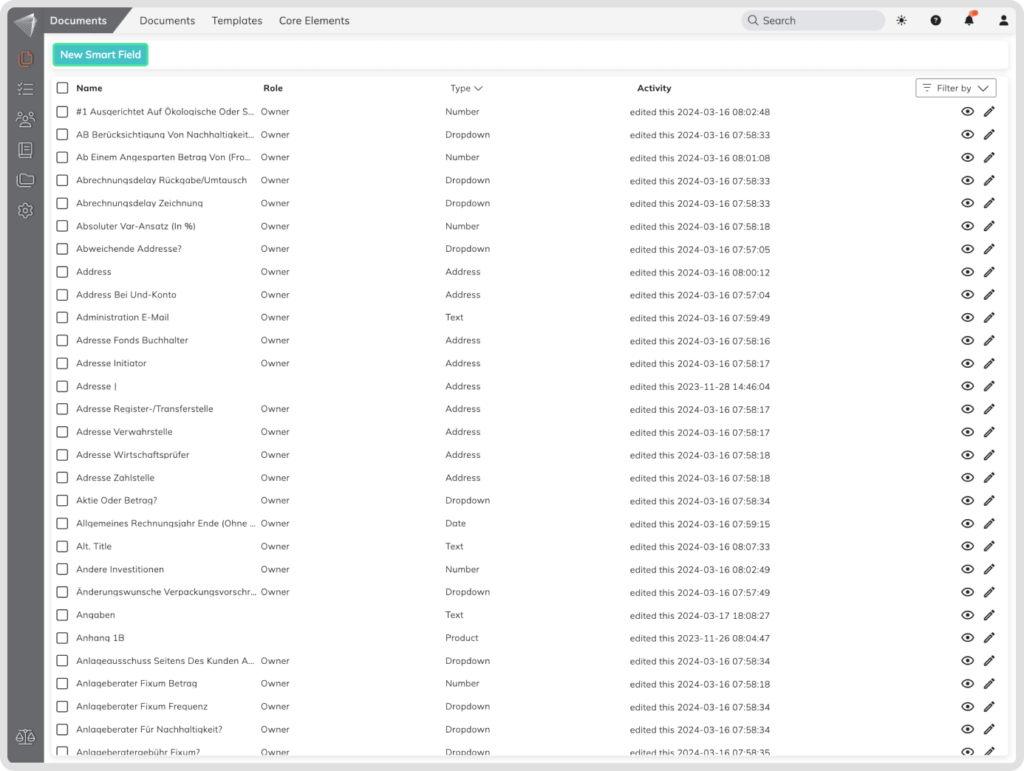
When opening the Smart Fields menu you will see existing smart fields and the Create New Smart Field button in the top left corner. Click on the button to create a new Smart Field.
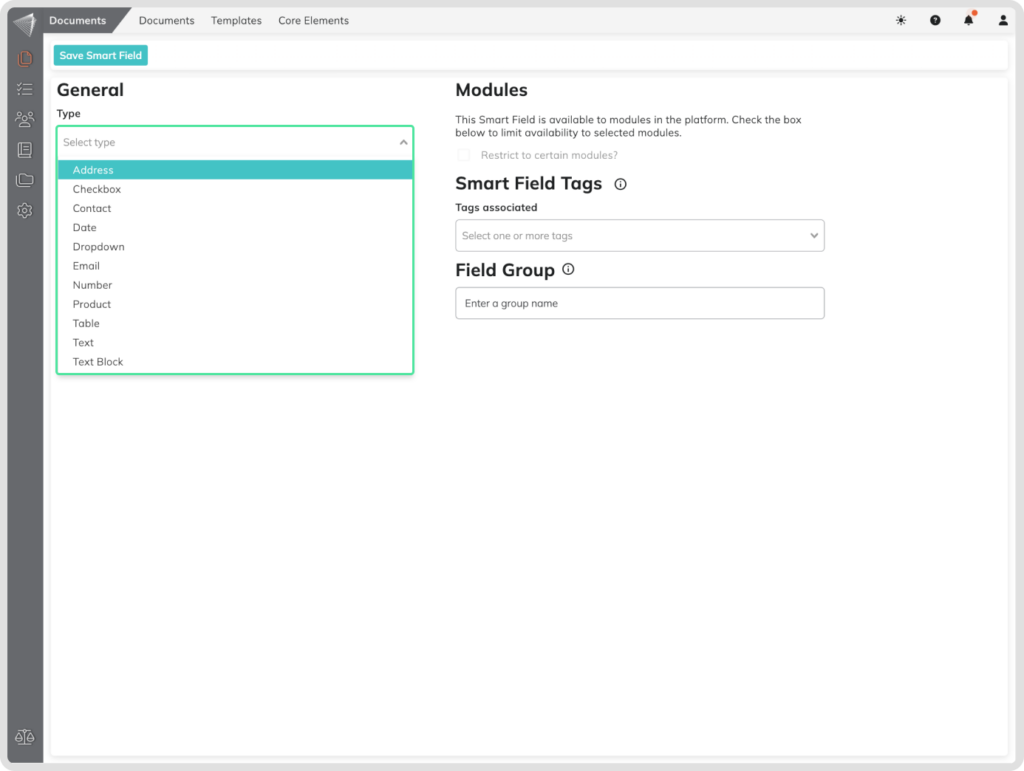
Contractuo provides a variety of Smart Fields, each with specific properties to match your needs. Here’s a breakdown of the available types:
General Smart Fields:
- Address: Simplify capturing addresses.
- Checkbox: Enable users to select yes/no options.
- Contact (Individuals/Organizations): Allow users to select existing contacts.
- Date: Let users choose dates.
- Dropdown: Present a list of pre-defined choices for selection.
- Email: Capture valid email addresses.
- Number: Collect numerical data.
- Text (Basic): Capture basic text input.
Advanced Smart Fields (Exclusively for Forms & Prospect Module):
- Product: Insert existing Products into documents/products. (Prospects only)
- Table: Create structured tables for complex data entry.
- Text (Editor): Allow rich text formatting within the editor.
- Text Block: Insert pre-defined text blocks into documents/products in a precise place.
Smart Field Types
Address Fields
Address Smart Fields take the hassle out of collecting accurate and complete addresses in your HR, banking, and administrative forms.
- Complete Capture: Capture all essential address components, including street, city, state, zip code, and country, with ease.
- Reduced Errors: Minimize typos and inconsistencies by offering a user-friendly format for address entry.
- Standardized Data: Streamline data management and analysis with consistent address formats across your forms and products.
- Global Reach: Collect addresses accurately, regardless of location, with support for international formats.
Address Smart Fields are ideal for any situation where collecting accurate and complete address information is crucial, regardless of the specific industry.
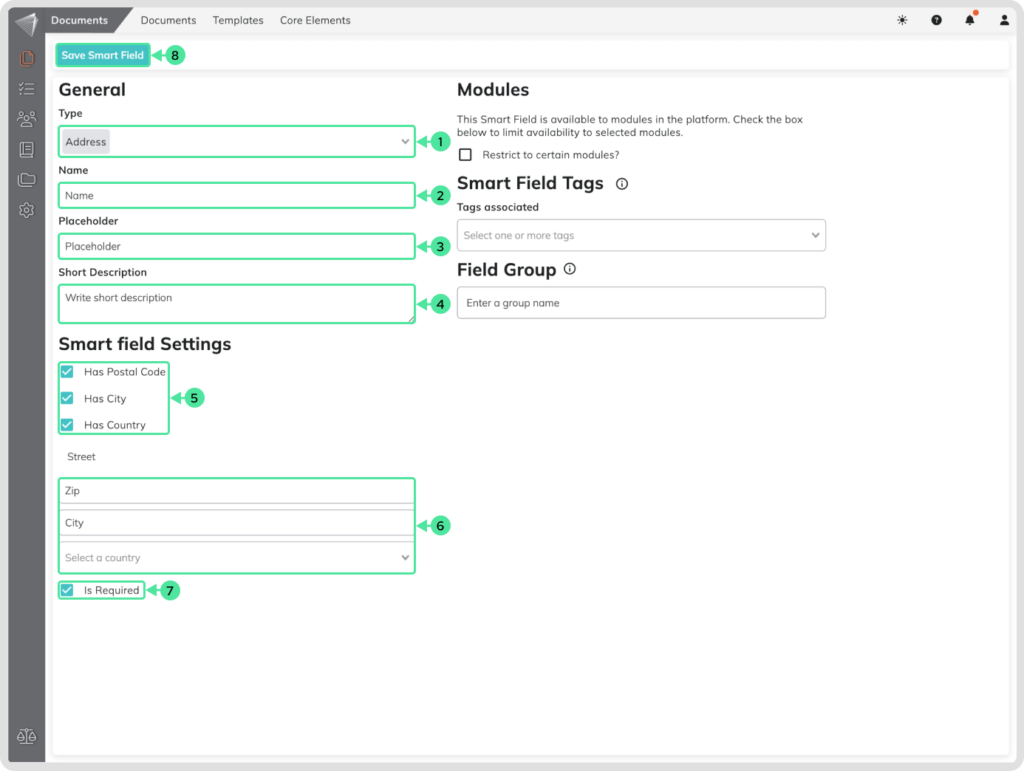
- Choose Address Field: Start by selecting “Address” from the Smart Field options.
- Assign a Clear Name: Give your Smart Field a descriptive name that reflects its purpose for easy identification and use.
- Consider Placeholder Text: Add placeholder text to provide users with guidance on the expected format (e.g., “Street Address”).
- Optional Description: Include a brief description if needed to clarify the field’s purpose or requirements for users.
- Customize Address Components: Select relevant address components (e.g., Street, City, State) for inclusion or exclusion in the field.
- Set a Default Value (Optional): Pre-populate the field with a default address, if applicable, to save time for users entering frequent information.
- Mandatory or Optional: Decide whether the field is required or optional for users to fill out.
- Save Settings: Once configured, click “Save Smart Field” to finalize the creation of the Address Smart Field.
Checkbox Fields
Checkbox Smart Fields provide a simple and intuitive way to gather specific user selections within your documents and products.
- Simple Selection: Present users with clear options they can easily choose from by ticking checkboxes. Perfect for situations requiring yes/no answers or multiple-choice selections.
- Enhanced Clarity: Improve the clarity and structure of your forms by using checkboxes to present options in a visually appealing and organized manner.
- Streamlined Workflows: Reduce the need for lengthy text entry and simplify data collection for both users and administrators.
Checkbox Smart Fields are a versatile tool for gathering user input and creating user-friendly forms and products.

- Choose Checkbox Field: Start by selecting “Checkbox” from the Smart Field options.
- Assign a Clear Name: Give your Smart Field a descriptive name that reflects its purpose for easy identification and use.
- Consider Placeholder Text: Add placeholder text within the field to provide users with guidance.
- Optional Description: Include a brief description if needed to clarify the field’s purpose or requirements for users.
- Set Default State: Decide whether the checkbox should be initially checked or unchecked.
- Mandatory or Optional: Choose whether users must fill out this field or if it’s optional.
- Save Your Settings: Once configured, click “Save Smart Field” to finalize the creation of the Checkbox Smart Field.
Contact Fields
Contacts Smart Fields elevate your forms and products by seamlessly integrating contact information from your existing contact database.
- Effortless Data Population: Pre-populate documents and products with accurate contact details by simply referencing a contact. Say goodbye to manual entry!
- Subfield Power: Pull specific information like email address, phone number, or even custom fields stored in your contact database, eliminating the need for repetitive data entry.
- Enhanced Accuracy: Reduce errors and ensure data consistency by using verified contact information directly from your central database.
- Improved Workflow: Save time and effort with a streamlined approach to contact information management.
Contacts Smart Fields unlock a world of convenience and accuracy when dealing with contact information within your forms and products.
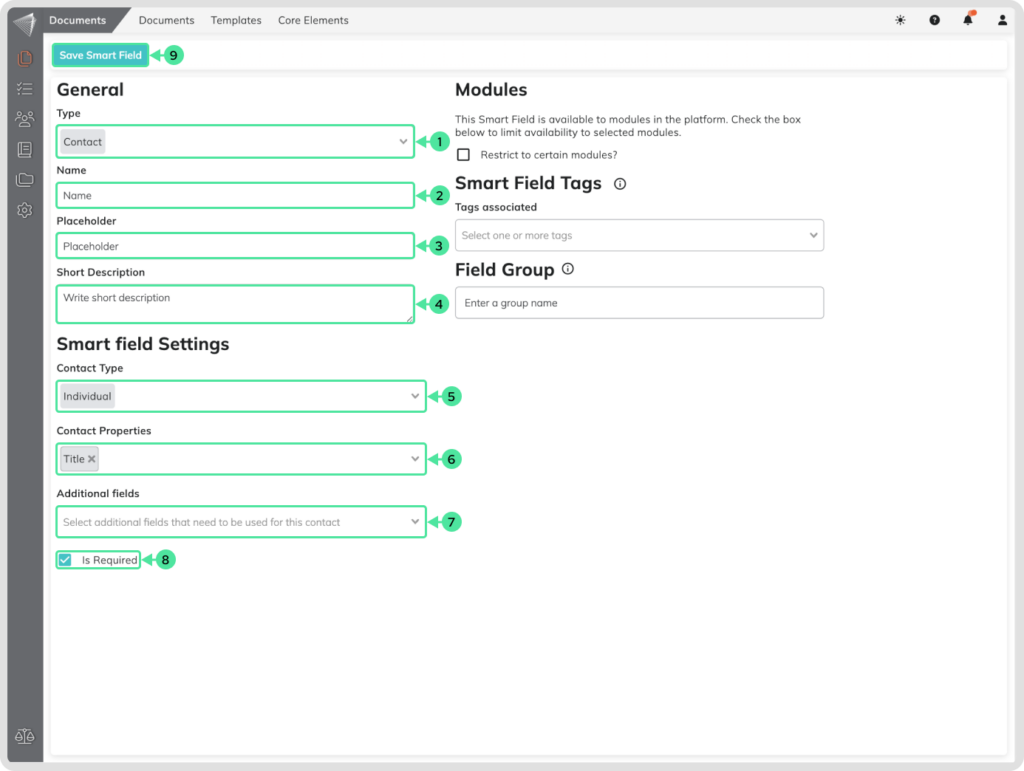
- Choose Contact Field: Begin by selecting “Contact” from the Smart Field type options.
- Assign a Meaningful Name: Give your Smart Field a clear and descriptive name that reflects its purpose. This will make it easier to identify and use later.
- Optional Placeholder Text: Consider adding placeholder text within the field. This provides a hint to users about the expected information format.
- Short Description (Optional): If necessary, include a brief description to further explain the field’s purpose or specific requirements for future users.
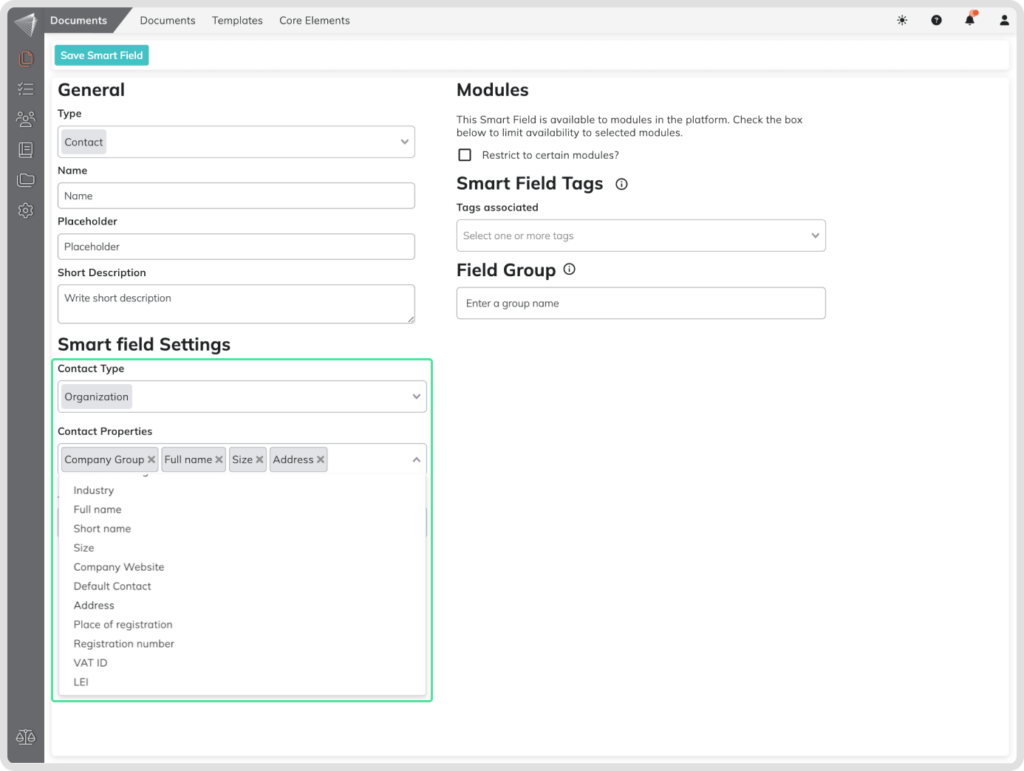
- Contact Type: You can choose which contact Type it should be. You can switch between Individuals and Organisations.
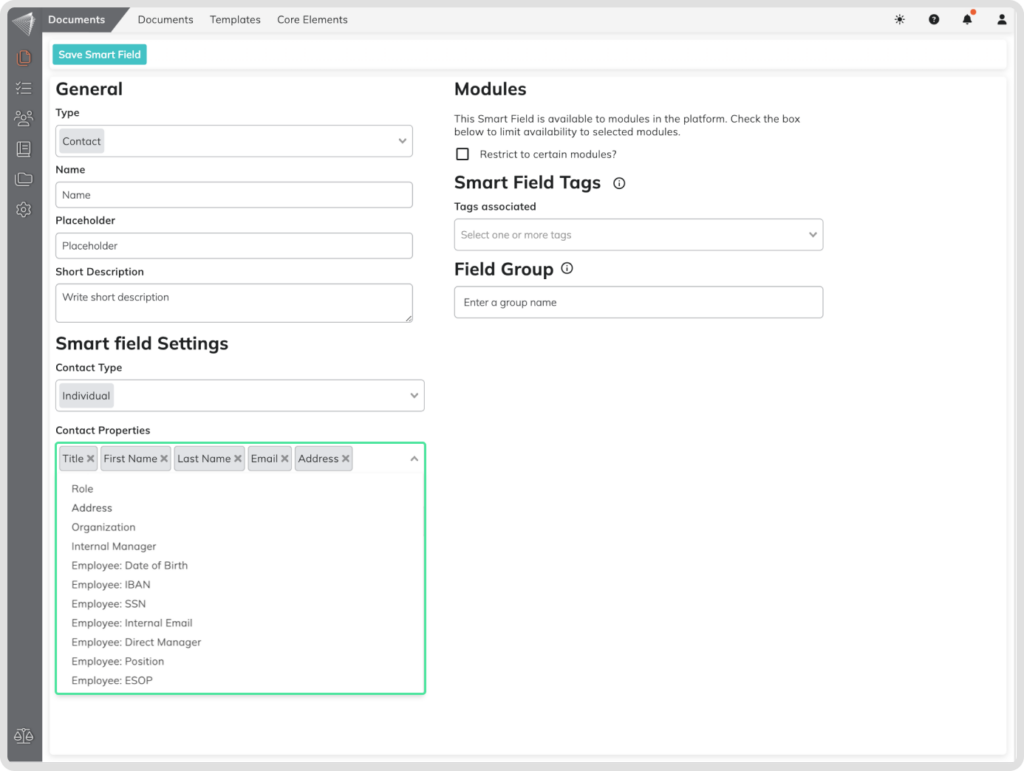
- Contact Properties: Select the order and which information should be added by the field inside the document.
- Additional Fields: You can add additional Smart Fields that should be included inside the contact field.
- Mandatory or Optional: Decide whether users are required to fill out this field or if it’s optional.
- Save Your Settings: Once you’ve configured the Contact Smart Field to your liking, click “Save Smart Field” to finalize its creation.
Individual Contact Smart Field
Organisation Contact Field
After switching from the Individuals to the Organisations from the Contact Type dropdown. You can also select which information should be rendered or not.
Dates Fields
Never struggle with messy date formats again! Our Date Smart Field simplifies the process of collecting date information from users.
- Clear and Concise: Users can easily enter dates directly or use a built-in calendar for a visual and intuitive experience.
- Accurate Data: Eliminate the confusion of manual entry by ensuring consistent date format throughout your forms and products.
- Streamlined Workflow: Save time and effort by collecting dates in a standardized way, making data analysis and reporting a breeze.
The Date Smart Field is a must-have for any form or product that requires accurate and easy-to-use date collection.
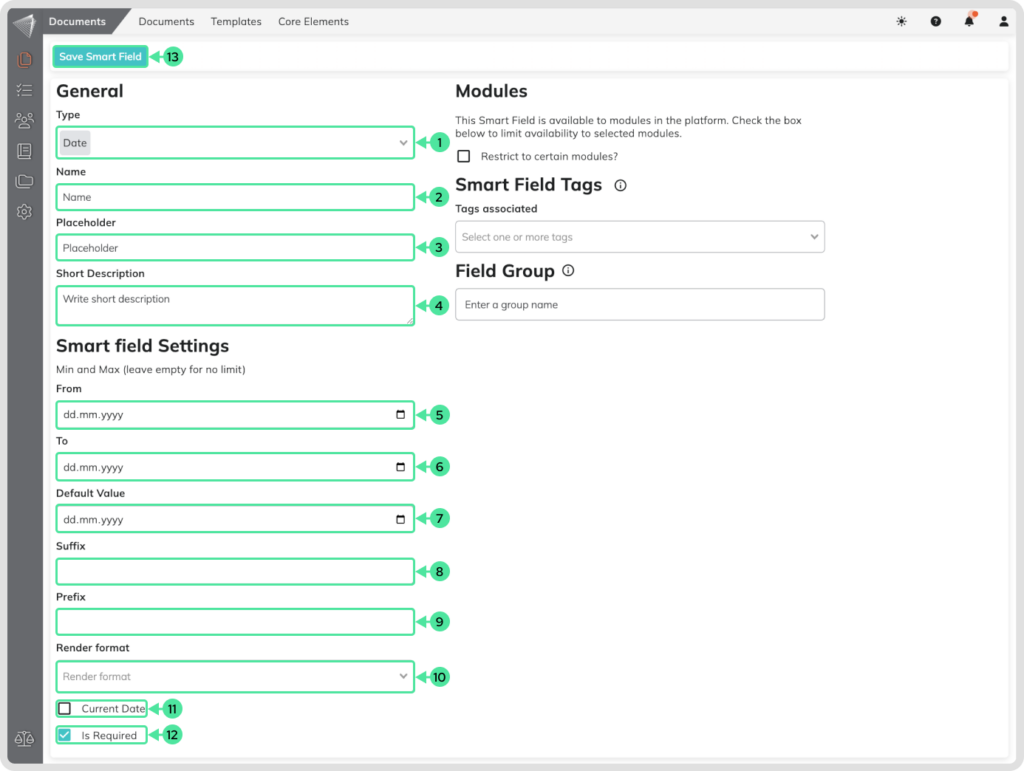
- Choose Date Field: Begin by selecting “Date” from the Smart Field type options.
- Assign a Meaningful Name: Give your Smart Field a clear and descriptive name that reflects its purpose. This will make it easier to identify and use later.
- Placeholder Text (Optional): Consider adding placeholder text within the field.
- Short Description (Optional): If necessary, include a brief description to further explain the field’s purpose or specific requirements for future users.
- Customize your Date Settings: You can select a From date, which means that the user can’t add a date before your present date.
- Restrict the range: You can also add a to Date, which means that the user can’t add a date after the pre-set date.
- Set a default Value: You can assign a date that should be by default set up.
- Set a default Suffix: By adding a suffix you can include data that should always added at the end of the date.
- Set a default Prefix: By adding a prefix you can include data that should always added in the front of the date.
- Select a Render Format: You can select in what format the date should visually appear in the document.
- Enable Current Date display: By checking this box, the smart field will automatically show the date of document creation.
- Mandatory or Optional: Decide whether users are required to fill out this field or if it’s optional.
- Save your Settings: Once you’ve configured the Date Smart Field to your liking, click “Save Smart Field” to finalize its creation.
Dropdown Fields
- Flexible Format: Dropdowns can be phrased as questions or statements, making them versatile for various scenarios.
- Predefined Answers: Save time and ensure consistency by offering pre-defined answer options that users can easily select from.
- Conditional Power: Elevate your forms by using dropdowns in conditional logic. Display specific information or follow-up questions based on the user’s selection, creating a dynamic and interactive experience.
In short, dropdowns streamline data collection, provide clear options, and unlock conditional logic, making them a powerful tool for building effective forms and products.
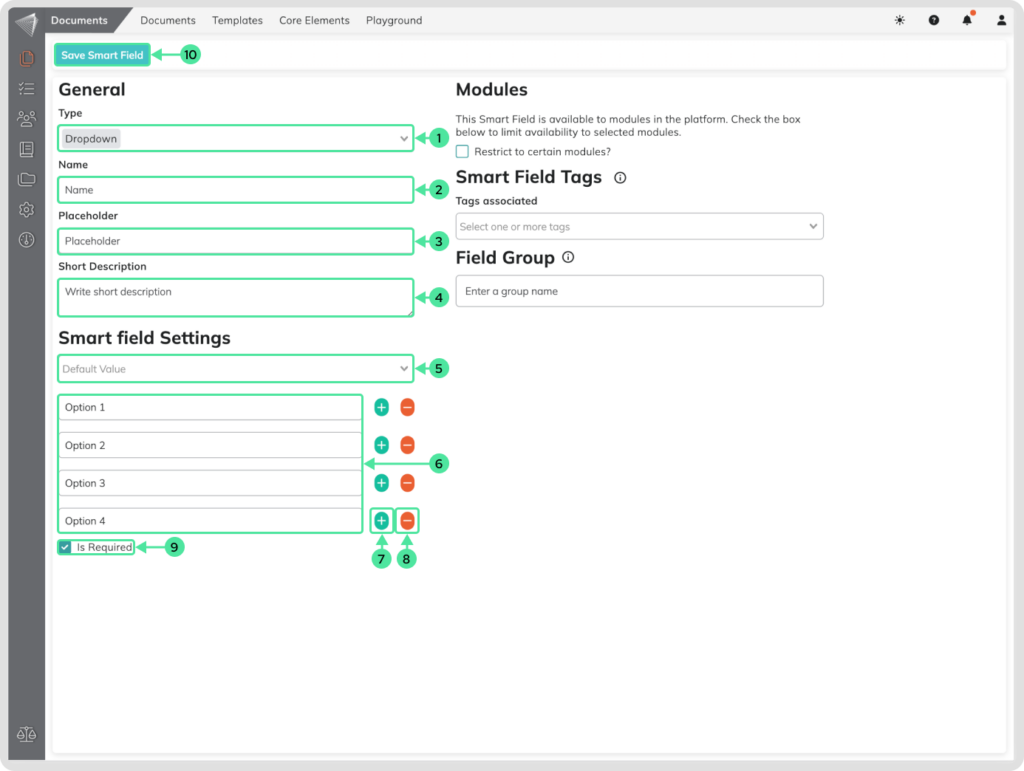
- Choose Dropdown Field: Begin by selecting “Dropdown” from the Smart Field type options.
- Assign a Meaningful Name: Give your Smart Field a clear and descriptive name that reflects its purpose. We recommend that you use full explanatory sentences that are questions or statements.
- Placeholder Text (Optional): Consider adding placeholder text within the field.
- Short Description (Optional): If necessary, include a brief description to further explain the field’s purpose or specific requirements for future users.
- Customize Dropdown Components: You can choose a default value that should be displayed.
- Include Option Names: The option names can also be formulated as full sentences. This should be connected to the field name, so that the user can select the suited answer.
- Add more Options: You can add more selection options if needed for your situation.
- Remove Options: If needed you can remove option. This is often used when a Yes or No question is added.
- Mandatory or Optional: Decide whether users are required to fill out this field or if it’s optional.
- Save Your Settings: Once you’ve configured the Dropdown Smart Field to your liking, click “Save Smart Field” to finalize its creation.
E-Mail Fields
Email Smart Fields streamline the process of collecting email addresses within your documents and products.
- Simplified Collection: Effortlessly gather email addresses from users, eliminating the need for manual entry and reducing errors.
- Enhanced Personalization: Personalize your communication by using Email Smart Fields to populate emails with pre-filled addresses, saving time and creating a more professional touch.
- Streamlined Workflows: Improve the efficiency of your workflows by automating email address collection within your documents and products.
Email Smart Fields offer a convenient and reliable way to gather email addresses, making communication faster and more efficient.
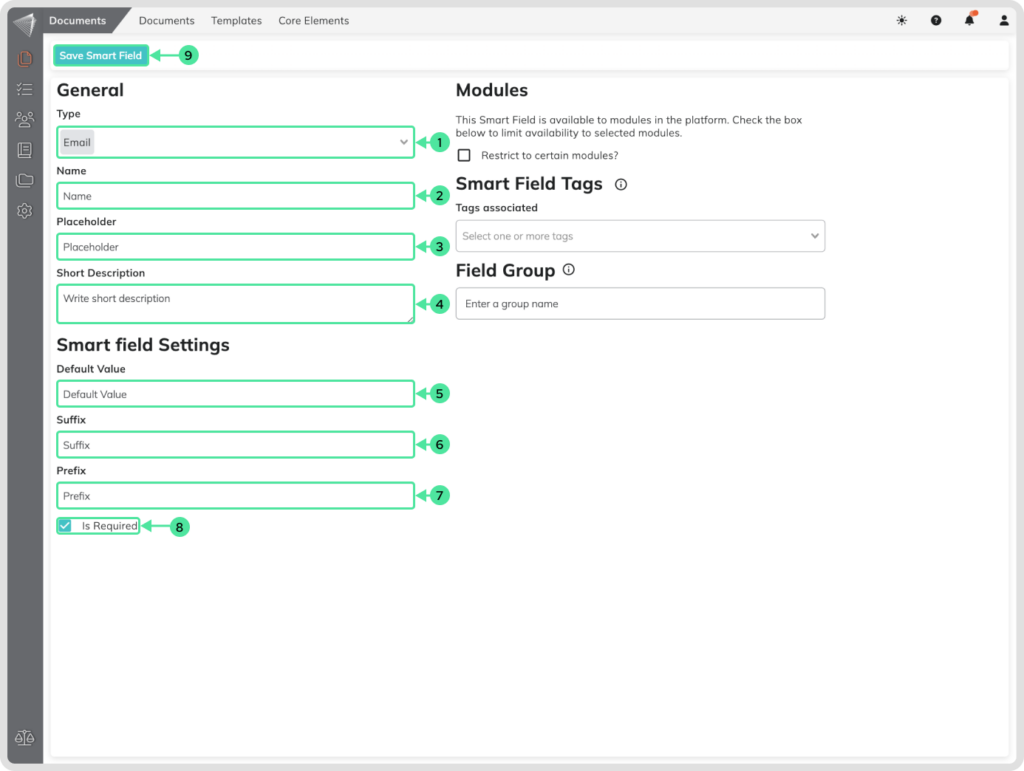
- Choose Email Field: Begin by selecting “Email” from the Smart Field type options.
- Assign a Meaningful Name: Give your Smart Field a clear and descriptive name that reflects its purpose.
- Placeholder Text (Optional): Consider adding placeholder text within the field.
- Short Description (Optional): If necessary, include a brief description to further explain the field’s purpose or specific requirements for future users.
- Set a default Value: You can select a Default value, which means that you can decide to propose a standard Email for the user that is going to use this specific field.
- Set a default Suffix: By adding a suffix you can include data that should always added at the end of the date.
- Set a default Prefix: By adding a prefix you can include data that should always added in the front of the date.
- Mandatory or Optional: Decide whether users are required to fill out this field or if it’s optional.
- Save Your Settings: Once you’ve configured the Email Smart Field to your liking, click “Save Smart Field” to finalize its creation.
Number Field
Number Smart Fields provide a dedicated space for users to input precise numerical data within your documents and products. These fields offer several advantages, especially when dealing with currency or monetary values.
- Accurate Input: Ensure accurate data collection by restricting entries to numbers only, eliminating the possibility of typos or irrelevant characters.
- Streamlined Calculations: Simplify calculations and data analysis by collecting numerical values in a standardized format, making calculations and analysis more efficient.
- Clear Communication: Improve the clarity of your documents and products by presenting numerical information in a well-defined way.
Number Smart Fields offer a reliable and user-friendly way to collect numerical data, making them ideal for situations involving currency, quantities, measurements, and other numerical values.
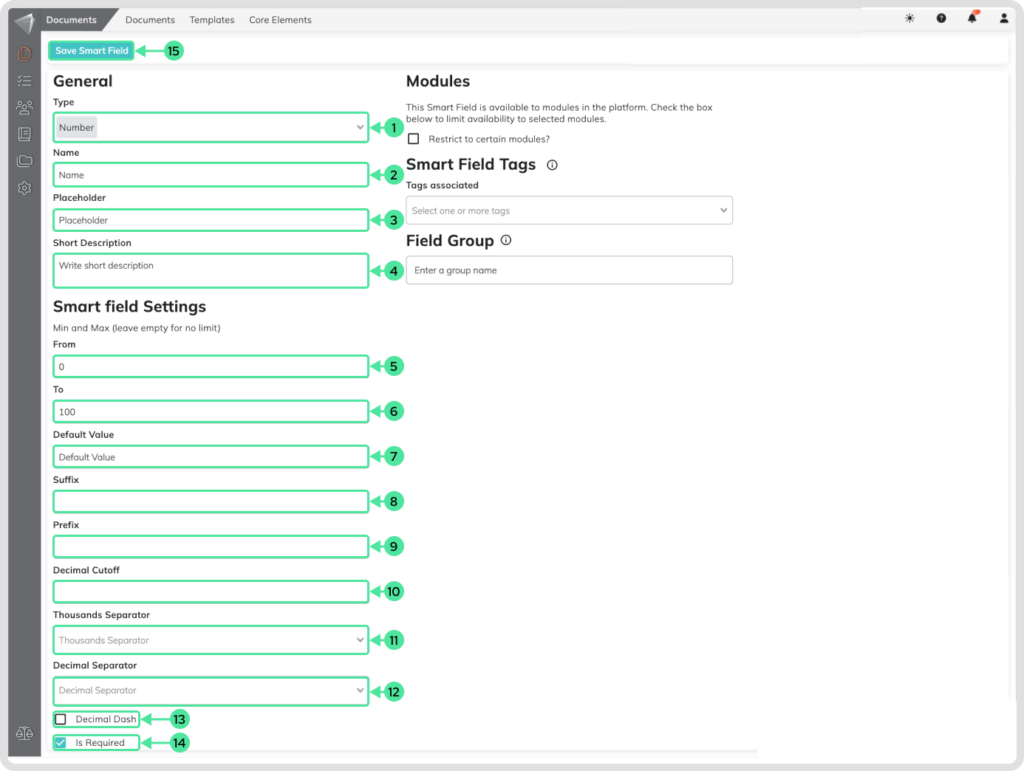
- Choose Number Field: Begin by selecting “Number” from the Smart Field type options.
- Assign a Meaningful Name: Give your Smart Field a clear and descriptive name that reflects its purpose. This will make it easier to identify and use later.
- Optional Placeholder Text: Consider adding placeholder text within the field.
- Short Description (Optional): If necessary, include a brief description to further explain the field’s purpose or specific requirements for future users.
- Customize your Date Settings: You can select a From Number, which means that the user can’t add a number under your present number.
- Restrict the range: You can also add a Number, which means that the user can’t add a number higher than the pre-set limit.
- Set a default Value: You can assign a number that should be by default setup.
- Set a default Suffix: By adding a suffix you can include data that should always added at the end of the Number.
- Set a default Prefix: By adding a prefix you can include data that should always added in the front of the Number.
- Decimal Cutoff: You can select if the number should be rounded this limits the number of decimal places displayed.
- Thousand Separator: Choose between “,” or “.” for separating thousands, for example, “10,000” or “10.000”.
- Decimal Separator: Select either “,” or “.” for indicating decimal points, for example, “3.14” or “3,14”.
- Decimal Dash: The decimal dash is a short line used instead of a dot to separate the whole numbers from the decimals in a number.
- Mandatory or Optional: Decide whether users are required to fill out this field or if it’s optional.
- Save Your Settings: Once you’ve configured the Number Smart Field to your liking, click “Save Smart Field” to finalize its creation.
Product Field (Prospects module only)
Product Smart Fields are a game-changer when it comes to streamlining product creation and editing within your platform. They allow you to effortlessly integrate existing products into new documents or drafts.
- Effortless Product Inclusion: Save time and ensure accuracy by incorporating complete product details from existing products into your new creations.
- Enhanced Data Consistency: Maintain consistent product information across your documents and products by referencing established data from existing products.
- Complexities Made Simple: Even for intricate product structures like mono funds within umbrella funds (assuming proper design and structure), Product Smart Fields handle the complexity, making product creation efficient.
Product Smart Fields offer a powerful and convenient way to leverage existing product data, accelerating your product creation and editing workflows.
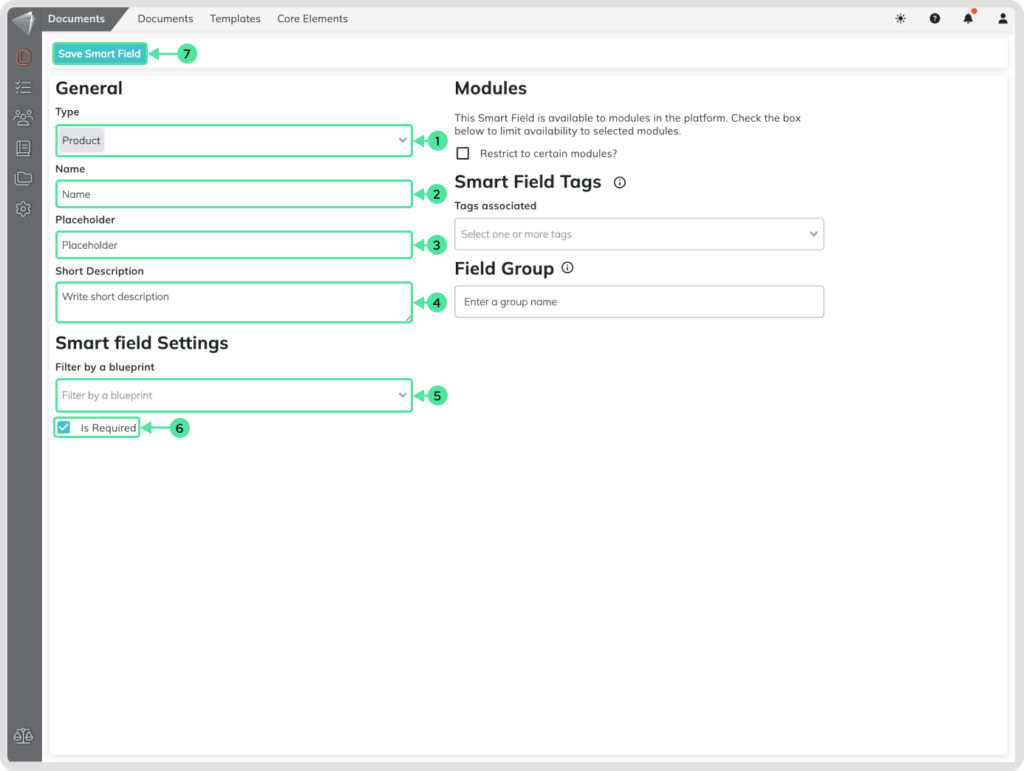
- Choose Product Field: Begin by selecting “Product” from the Smart Field type options.
- Assign a Meaningful Name: Give your Smart Field a clear and descriptive name that reflects its purpose.
- Placeholder Text (Optional): Consider adding placeholder text within the field.
- Short Description (Optional): If necessary, include a brief description to further explain the field’s purpose or specific requirements for future users.
- Select your Product: You can select a Default Product that should be implemented, which means that you can propose a Product for the user that is going to use this specific field.
- Mandatory or Optional: Decide whether users are required to fill out this field or if it’s optional.
- Save Your Settings: Once you’ve configured the Product Smart Field to your liking, click “Save Smart Field” to finalize its creation.
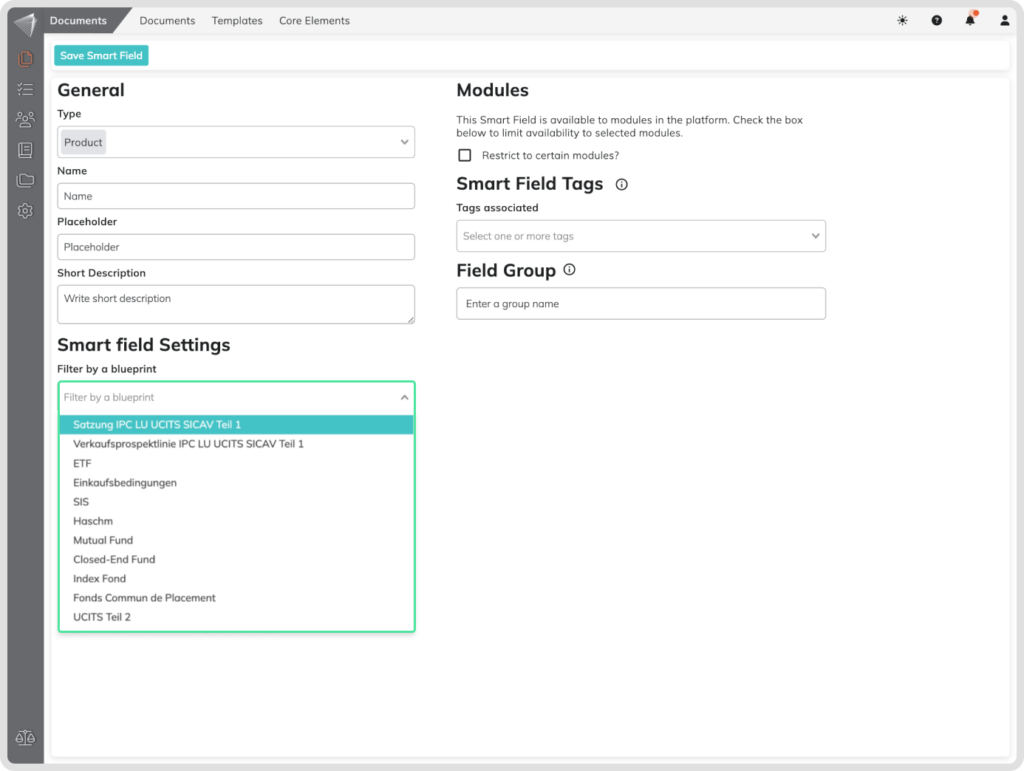
Table Field
Table Smart Fields provide a structured way to present and manage complex information within your documents and products. Here’s how they benefit you:
- Enhanced Clarity: Organize large amounts of data into a clear and easy-to-understand table format, improving readability and information retrieval for users.
- Flexibility at your Fingertips: Customize your tables by adding or removing rows and columns as needed, ensuring they perfectly match your specific data requirements.
- Metadata Magic: Unlock the true power of Table Smart Fields when used as metadata. They transform into interactive tables within your Procedures and Products creation, offering a user-friendly way to manage detailed information.
Table Smart Fields offer a versatile and informative way to structure and present complex data, making them a valuable asset for various use cases within your documents and products.
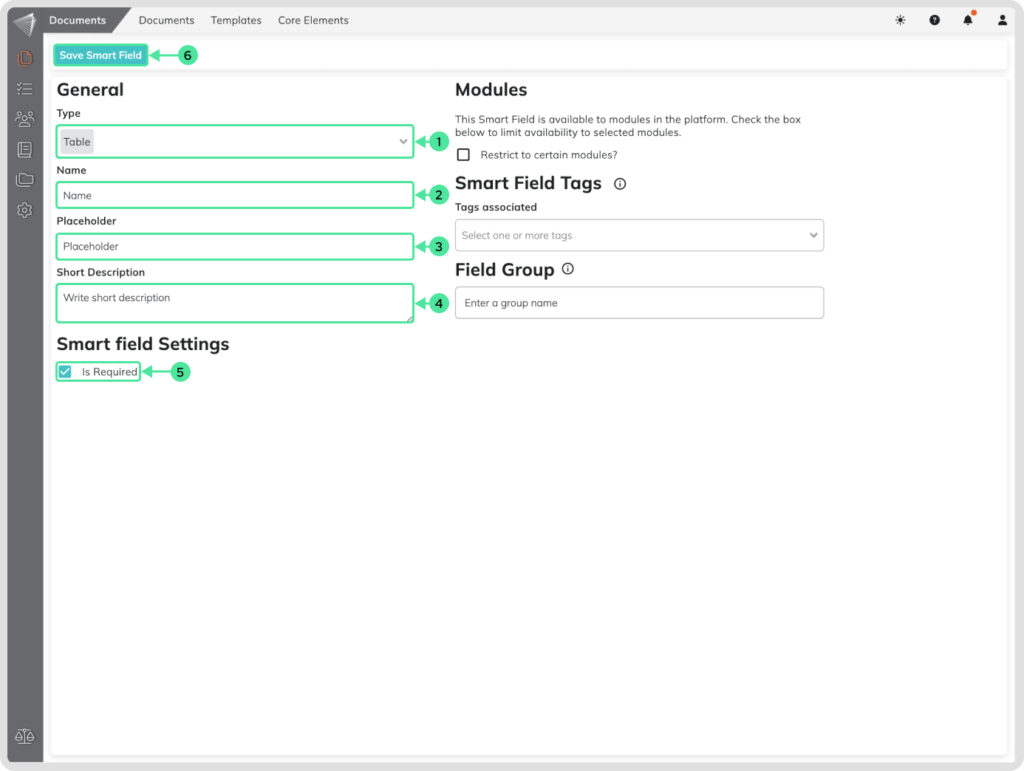
- Choose Table Field: Begin by selecting “Table” from the Smart Field type options.
- Assign a Meaningful Name: Give your Smart Field a clear and descriptive name that reflects its purpose.
- Placeholder Text (Optional): Consider adding placeholder text within the field.
- Short Description (Optional): If necessary, include a brief description to further explain the field’s purpose or specific requirements for future users.
- Mandatory or Optional: Decide whether users are required to fill out this field or if it’s optional.
- Save Your Settings: Once you’ve configured the Table Smart Field to your liking, click “Save Smart Field” to finalize its creation.
Text Fields
Basic Text Field
Basic Text Smart Fields offer a simple and versatile way to collect user input within your documents and products.
- Clear Communication: Provide clear prompts and labels for users to enter essential text information directly within your documents and products.
- Flexibility at its Finest: Adapt Text Smart Fields to various needs by setting character limits or including pre-defined default text, ensuring efficient data collection.
- Streamlined Workflows: Reduce the need for lengthy explanations or separate attachments by incorporating Text Smart Fields for concise and focused data input.
Basic Text Smart Fields are a foundational tool for gathering user input, making them ideal for capturing essential information within your documents and products.
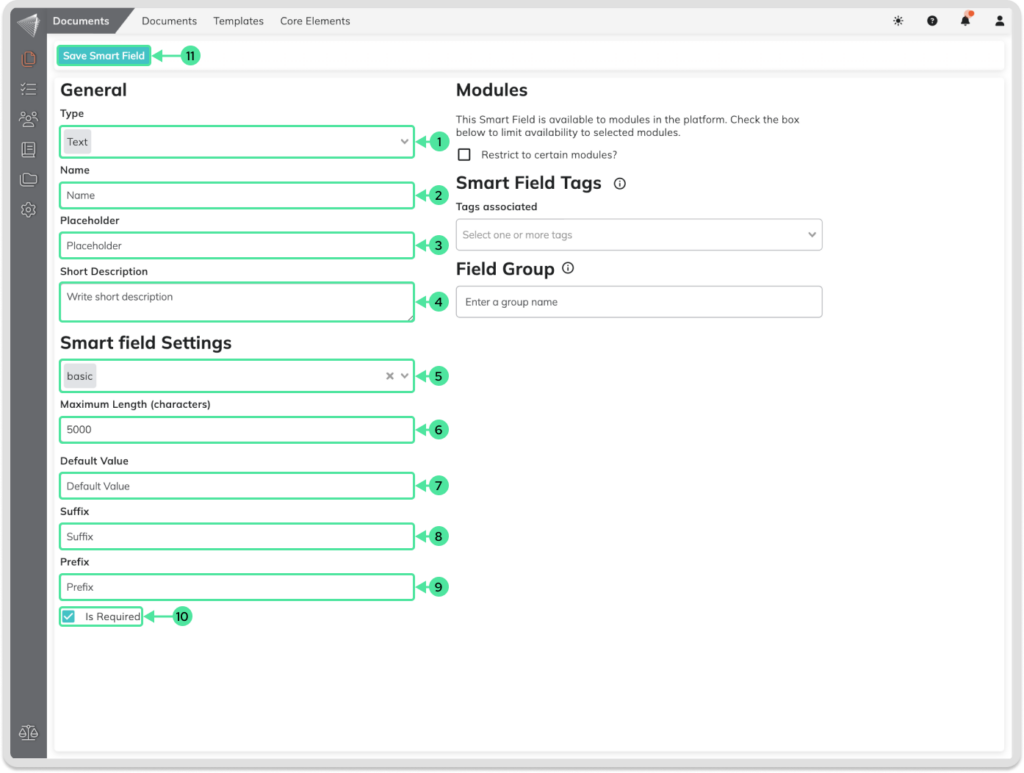
- Choose Text Field: Begin by selecting “Text” from the Smart Field type options.
- Assign a Meaningful Name: Give your Smart Field a clear and descriptive name that reflects its purpose. This will make it easier to identify and use later.
- Placeholder Text (Optional): Consider adding placeholder text within the field.
- Short Description (Optional): If necessary, include a brief description to further explain the field’s purpose or specific requirements for future users.
- Customize your Text Settings: You can choose the properties for the field. You have the option to select between Basic and Editor modes. In the Basic version, the field serves as an input field, while in the Editor version, a complete Editor window is available for including and storing text as needed. Users can modify the text within the field.
- Restrict the range: You can also set a limit on the number of characters allowed, preventing users from exceeding the preset limit.
- Set a default Value: You can assign a default text to be included.
- Set a default Suffix: By adding a suffix you can include data that should always added at the end of the text field.
- Set a default Prefix: By adding a prefix you can include data that should always added in the front of the text field.
- Mandatory or Optional: Decide whether users are required to fill out this field or if it’s optional.
- Save Your Settings: Once you’ve configured the basic Text Smart Field to your liking, click “Save Smart Field” to finalize its creation.
Editor Text Field
Editor Text Smart Fields unlock the power of rich text editing within the prospect module of your platform.
- In-Depth Descriptions: Craft detailed descriptions for your prospects using the full editing experience provided by the Editor field. Include formatting, lists, and other elements to deliver clear and informative content.
- Enhanced Prospect Communication: Go beyond basic text with Editor Text Smart Fields. Tailor your communication with prospects by incorporating rich text elements that effectively showcase your offerings.
- Streamlined Workflows: Save time and effort by creating pre-formatted text templates within the Editor field. These templates can then be easily inserted into your prospect documents, improving workflow efficiency.
By leveraging the capabilities of Editor Text Smart Fields, you can create compelling and informative content for your prospects.
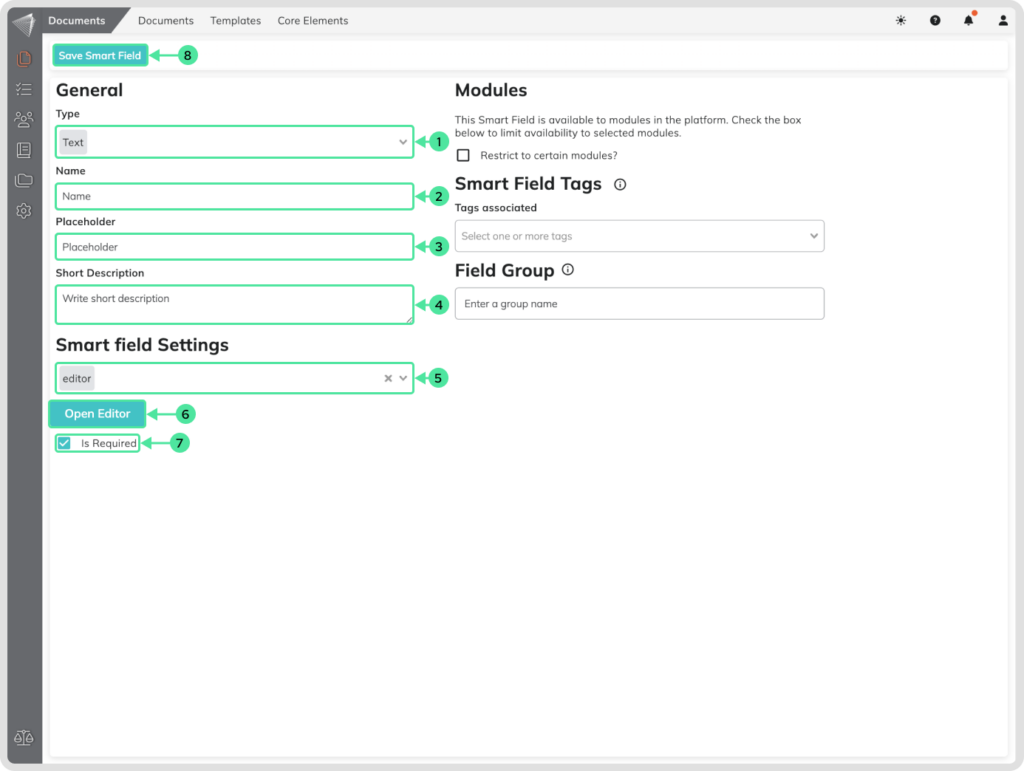
- Choose Text Field: Begin by selecting “Text” from the Smart Field type options.
- Assign a Meaningful Name: Give your Smart Field a clear and descriptive name that reflects its purpose. This will make it easier to identify and use later.
- Placeholder Text (Optional): Consider adding placeholder text within the field.
- Short Description (Optional): If necessary, include a brief description to further explain the field’s purpose or specific requirements for future users.
- Customize your Text Settings: Select the Editor mode. The Editor version offers a full editing experience, allowing you to include and store text as required
- Open Editor: You open the editor window and include text. The text can be modified by the user how includes the field inside his project.
- Mandatory or Optional: Decide whether users are required to fill out this field or if it’s optional.
- Save Your Settings: Once you’ve configured the editor Text Smart Field to your liking, click “Save Smart Field” to finalize its creation.
Text Block Field
Text Block Smart Fields act as designated spots within your documents and products, marking where pre-written and reusable text blocks should be included. They offer several advantages:
- Streamlined Document Creation: Save time and ensure consistency by using Text Block Smart Fields to insert pre-written and reusable text blocks into your documents and products.
- Interactive Templates: Create dynamic templates where users can select the most relevant text block from a dropdown menu, making your templates adaptable to various situations. (e.g., Employment contract benefits section)
- Enhanced Flexibility: Offer users the flexibility to choose from pre-approved text blocks while creating documents and products, ensuring accuracy and efficiency.
Text Block Smart Fields promote efficiency and consistency by allowing you to leverage pre-defined content across your documents and products.
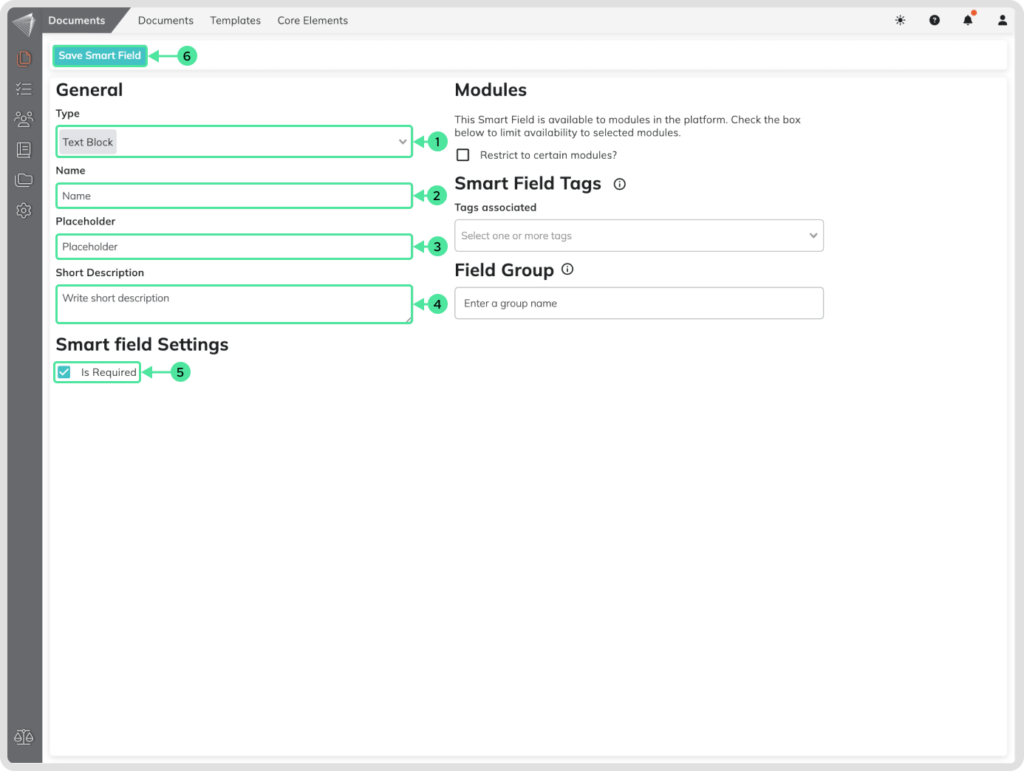
- Choose Text Block Field: Begin by selecting “Text Block” from the Smart Field type options.
- Assign a Meaningful Name: Give your Smart Field a clear and descriptive name that reflects its purpose.
- Placeholder Text (Optional): Consider adding placeholder text within the field.
- Short Description (Optional): If necessary, include a brief description to further explain the field’s purpose or specific requirements for future users.
- Mandatory or Optional: Decide whether users are required to fill out this field or if it’s optional.
- Save Your Settings: Once you’ve configured the Text Block Smart Field to your liking, click “Save Smart Field” to finalize its creation.
Target Specific Usage Areas: Using ‘Restriction to Modules’
The ‘Restrict to modules?’ checkbox allows you to control where a Smart Field can be used within contractuo.
Here’s how to manage Smart Field availability:
Control Availability
Checked: When ticked, a dropdown menu appears, letting you choose the specific modules like the Documents, the Contacts (Individuals/Organisations), Prospects, and Marketplace where this Smart Field will be available. You can select multiple modules for broader usage.
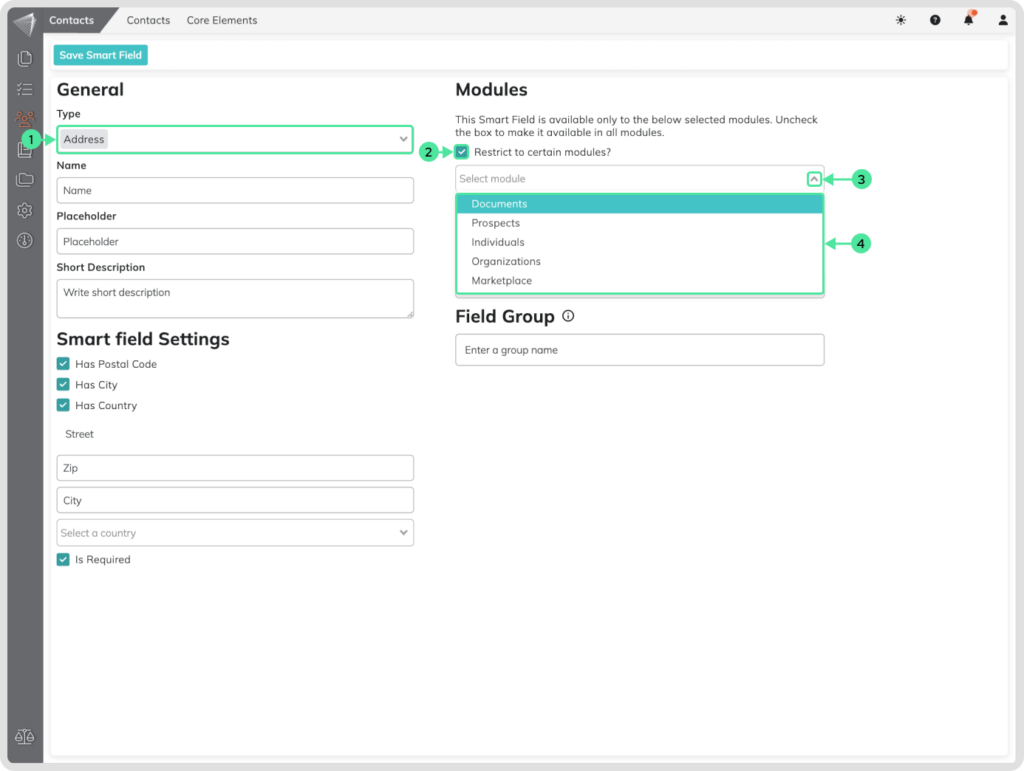
- Select Smart Field Type: Choose the type of Smart Field you want to create/modify (e.g., Address, Text, Checkbox).
- Restrict Availability: Tick the “Restriction to Modules” checkbox to limit where the Smart Field can be used. (Unchecked means it’s available everywhere).
- Open dropdown: Open the dropdown menu that you enabled, to see the modules where you can restrict the Smart fields.
- Choose Modules: Select the desired modules where you want this particular Smart Field should be available (multiple selections allowed).
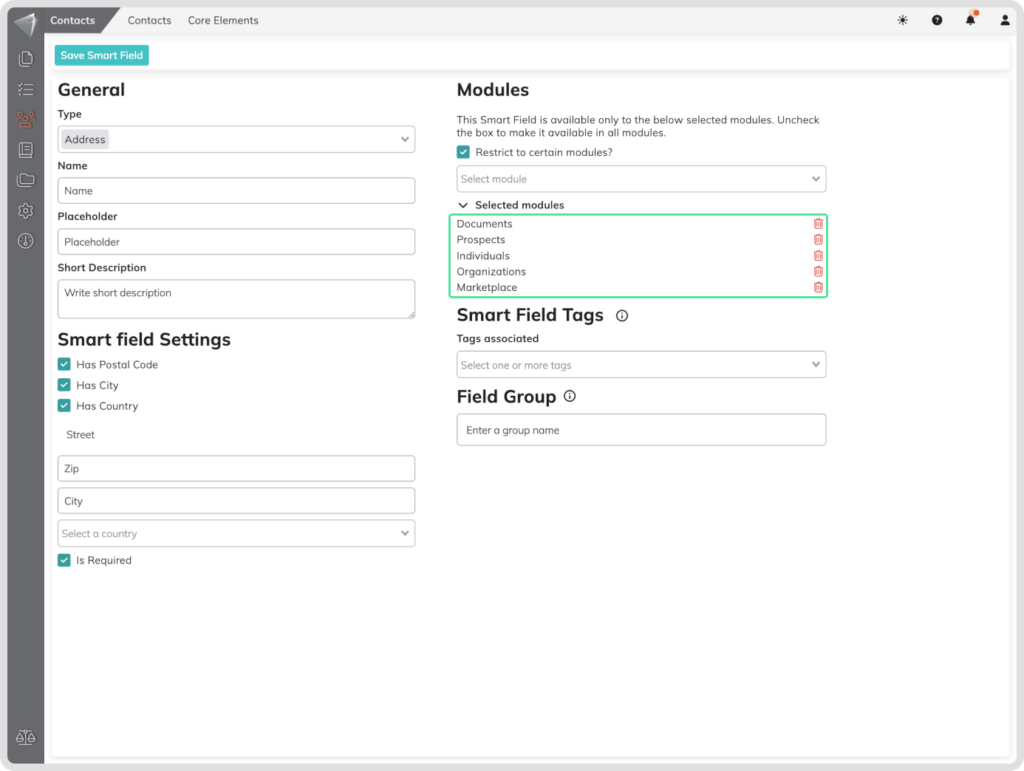
Universal Access
Leaving the ‘Restriction to Modules’ checkbox unchecked (default setting) makes the Smart Field accessible across the contractuo modules, Documents, Contacts, and Prospects. This is the most flexible option, allowing you to use the Smart Field in any context.