What is it
Blueprints in contractuo are complex templates that combine Forms, conditional and non-conditional Text Blocks, and Text. They serve as the fundamental framework for crafting and customizing various documents, especially financial products.
Who is it for
Professionals in the financial sector, legal departments, administrative roles, and those involved in complex contract management benefit from Blueprints. They enhance efficiency and reliability in product creation.
Why use the Blueprints?
Blueprints are dynamic, and adaptable, and support conditional logic, essential for compliance with financial regulations and contract requirements. Crafting effective Blueprints can be complex, but they have the power to transform weeks of work into just a few hours when creating products.
Requirements to be able to use the Blueprints:
You should be able to access the Prospect module.
You should have Administrative permissions in contractuo.
You should have already existing Forms, including Form Fields and Text Blocks, recommend are also Form Types.
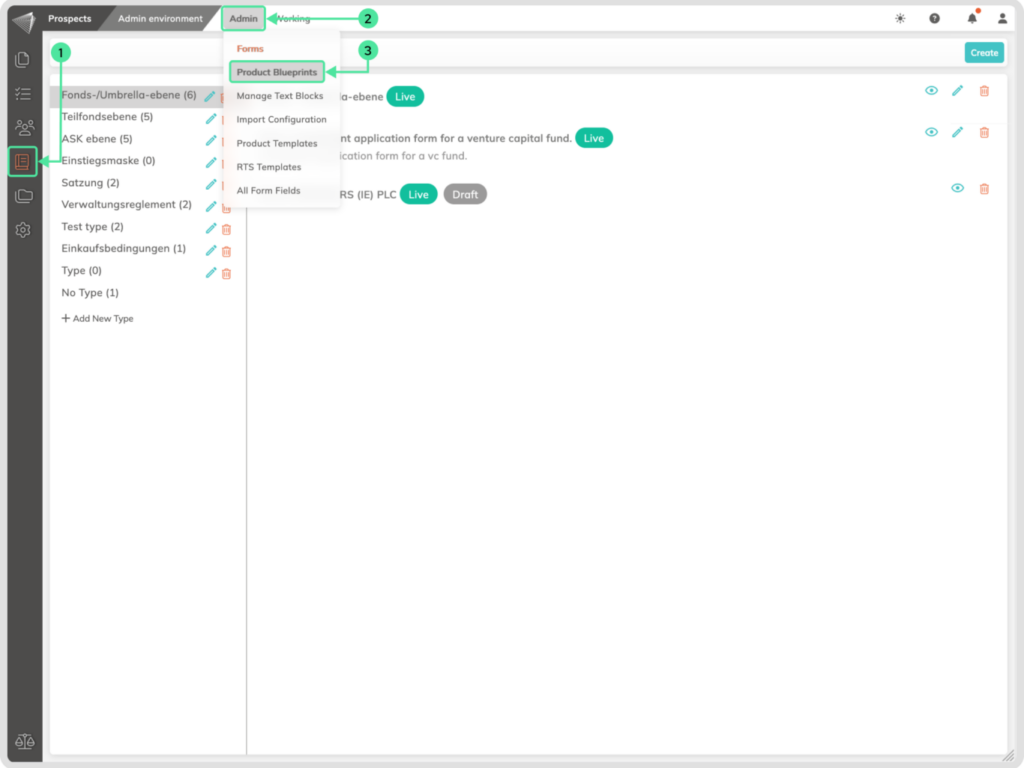
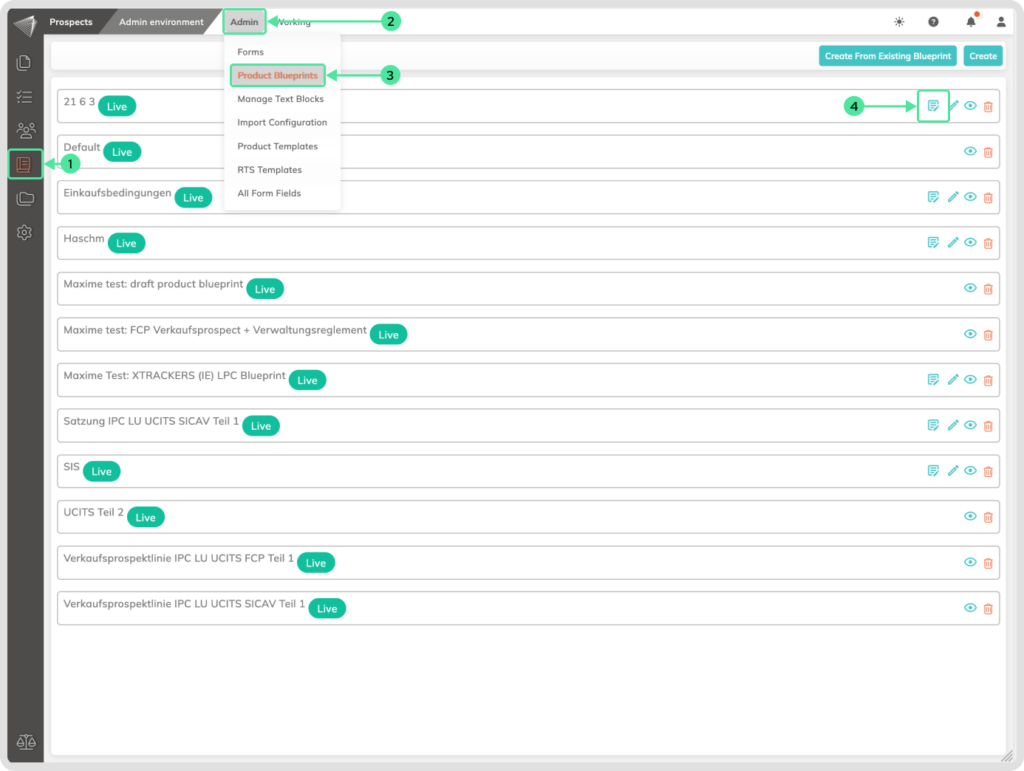
Where can you manage the Blueprints?
- Navigate to the Prospect module by clicking the icon on the left-side menu, and enter the ‘Admin Environment’ submenu.
- Open the Admin menu.
- Select the ‘Product Blueprints’ submenu.
How to Create a New Blueprint from an Existing Blueprint?
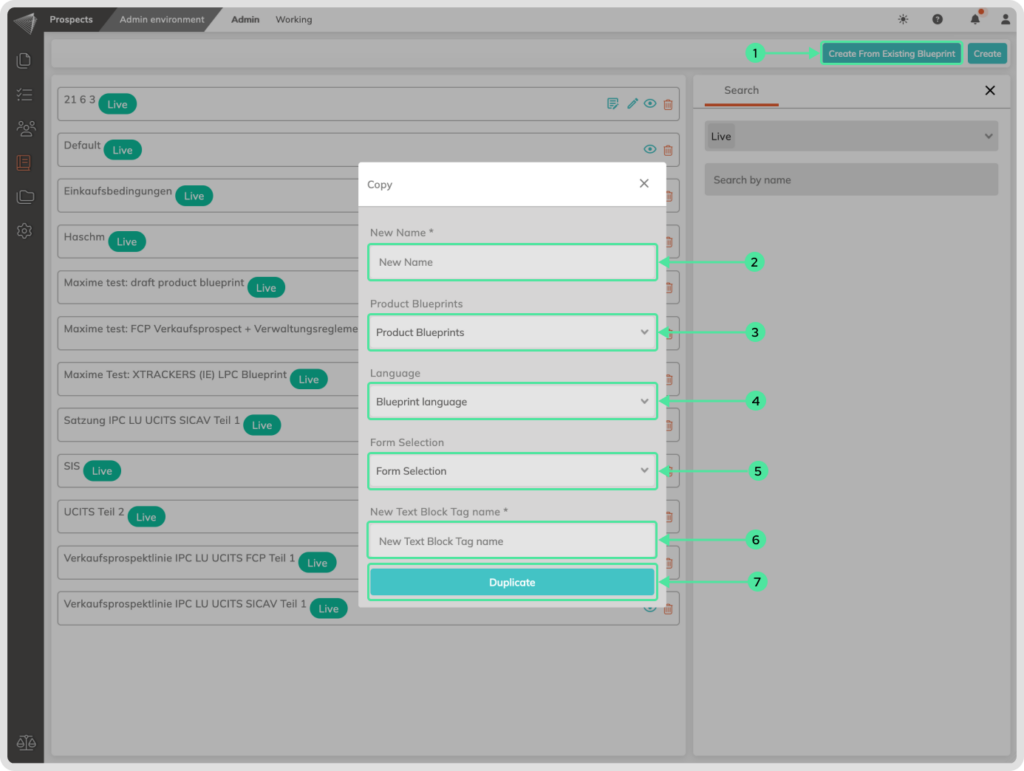
- Click on the ‘Create From Existing Blueprint’.
- Insert the Name of the new Blueprint.
- Choose an existing Blueprint to duplicate.
- Select a Language for the new Blueprint.
- Choose one or multiple Forms for your new Blueprint.
- Create a new Text Block Tag.
- Click on the ‘Duplicate’ button.
- Click on the ‘Publish Now’ button to save.

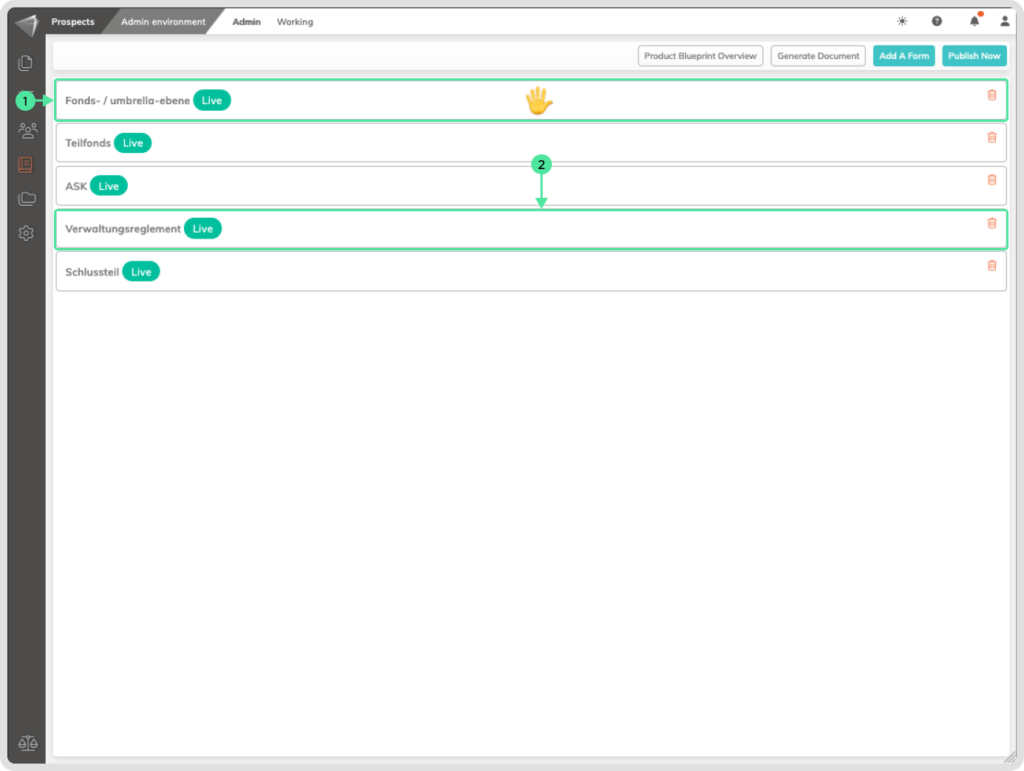
How to Manage the Blueprint Structure?
How to add Forms inside Blueprints?
Go to the Prospect module icon in the left-side menu. Select the ‘Admin Environment’ submenu. Select the Admin menu, and go to ‘Product Blueprints’. Select your Blueprint and click the ‘Edit Content’ icon.
- Click the ‘Add a Form’ button.
- Select an existing Form from the dropdown list (you can add multiple Forms).
- Click on the ‘Add A Form’ button to add it.
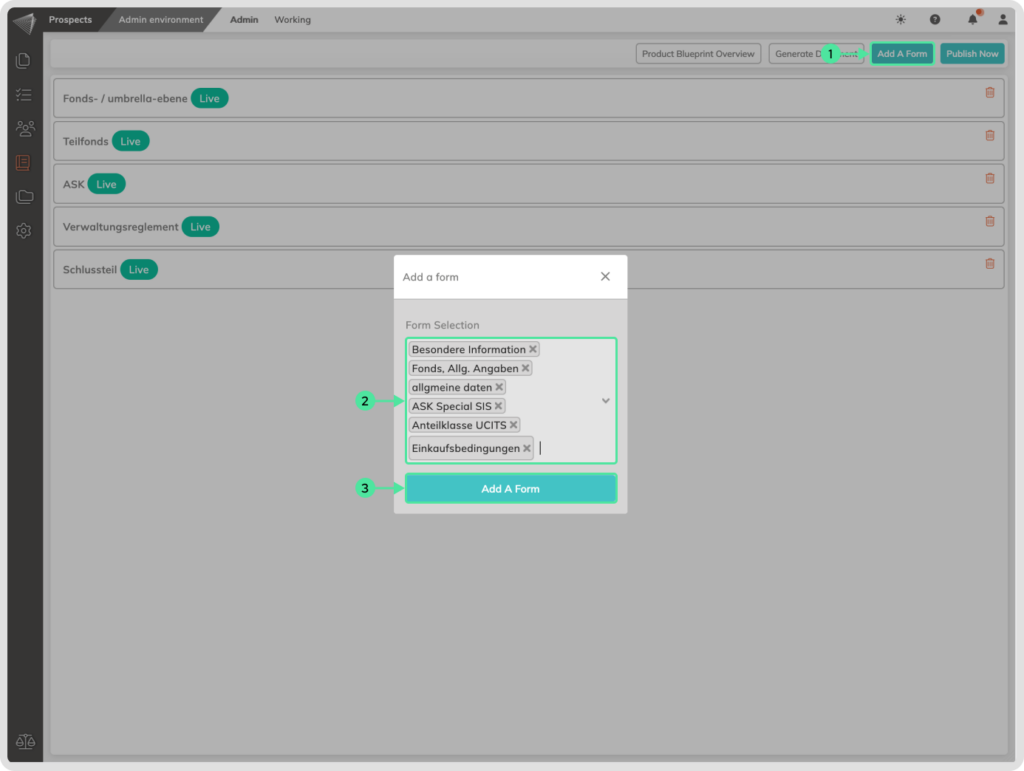
Click on the ‘Publish Now’ button to save the changes inside the Blueprint.
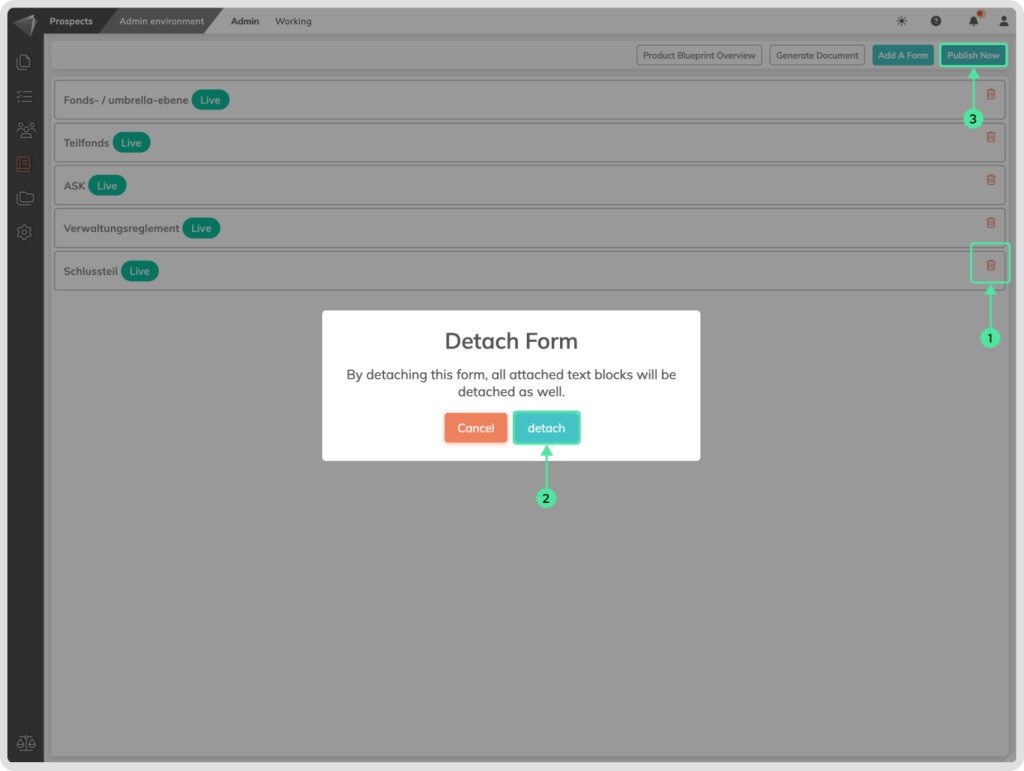
How to remove Forms from a Blueprint?
Go to the Prospect module icon in the left-side menu. Select the ‘Admin Environment’ submenu. Select the Admin menu, and go to ‘Product Blueprints’. Select your Blueprint and click the ‘Edit Content’ icon.
- To remove a Form from the Blueprint, click the ‘Delete’ icon (bin symbol) associated to the intended Form.
- Confirm the detaching step.
- Click the ‘Publish Now’ button to save the settings.
How to Rearrange Forms inside the Blueprint:
Go to the Prospect module icon in the left-side menu. Select the ‘Admin Environment’ submenu. Select the Admin menu, and go to ‘Product Blueprints’. Select your Blueprint and click the ‘Edit Content’ icon.
- Click and hold the Form you want to move.
- Drag it to the desired position, and Release the mouse click.
How to set up the content of a Blueprint?
This is the part where the magic happens. Here you can define several paths for the user who is going to create the product. So that his decisions will create a final product guided by your paths.
How to find the Edit Content area:
- Navigate to the Prospect module by clicking the icon in the left-side menu and access the ‘Admin Environment’ submenu.
- Open the Admin menu.
- Go to ‘Product Blueprints’.
- If you want to change the Blueprint name, click on the Edit Pen.
- Click the ‘Edit Content’ icon (paper and pen symbol) next to your chosen Blueprint, to be able to change the content of the Blueprint.
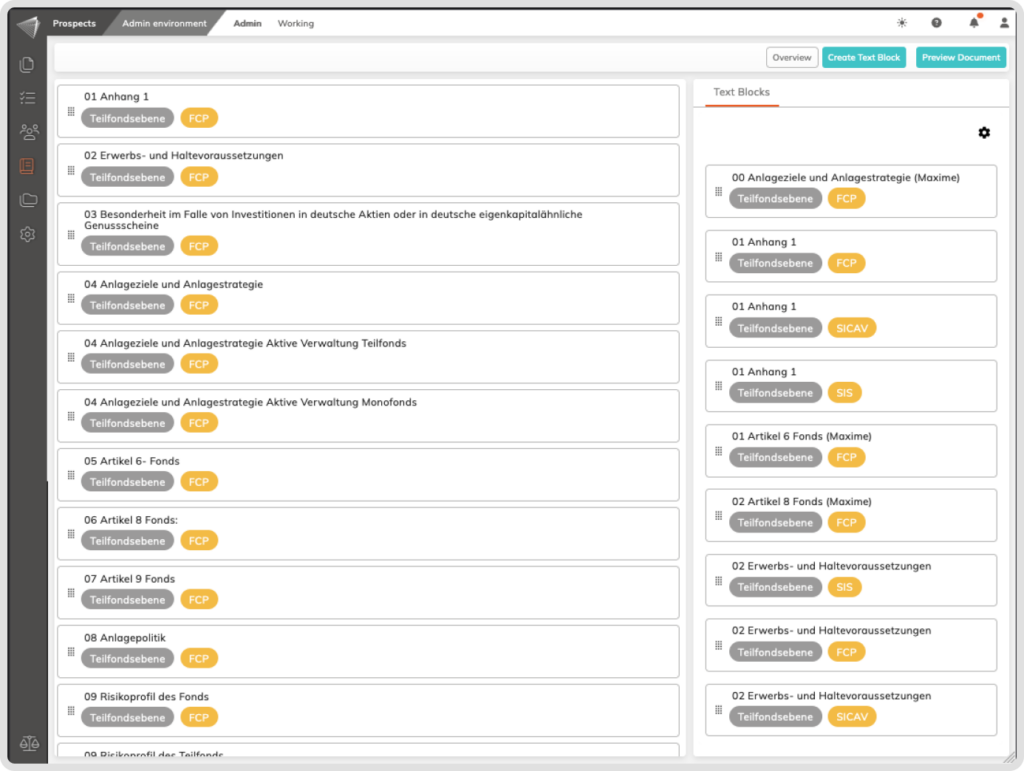
How to manage Text Blocks and Content in Blueprints?
Accessing Text Blocks:
Go to the Prospect module icon in the left-side menu. Select the ‘Admin Environment’ submenu. Select the Admin menu, and go to ‘Product Blueprints’. Select your Blueprint and click the ‘Edit Content’ icon.
- Click on the Form that you want to view and edit its content.

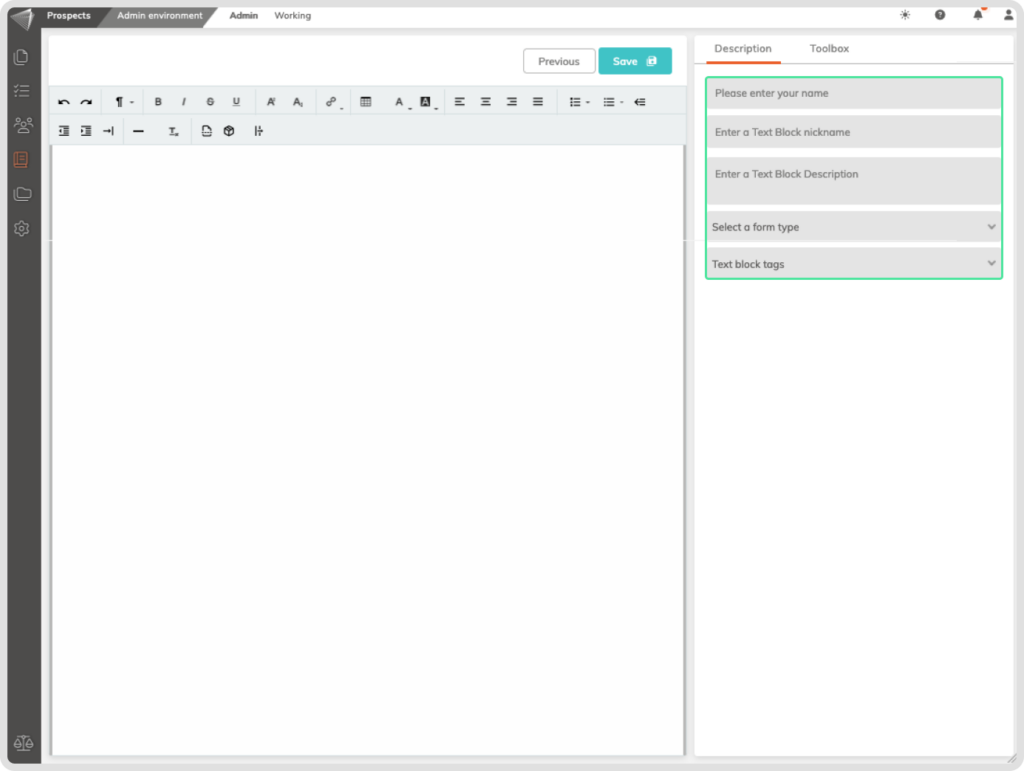
How to create a new Text Block inside the Prospect Module:
Go to the Prospect module icon in the left-side menu. Select the ‘Admin Environment’ submenu. Select the Admin menu, and go to ‘Product Blueprints’. Select your Blueprint and click the ‘Edit Content’ icon.
- Click the ‘Create New Text Block’ button. Input your informations inside the Text Block and save the Text Block by clicking the ‘Save’ button.
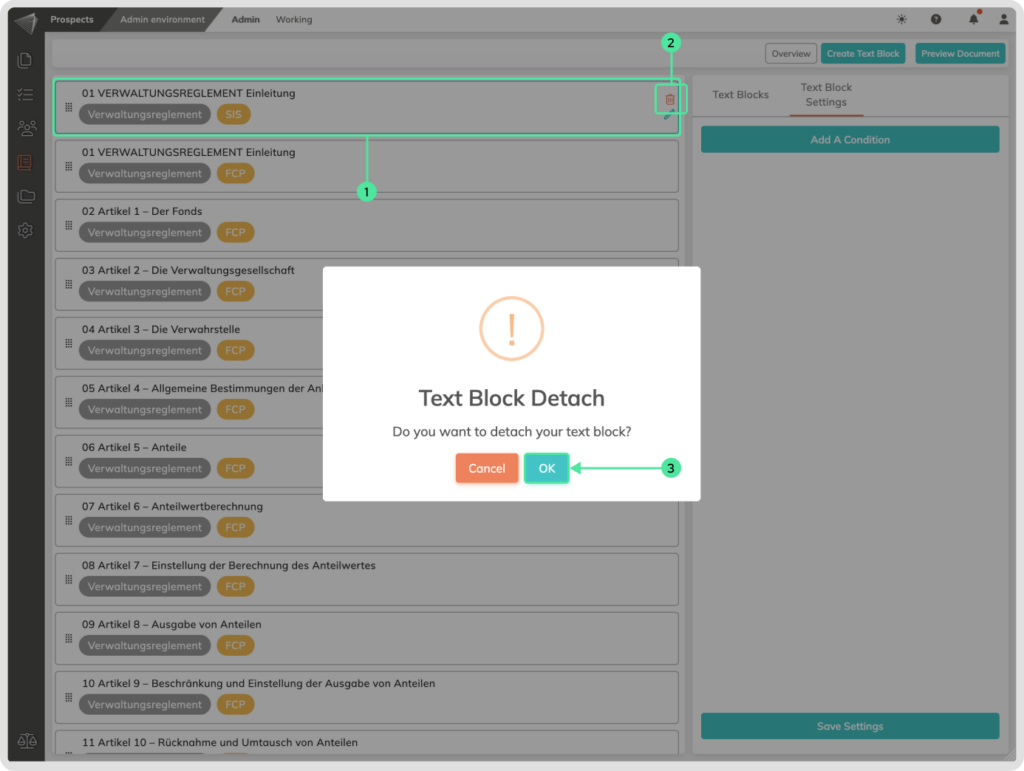
How to Delete a Text Block from the Blueprint?
Go to the Prospect module icon in the left-side menu. Select the ‘Admin Environment’ submenu. Select the Admin menu, and go to ‘Product Blueprints’. Select your Blueprint and click the ‘Edit Content’ icon. Click on the desired Form with the content.
- Select the Text Block.
- Click the Bin icon that appears on the Text Block.
- Confirm the deletion to remove the Text Block from the Form.
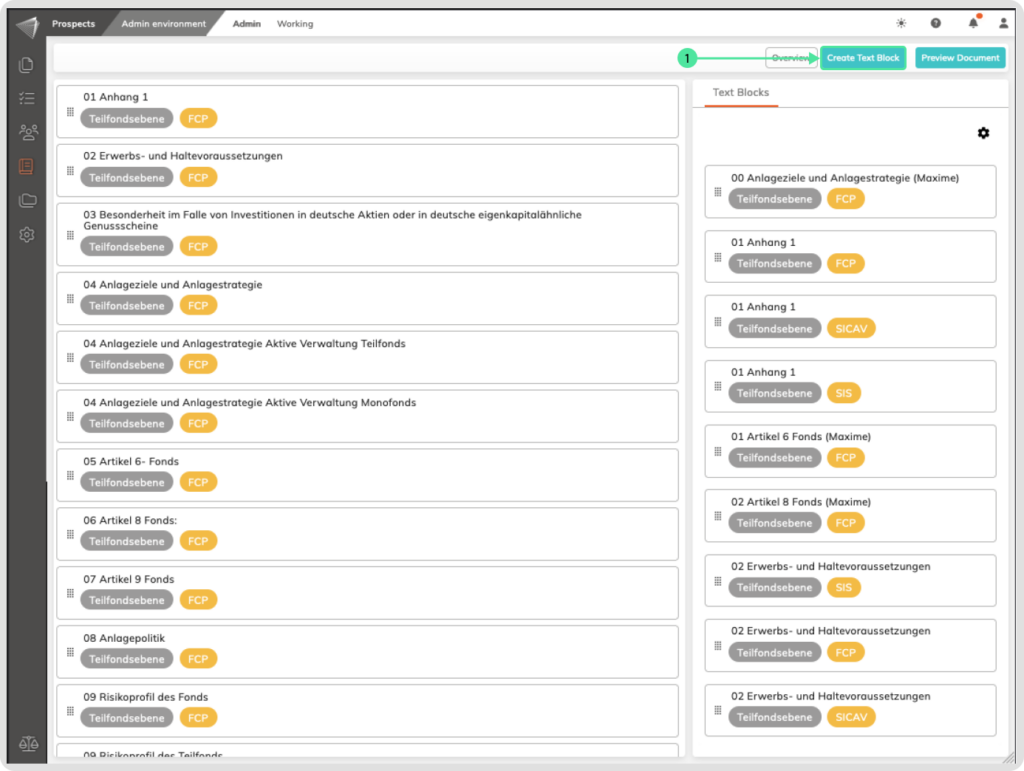
In order to Save this step click on the ‘Overview’ button and click on the ‘Publish Now’ button.
Adjusting Conditional Logic for Text Blocks:
Go to the Prospect module icon in the left-side menu. Select the ‘Admin Environment’ submenu. Select the Admin menu, and go to ‘Product Blueprints’. Select your Blueprint and click the ‘Edit Content’ icon. Click on the desired Form with the content.
- Click on the existing Text Block to check for conditional logic.
- Select and/or modify conditions on the right side. This is a Form Fields that is used as a reference.
- Select an existing operator as a reference from the dropdown.
- Enter or choose the data that must be met for the Text Block to be applicable
- Specify whether the text block should be shown or hidden according to the user input.
- Save the Settings.
In order to Save this step in the Blueprint click on the ‘Overview’ button and click on the ‘Publish Now’ button.
How to add an existing Text Block to an existing Blueprint?
Go to the Prospect module icon in the left-side menu. Select the ‘Admin Environment’ submenu. Select the Admin menu, and go to ‘Product Blueprints’. Select your Blueprint and click the ‘Edit Content’ icon. Select the desired Form to view its content.
- Select an existing Text Block from the right side to the left side to add it to the Form. (Click and hold)
- Move the mouse to the left and release the mouse click.
To save this step click on the ‘Overview’ button to access the Forms overview, and click ‘Publish Now’ to save the changes made in the Blueprint.
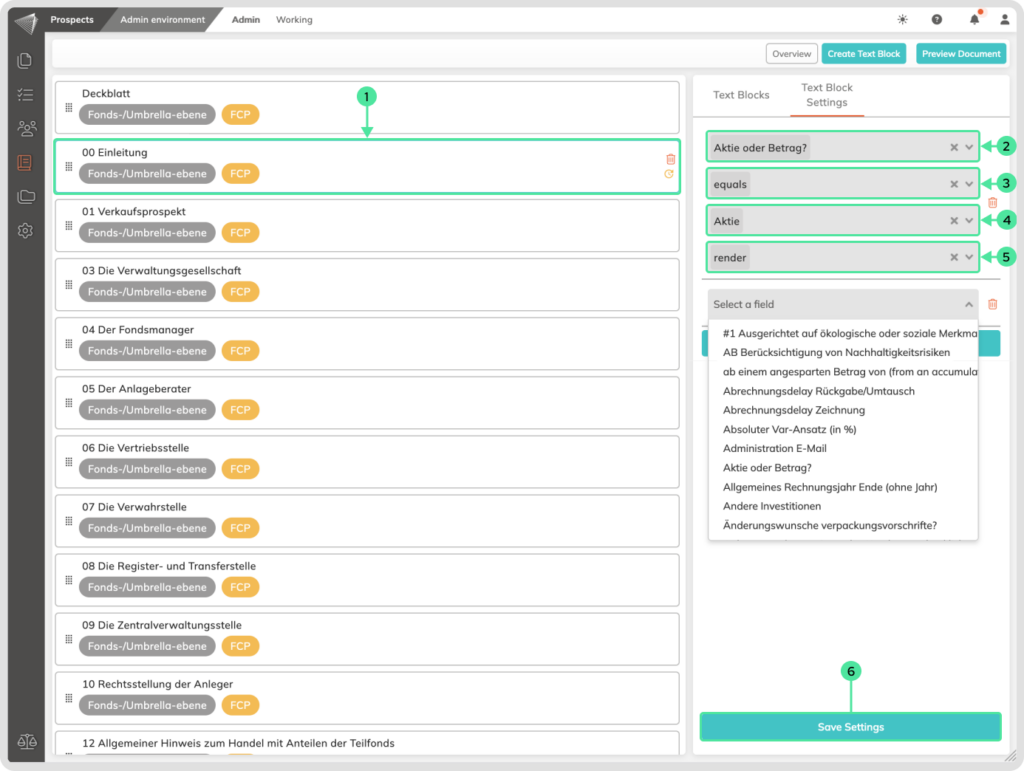
How to Add Conditional Logic on a Text Block?
To control what content is shown in a Product based on conditions, follow these steps:
Go to the Prospect module icon in the left-side menu. Select the ‘Admin Environment’ submenu. Select the Admin menu, and go to ‘Product Blueprints’. Select your Blueprint and click the ‘Edit Content’ icon. Select the desired Form to view its content.
- Click on the chosen Text Block to reveal the conditional function on the right side.
- Select the Form Field that will act as a reference for your condition.
- Choose an operator (e.g., equals, greater than, is, etc.) to define the condition.
- Input the specific value, text, date, or number that triggers the condition and Click outside the condition input field to access the Condition Setting selector for text-related Form Fields.
- Choose whether the text block should be rendered or not based on the user’s input matching the condition.
- You can add multiple conditions by clicking the ‘Add a Condition’ button.
- Save your settings.
To save this step click on the ‘Overview’ button to access the Forms overview, and click ‘Publish Now’ to save the changes made in the Blueprint.
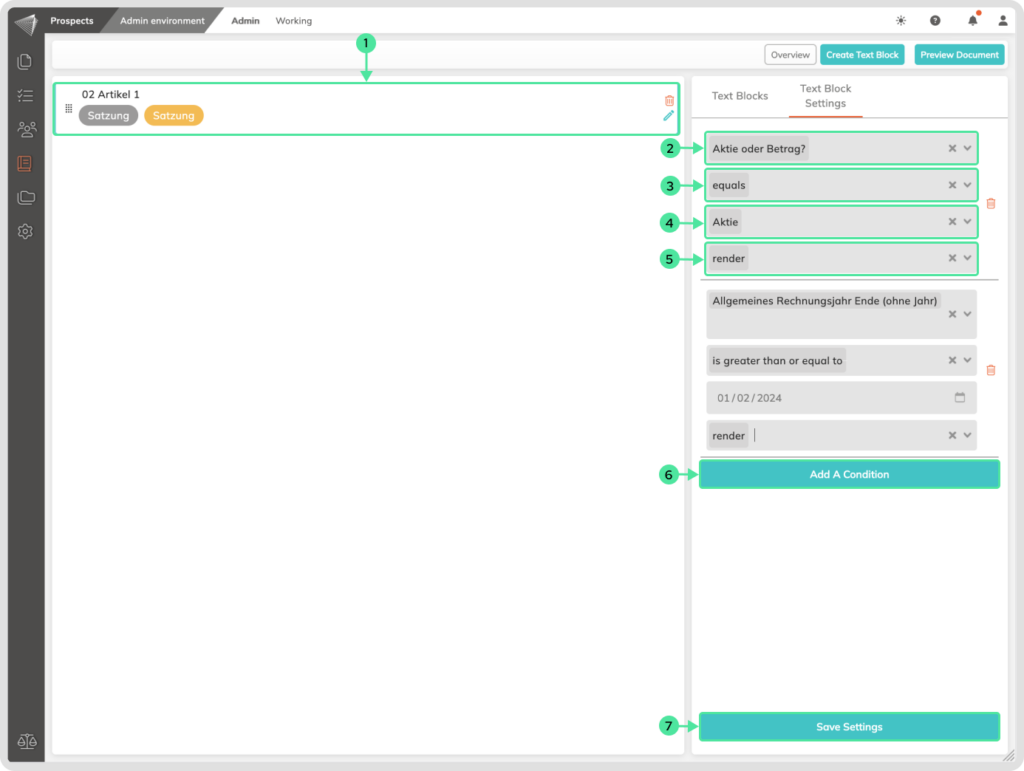
How to Add Conditions inside Text Blocks?
Go to the Prospect module icon in the left-side menu. Select the ‘Admin Environment’ submenu. Select the Admin menu, and go to ‘Product Blueprints’. Select your Blueprint and click the ‘Edit Content’ icon. Select the desired Form to view its content. Click on the chosen Text Block. Click the Edit Pen icon on the Text Block.
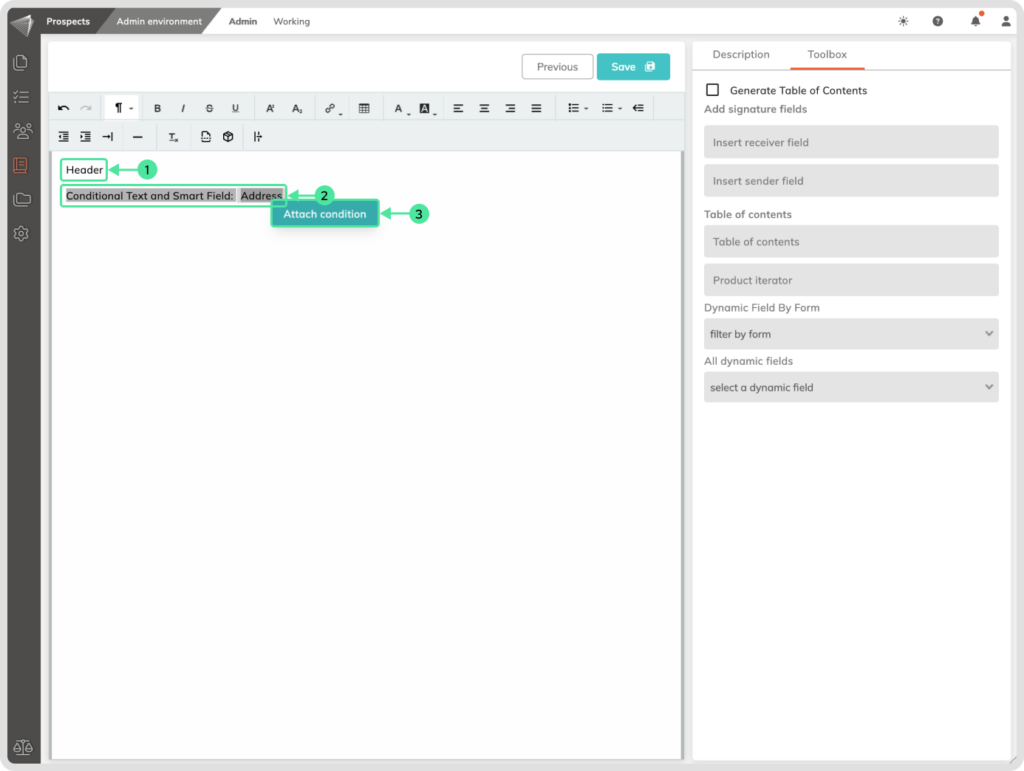
- Include your Text or dynamic Smart Fields. Smart Fields can be found in the Sidebar menu names Toolbox or type them in with the /dSmartFieldName.
- Highlight the text or smart field to dispel according to the conditional situation, and Right-click on the highlighted element.
- Click ‘Attach Condition’ on the element.
- Select the Form Field as the reference for your condition.
- Choose an operator (e.g., equals, greater than, is, etc.) to define the condition.
- Input or select a specific triggering value, text, date, or number, and click outside the condition input field to access the Condition Setting selector for text-related Form Fields.
- Choose whether the text or smart field should be rendered or not based on the users input matching the condition.
- Add multiple conditions with the ‘Add a Condition’ button, if needed.
- Click on the ‘Save’ button.
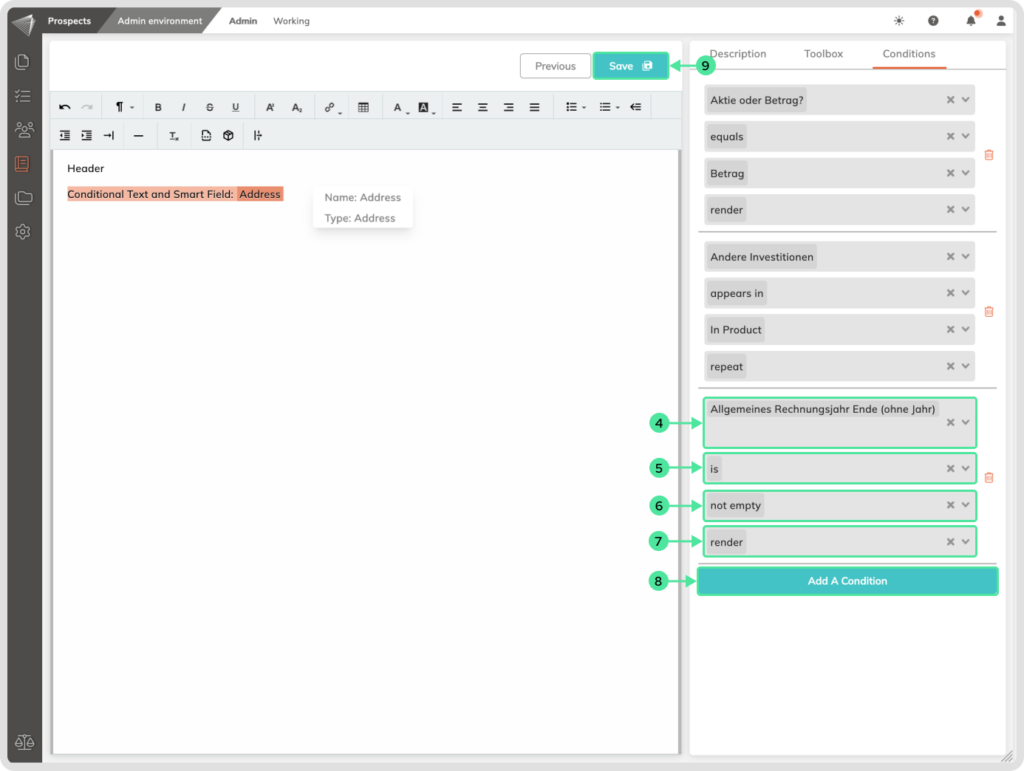
To save the changes inside the Blueprint click on the ‘Overview’ button to access the Forms overview, and click the ‘Publish Now’ button.
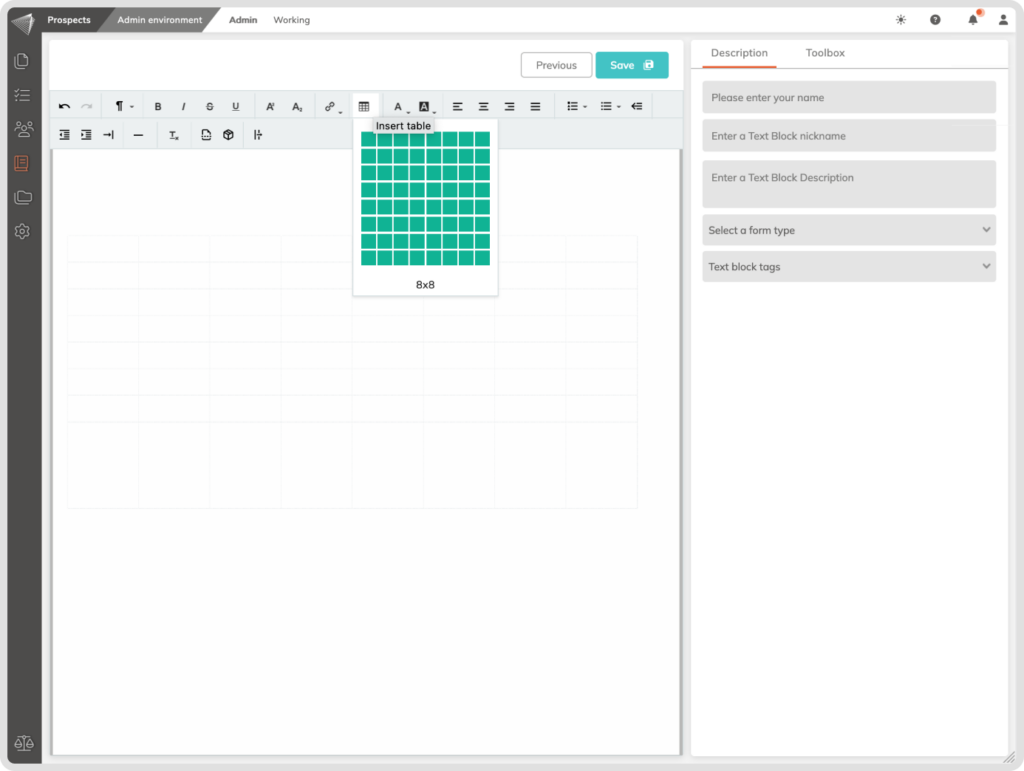
Advanced Table Features in Text Blocks
You can edit the text within your Text Block just like you would in a regular word processing environment. There are a few differences you should be aware of, especially when it comes to adding or deleting columns and rows within a table embedded in a Text Block. Here are the steps to do this:
- Click ‘Insert table’ within a Text Block to add a table and choose the desired table size (e.g., 1×1, 2×2, up to 8×8 cells).
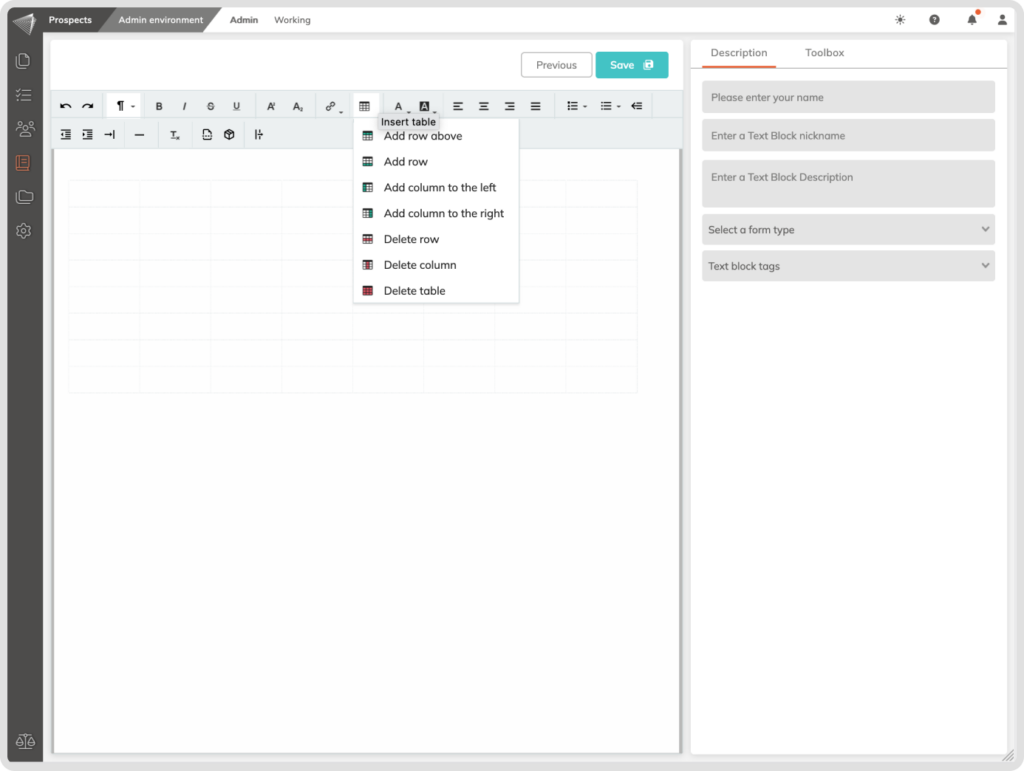
- Click in a cell where you want to add or delete a row or column. Then, click the ‘Insert table’ button again to add rows or columns, either before or after the current cell. You can also delete a row or column from this menu.
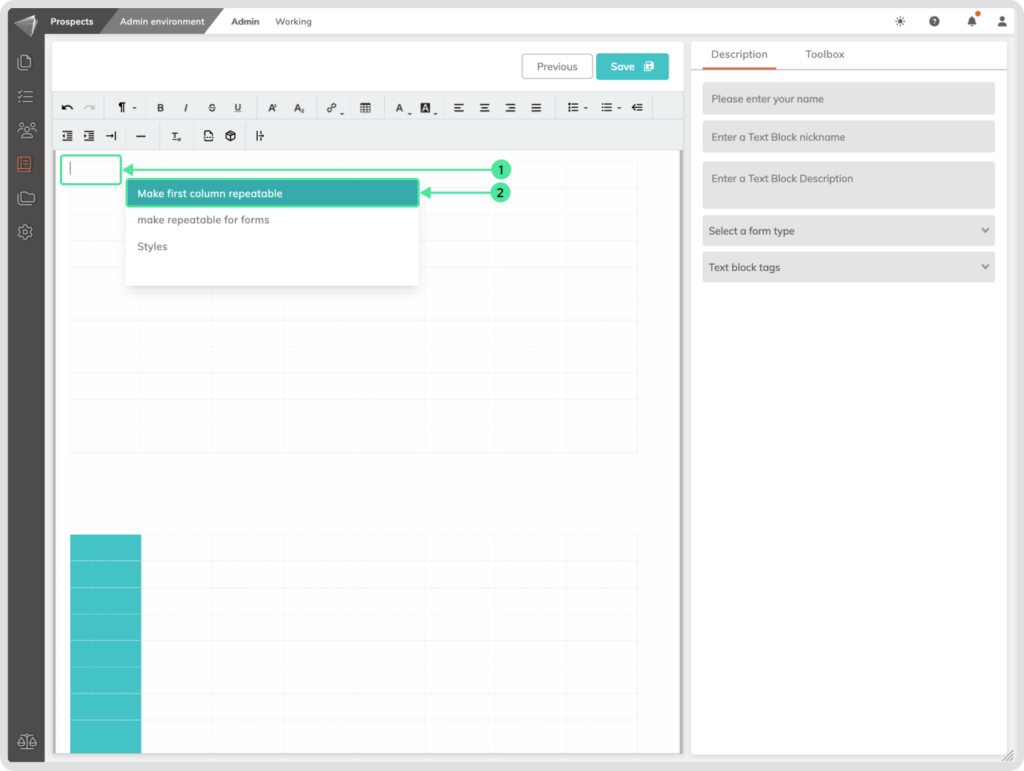
Making Columns Repeatable
How to make the first column repeatable?
- Right-click on any cell inside the table where you want the first column to repeat if the table becomes too large.
- Choose ‘Make First Column Repeatable’ inside the Text Block.
How to Make the Complete Table Repeatable within Forms?
To make the entire table repeatable within forms:
- Right-click on any cell inside the table where you want the table to be repeatable within forms.
- Select ‘Make Repeatable for Form’.

Previewing Blueprints
After creating or editing a Blueprint, find the ‘Preview’ button, which is symbolized by an eye icon. Click this button to open a preview window that displays the content.
Version control Timeline
Version control is essential for maintaining the integrity of Blueprints over time, providing a historical record of changes, and the ability to revert to previous versions if needed.
How to find the Product Blueprint Timeline?
Click on an existing Blueprint. On the right side, a sidebar will appear with the Product Blueprint Timeline.
How to View the content of the Blueprints inside the Timeline?
Inside the Product Blueprint Timeline, click on the eye icon to view the content of a particular version.
How to go to an older Version?
If you need to revert to an earlier version, click on the delete icon at the latest version. Confirm the action, and the system will roll back the Blueprint to that specific state.