What is it
Text Blocks are predefined segments of text that can be repeatedly used across various templates or documents within the contractuo platform. They can contain conditional and non-conditional text and dynamic smart fields. Text blocks are the backbone of documents. They can be inserted at any point. They offer a convenient way to insert standard text, like legal clauses, terms, and conditions, or introductions, into various documents.
Who is it for
These blocks are primarily designed for content creators, including content experts and external consultants, who are responsible for generating and managing standardized text segments. They are particularly useful for those frequently dealing with repetitive text in documents.
Why use the Blueprints?
Text Blocks enhance efficiency and consistency across documents. They simplify the process of incorporating standard text into different documents, such as terms in contracts or definitions in NDAs. Central modifications to a Text Block can simultaneously update all associated documents, saving significant time and effort. For example, a legal update in an NDA clause requires only a single change in the Text Block, automatically updating all relevant documents.
Requirements to be able to use the Blueprints:
You should be able to access the Prospect module.
You should have Administrative permissions in contractuo.
It is also recommended to have already existing Forms, including Form Types, and Form Fields. (Form Fields are dynamic Smart Fields)
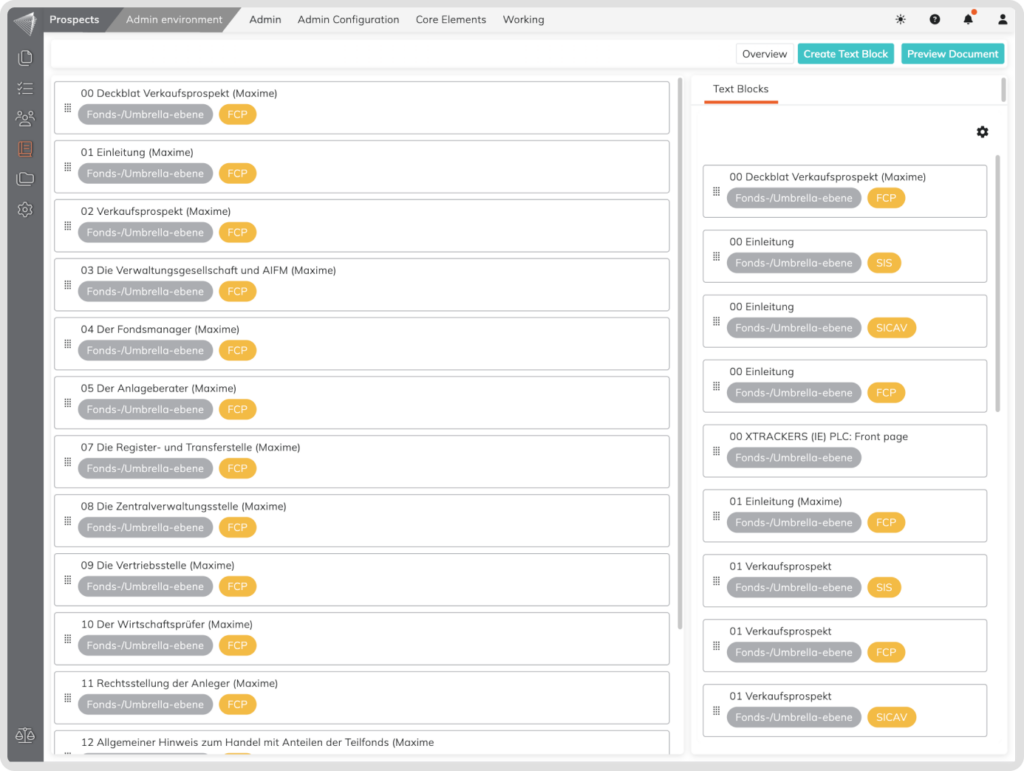
How to find the Text Blocks inside the Prospect Module?
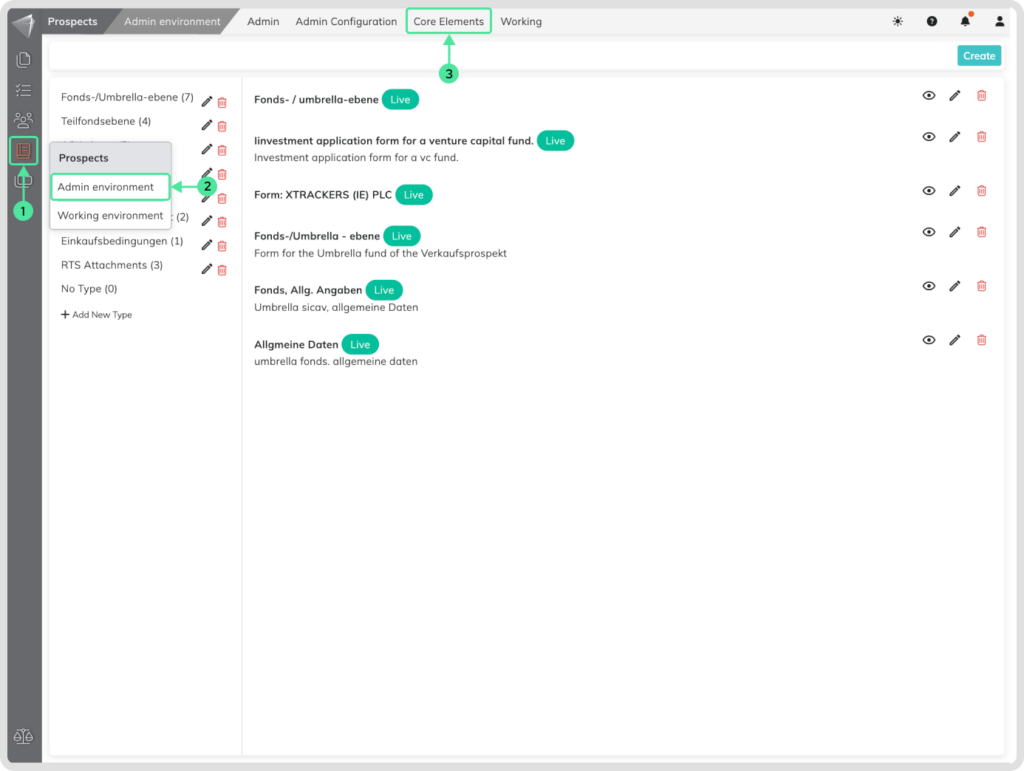
- Go to the ‘Prospect Module‘ menu.
- Select the ‘Admin Environment‘.
- Click on the ‘Core Elements‘.
- Select the ‘Text Blocks‘.
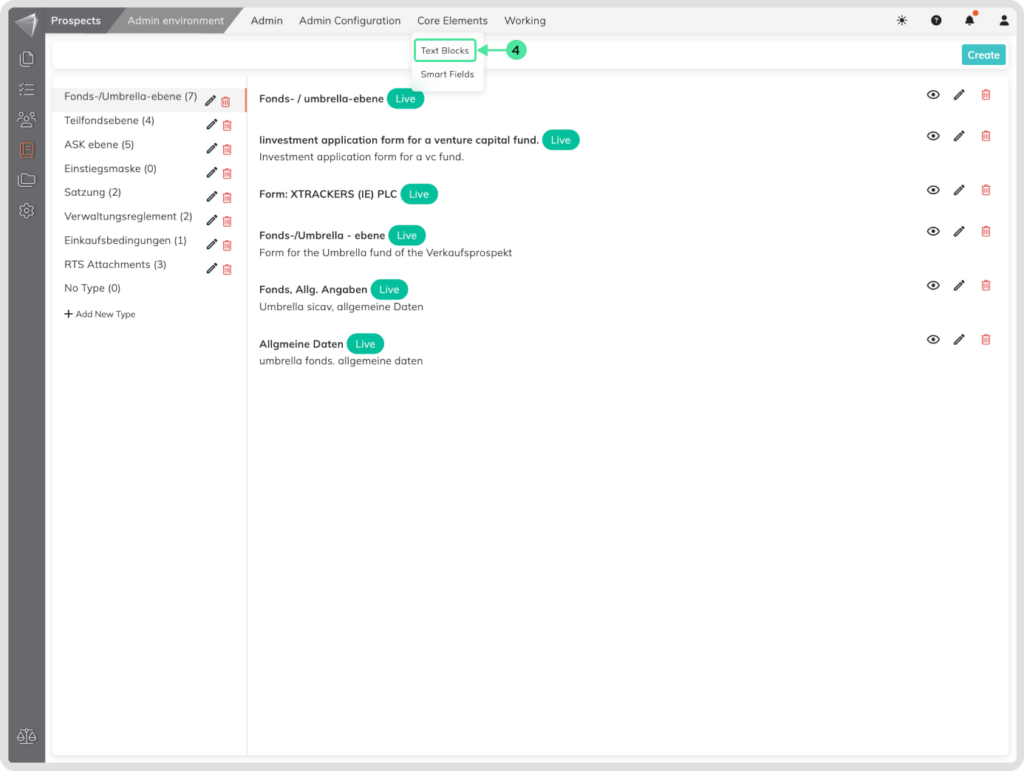
How to create a new Text Block?
Go to the Prospect module by clicking the icon on the left-side menu, and enter the Admin Environment submenu. Open the Core Elements, and select the Text Blocks.
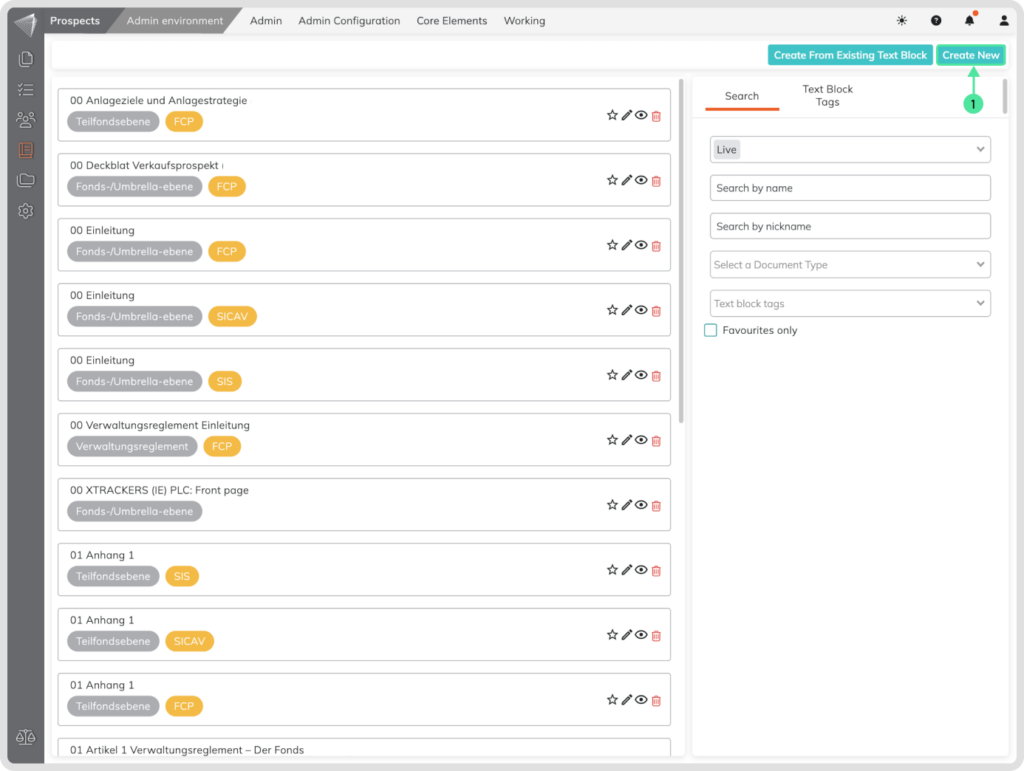
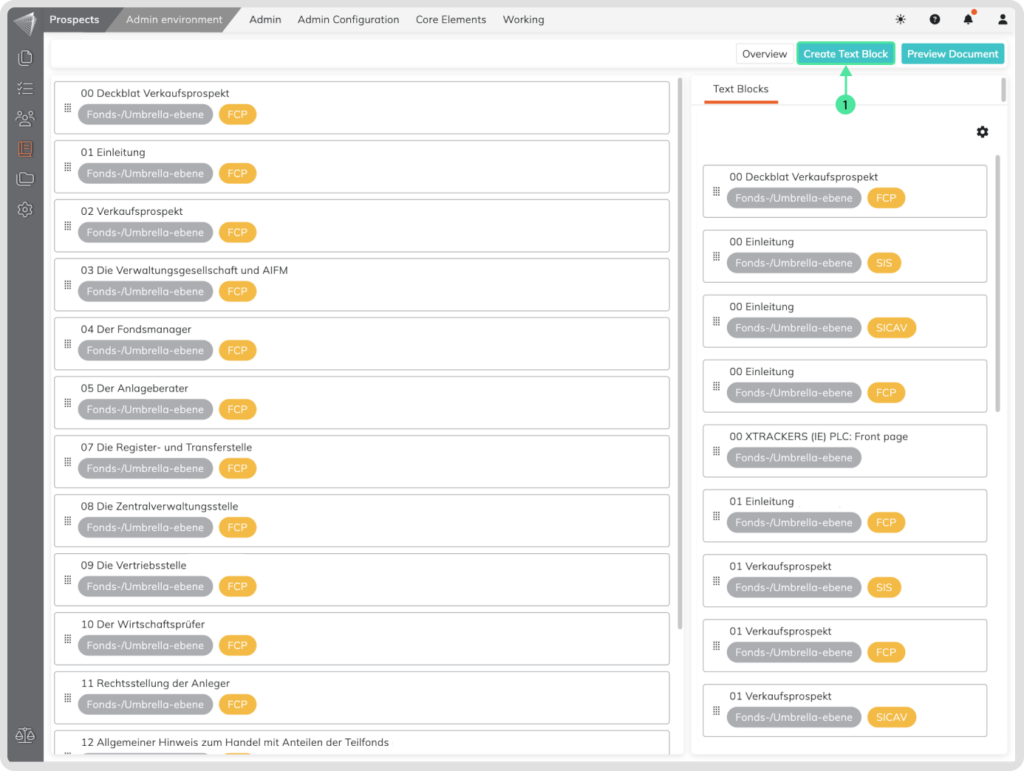
- Click on the ‘Create New’ button.
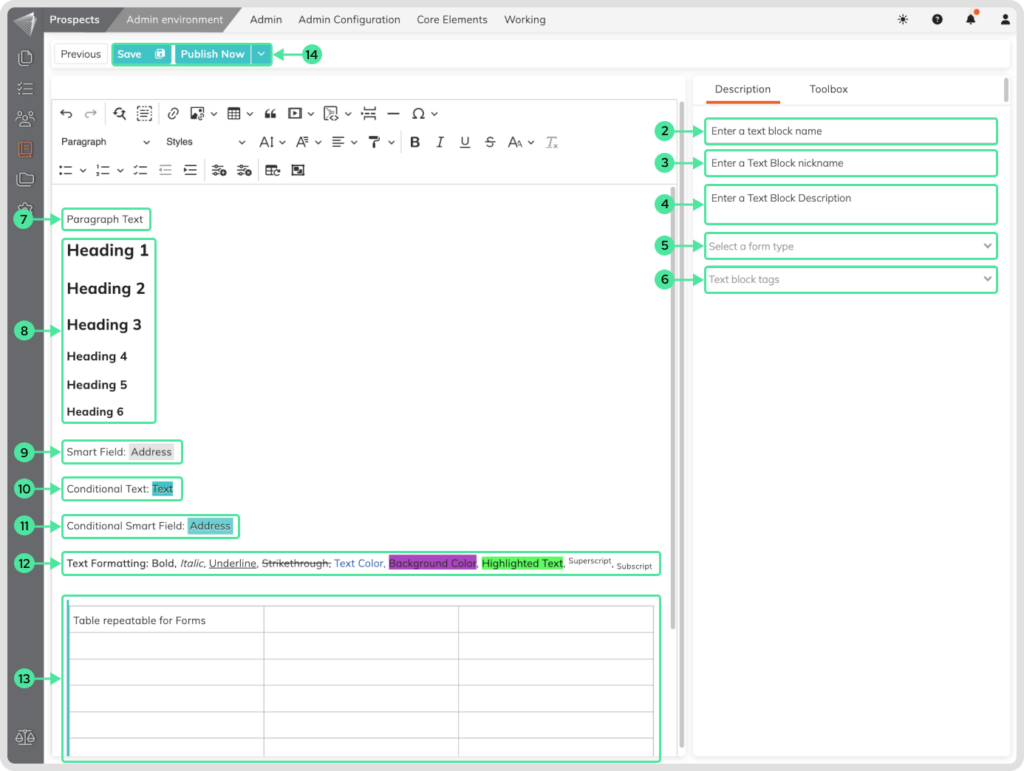
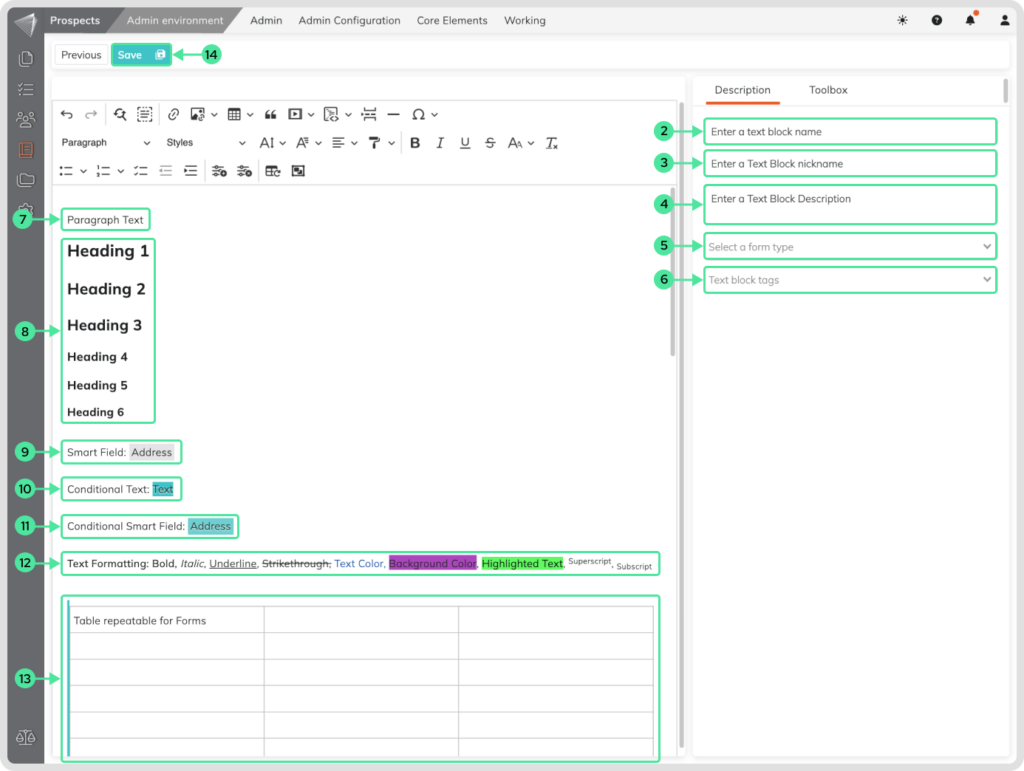
- Enter the Text block’s name.
- Enter a Text block nickname (optional).
- Enter a Text block description (optional).
- Select one or multiple Form Types to associate this Text Block with. This is a filtering option.
- Select one or multiple Text Block Tags for better categorization. This is a filtering option.
- Include a text in the editor, the default text format is Paragraph.
- From the same menu where you find the Paragraph, you can select between six Headings.
- You can include Smart fields inside the editor from the Toolbox Sidebar menu or by typing /dNameSmartField.
- You can include text, highlight it, and set it as a conditional text.
- It is also possible to highlight Smart Fields and set them as conditional Smart Fields.
- Select from various Text Formatting options.
- You can also include Tables and set them to be Repeatable into Forms.
- Click ‘Save’ to save it as a draft, or ‘Publish Now’ to make it immediately available. To schedule the Text Block for a future date, click on the arrow beside ‘Publish Now’ and select your desired date.
How to duplicate Text Blocks?
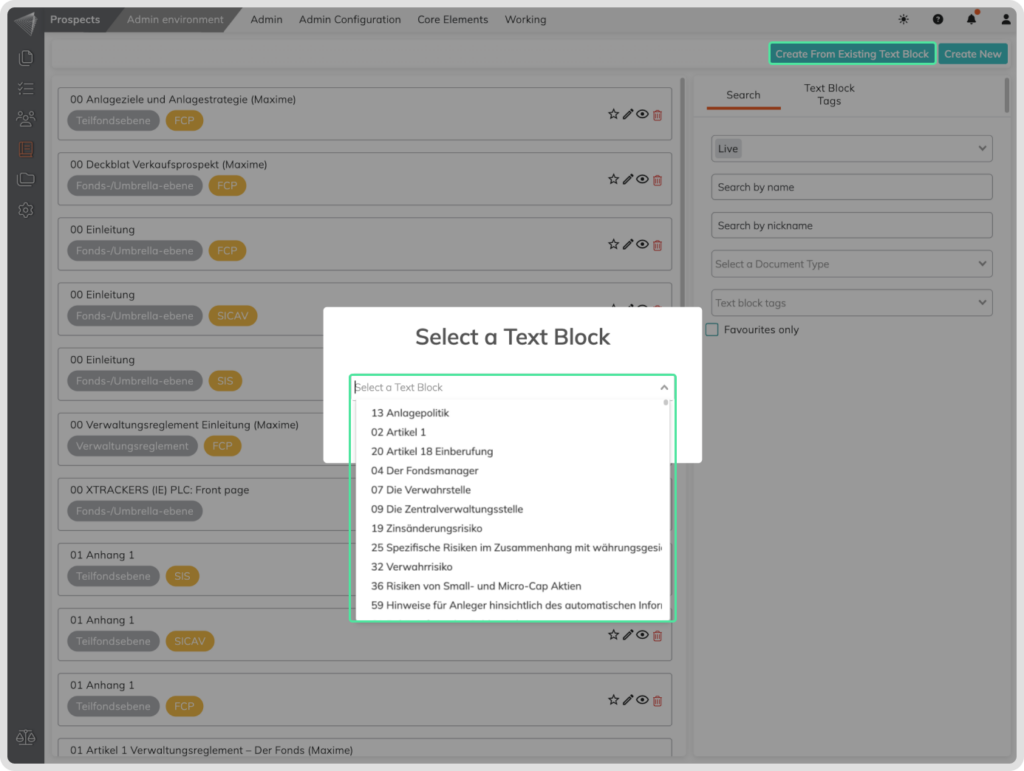
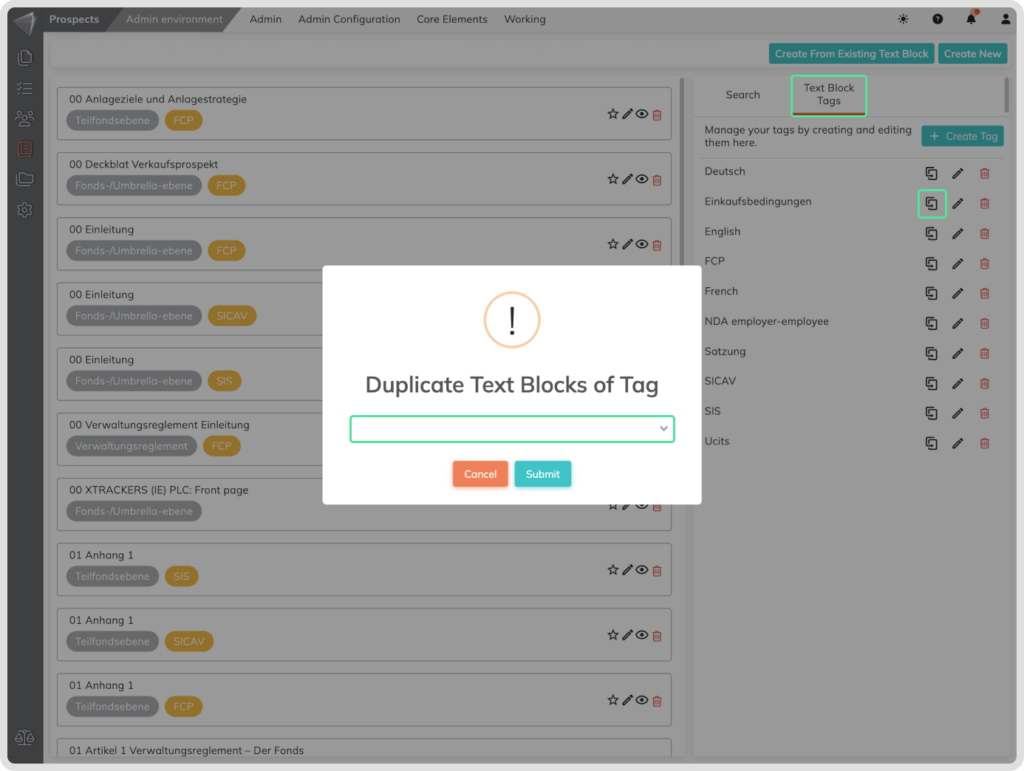
You can also duplicate text blocks. This can be achieved in two ways. Firstly, by clicking on Create existing text block. This will display a list of existing text blocks from which you want to select one to use as a base. Editing afterwards is similar to the process of creating new text blocks, except that there is already information available that can be changed. The second method is via the text block tags. To do this, click from the Manage Text Blocks menu in the Text Blocks Tags submenu and click on the Duplicate icon. A popup will appear with the list of the Tags that can be duplicate. Select the intended tag and click on the Submit button. This will duplicate all text blocks that have that tag.
What are Text Block Tags?
Text Block Tags are labels you can attach to your text blocks to help organize and categorize them. Think of them like sticky notes or hashtags for your content. By using tags, you can easily group related text blocks, making it simpler to find, manage, and reference them in the future. Tags are a powerful way to keep your work organized and searchable, especially as you accumulate more content.
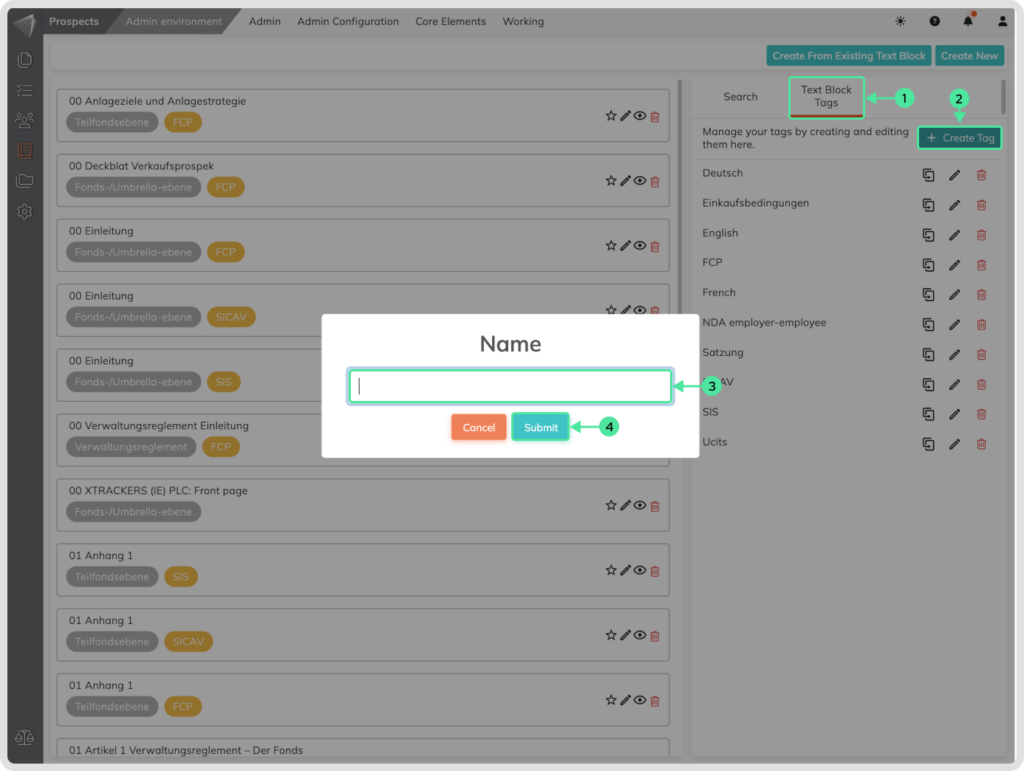
How to create a Text Block Tag?
Go to the Prospect module by clicking the icon on the left-side menu, and enter the Admin Environment submenu. Open the Core Elements, and select the Text Blocks.
- Select the submenu Text Blocks Tags that can be seen in the sidebar right.
- Click the ‘+ Create Tag’ to create a new Tag.
- Include the new Text Block Tag Name.
- Confirm the creation.
How to manage Text Blocks and Content inside the Blueprints?
Accessing Text Blocks inside the Blueprints:
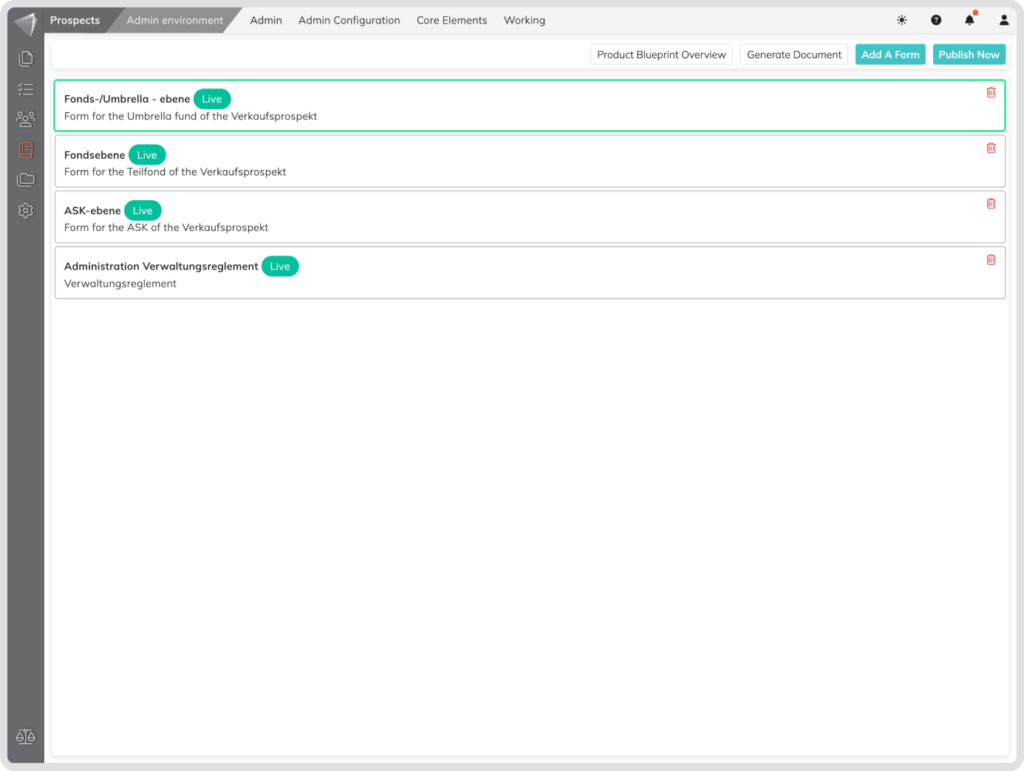
Go to the Prospect module icon in the left-side menu. Select the ‘Admin Environment’ submenu. Select the Admin menu, and go to ‘Product Blueprints’. Select your Blueprint and click the ‘Edit Content’ icon.
- Click on the Form that you want to view and edit its content.
How to create a new Text Block inside the Prospect Module:
Go to the Prospect module icon in the left-side menu. Select the ‘Admin Environment’ submenu. Select the Admin menu, and go to ‘Product Blueprints’. Select your Blueprint and click the ‘Edit Content’ icon.
- Click on the ‘Create New’ button.
- Enter the Text block’s name.
- Enter a Text block nickname (optional).
- Enter a Text block description (optional).
- Select one or multiple Form Types to associate this Text Block with. This is a filtering option.
- Select one or multiple Text Block Tags for better categorization. This is a filtering option.
- Include a text in the editor, the default text format is Paragraph.
- From the same menu where you find the Paragraph, you can select between six Headings.
- You can include Smart fields inside the editor from the Toolbox Sidebar menu or by typing /dNameSmartField.
- You can include text, highlight it, and set it as a conditional text.
- It is also possible to highlight Smart Fields and set them as conditional Smart Fields.
- Select from various Text Formatting options.
- You can also include Tables and set them to be Repeatable into Forms.
- Click ‘Save’ to save it. This will save the Text Block only in the specific Blueprint
How to Delete a Text Block from the Blueprint?
Go to the Prospect module icon in the left-side menu. Select the ‘Admin Environment’ submenu. Select the Admin menu, and go to ‘Product Blueprints’. Select your Blueprint and click the ‘Edit Content’ icon. Click on the desired Form with the content.
- Select the Text Block.
- Click the Bin icon that appears on the Text Block.
- Confirm the deletion to remove the Text Block from the Form.

In order to Save this step click on the ‘Overview’ button and click on the ‘Publish Now’ button.
Adjusting Conditional Logic for Text Blocks:
Go to the Prospect module icon in the left-side menu. Select the ‘Admin Environment’ submenu. Select the Admin menu, and go to ‘Product Blueprints’. Select your Blueprint and click the ‘Edit Content’ icon. Click on the desired Form with the content.
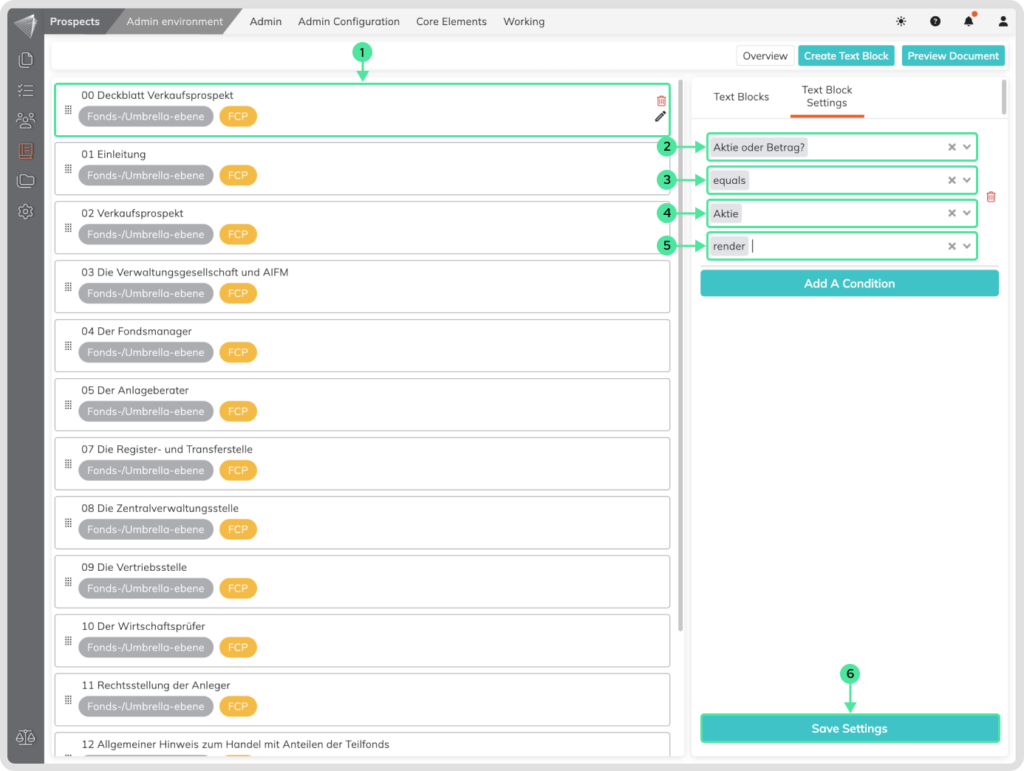
- Click on the existing Text Block to check for conditional logic.
- Select and/or modify conditions on the right side. This is a Form Fields that is used as a reference.
- Select an existing operator as a reference from the dropdown.
- Enter or choose the data that must be met for the Text Block to be applicable
- Specify whether the text block should be shown or hidden according to the user input.
- Save the Settings.
In order to Save this step in the Blueprint click on the ‘Overview’ button and click on the ‘Publish Now’ button.
How to add an existing Text Block to an existing Blueprint?
Go to the Prospect module icon in the left-side menu. Select the ‘Admin Environment’ submenu. Select the Admin menu, and go to ‘Product Blueprints’. Select your Blueprint and click the ‘Edit Content’ icon. Select the desired Form to view its content.
- Select an existing Text Block from the right side to the left side to add it to the Form. (Click and hold)
- Move the mouse to the left and release the mouse click.
To save this step click on the ‘Overview’ button to access the Forms overview, and click ‘Publish Now’ to save the changes made in the Blueprint.
How to Add Conditional Logic on a Text Block?
To control what content is shown in a Product based on conditions, follow these steps:
Go to the Prospect module icon in the left-side menu. Select the ‘Admin Environment’ submenu. Select the Admin menu, and go to ‘Product Blueprints’. Select your Blueprint and click the ‘Edit Content’ icon. Select the desired Form to view its content.
- Click on the chosen Text Block to reveal the conditional function on the right side.
- Select the Form Field that will act as a reference for your condition.
- Choose an operator (e.g., equals, greater than, is, etc.) to define the condition.
- Input the specific value, text, date, or number that triggers the condition and Click outside the condition input field to access the Condition Setting selector for text-related Form Fields.
- Choose whether the text block should be rendered or not based on the user’s input matching the condition.
- You can add multiple conditions by clicking the ‘Add a Condition’ button.
- Save your settings.

To save this step click on the ‘Overview’ button to access the Forms overview, and click ‘Publish Now’ to save the changes made in the Blueprint.
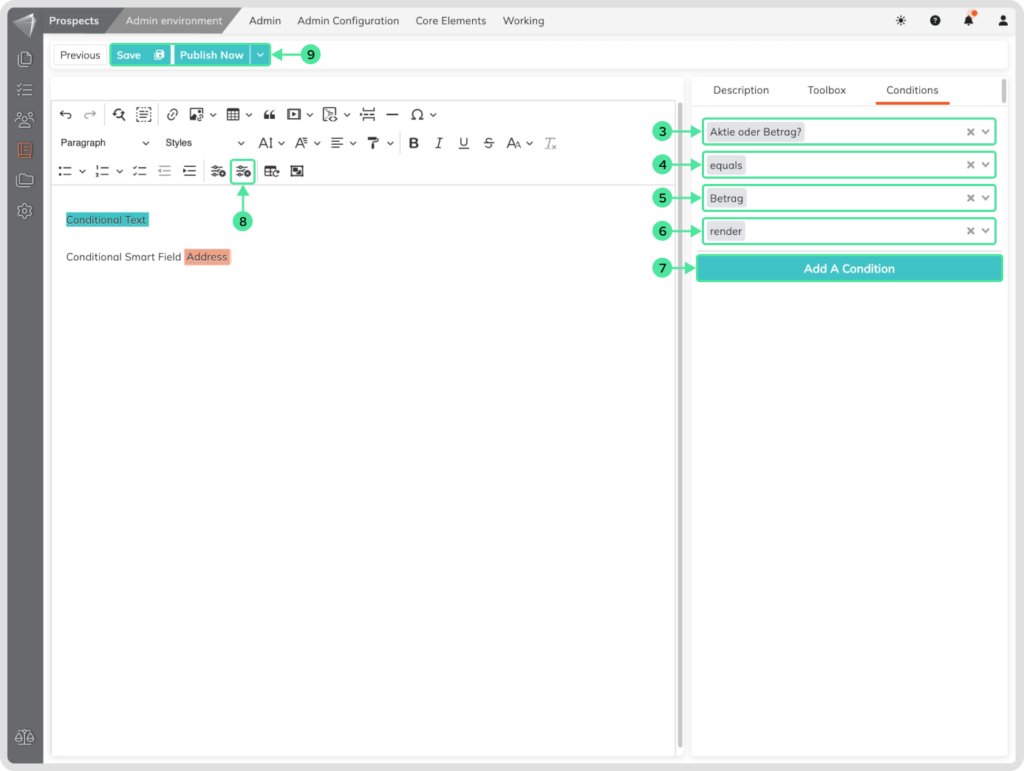
How to Add Conditions inside Text Blocks?
Go to the Prospect module icon in the left-side menu. Select the ‘Admin Environment’ submenu. Select the Admin menu, and go to ‘Product Blueprints’. Select your Blueprint and click the ‘Edit Content’ icon. Select the desired Form to view its content. Click on the chosen Text Block. Click the Edit Pen icon on the Text Block.

- Include your Text or dynamic Smart Fields. Smart Fields can be found in the Sidebar menu names Toolbox or type them in with the /dSmartFieldName. Highlight the desired text or smart field that should be conditional.
- Click on the ‘Attach Condition’ Button. Click on the same element to see the conditional setup process in the sidebar menu.
- Select the Form Field as the reference for your condition.
- Choose an operator (e.g., equals, greater than, is, etc.) to define the condition.
- Input or Select a specific triggering value, text, date, or number.
- Choose whether the text or smart field should be rendered or not based on the users input matching the condition.
- Add multiple conditions with the ‘Add a Condition’ button, if needed.
- Click on the remove condition, if you need to remove the conditional function from Text or Smart Fields.
- Save your setting by clicking on the ‘Save’ button, to save it as a draft Text block, or ‘Publish Now’ to make it directly available.
Advanced Table Features in Text Blocks
You can edit the text within your Text Block just like you would in a regular word processing environment. There are a few differences you should be aware of, especially when it comes to adding or deleting columns and rows within a table embedded in a Text Block. Here are the steps to do this:
- Click ‘Insert table’ within a Text Block to add a table and choose the desired table size (e.g., 1×1, 2×2, up to 10×10 cells).
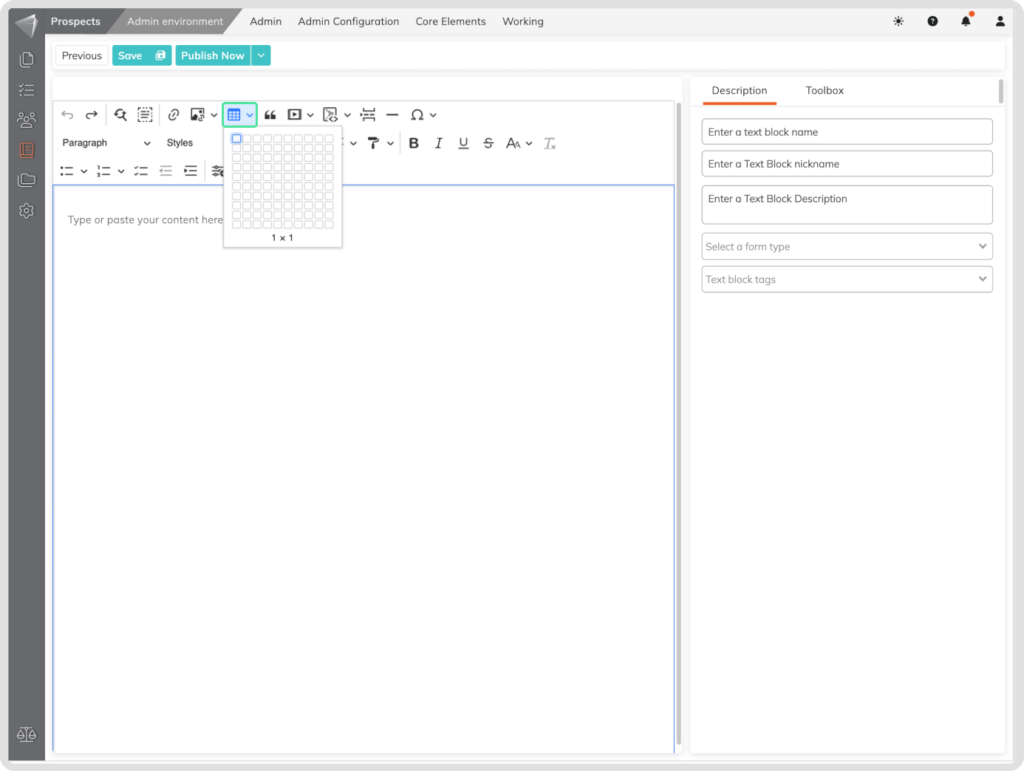
- Clicking inside a table cell lets you add/delete rows & columns, format the table, and merge cells.

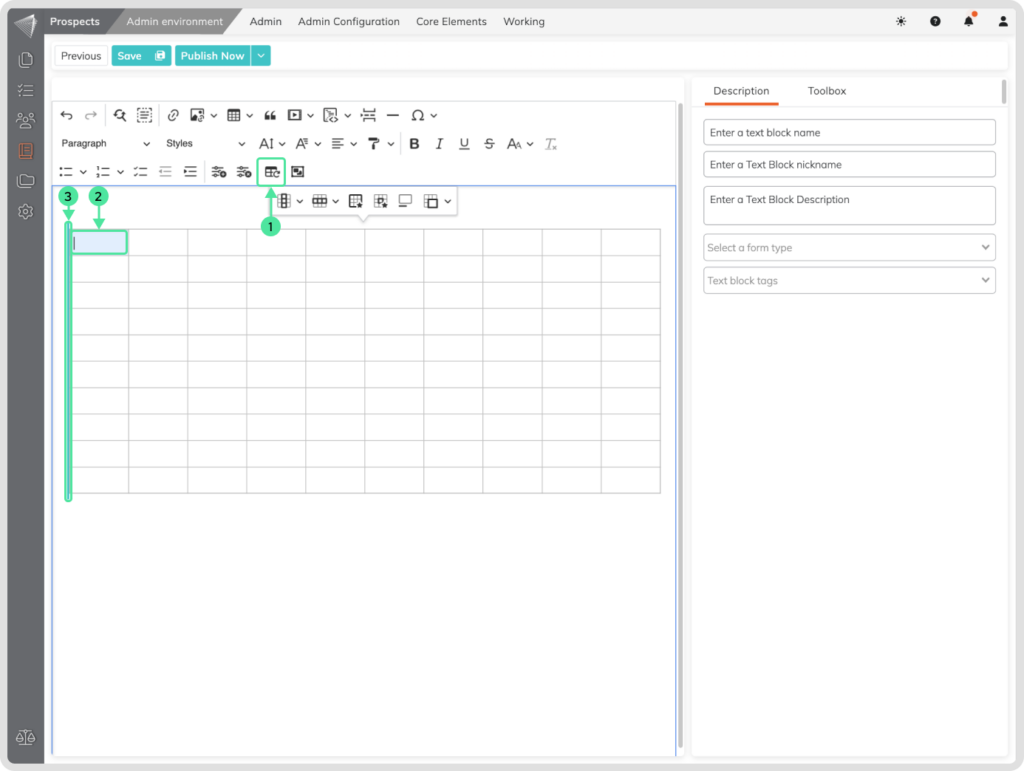
Making Tables Repeatable
How to make the Tables repeatable?
- Click on any cell inside the table that you want to make it relatable.
- Click the ‘Make Table Repeatable’ button, this will make the table relatable.
- A blue color indicates that the table is repeated in all forms within the Blueprint. By clicking the same button you can remove this setting from the Table.
Additional Informations
Sticky Paragraphs
What it is:
Sticky paragraphs is a function in the editor that allows you to keep a paragraph together that would otherwise be split across a page break. This can be useful for ensuring that related text stays together, such as a heading and its subheading, or the last line of a paragraph and the first line of a table.
How to use it:
- Click inside the Paragraph that you want to keep together.
- Click the Sticky paragraph button. A blue highlighted line will appear in front of the text to indicate that the function is active.
To undo:
- Click inside the Paragraph that has the sticky paragraph function applied.
- Click the Sticky paragraph button again. The blue highlighted line will disappear.
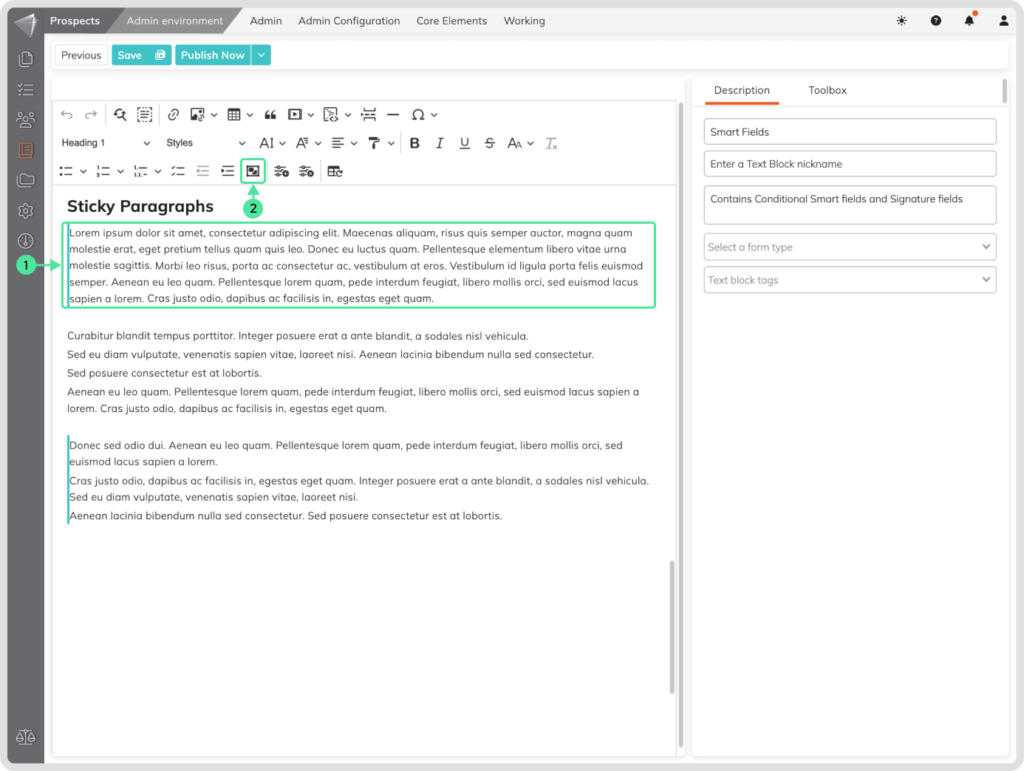
Example:
Let’s say you have a document with a heading and a subheading. The subheading is at the bottom of the page, and you want to keep it together with the heading on the next page. You can use the sticky paragraphs function to do this.
Previewing Blueprints
When a Blueprint is not saved by clicking the ‘Publish Now’ button, it will no longer display the ‘Edit Content’ icon in the Blueprints overview. To access the ‘Edit Content’ of the Blueprint, click on the Blueprint and look at the sidebar on the right. The ‘Edit Content’ icon will appear around the latest version and can be accessed from there
How to find the Product Blueprint/Text Block Timeline?
Click on an existing Blueprint/Text Block. On the right side, a sidebar will appear where the Timeline is included.
How to View the content of the Blueprints inside the Timeline?
Inside the Product Blueprint Timeline, click on the eye icon to view the content of a particular version.
Version control Timeline
Version control is essential for maintaining the integrity of Blueprints over time, providing a historical record of changes, and the ability to revert to previous versions if needed.
By clicking on an existing Text Block, the sidebar menu will be displayed, where you can observe the Text Block timeline.

- Reverting to a Previous Version: Made some changes and want to go back? Simply click on the bin icon (trash can symbol) next to the Text Block. This will reverse your changes and bring back the previous version.
- Identifying Draft Versions: Draft versions of Text Blocks are displayed with a gray color to indicate they haven’t been published yet. These drafts are safe for editing without affecting the live version.
- Viewing Draft Content: Curious about what’s in a draft version? Click on the eye icon next to the draft to see its content without publishing it.
Editing Drafts from the Timeline: Working on a draft and need to make quick edits? Look for the edit pen icon on the timeline next to the draft Text Block. Clicking this pen allows you to edit the content directly within the timeline, which can be especially useful if the Text Block is long or located far down the page.