What is it
Forms are digital equivalents of paper questionnaires or applications, collecting user input through various fields like text boxes, checkboxes, or dropdown menus. In this specific context, Forms act as dynamic building blocks within Blueprints, automatically generating customized documents based on user-provided information. This streamlines document creation, minimizes errors and ensures consistent information usage.
Who is it for
Forms are mainly created by content experts or professionals who need to gather data in a structured way to personalize documents. This includes roles like finance professionals, lawyers, administrators, and contract managers.
Why use the Forms?
Are you tired of repetitive editing? Forms are your magic wand for personalized documents & structured products! Drag-and-drop fields, gather accurate data and categorize for ease. No more errors, just efficiency!
Plus, build Blueprints with ultimate flexibility! Craft intricate hierarchies and dependencies within your products using Forms. Gather essential info, customize documents precisely, and leverage conditional & non-conditional text blocks. It’s all in one powerful tool!
Advantages of using forms
Say goodbye to tedious manual editing! Forms are your new best friend in both Documents and Prospects, offering a bunch of amazing perks:
- Fill-in-the-blanks ease: Only answer the essential questions – no need to wade through unnecessary text!
- Error-free magic: Create perfect documents/products without needing expert knowledge. ✨
- Single source of truth: Update information once, and boom! All your generated documents reflect the latest version.
- Reuse like a pro: One form covers multiple documents/products. Think NDAs, contracts, you name it!
- Share outside the platform: Let anyone, even without an account, fill out your forms and generate documents!
Requirements to be able to use the Forms:
You should be able to access the Prospect module.
You should have Administrative permissions in contractuo.
You should have already existing Form Fields, Text Blocks, and recommended are also Form Types. You can also use them in the process of creating Templates.
How to Manage the Forms inside the Blueprints?
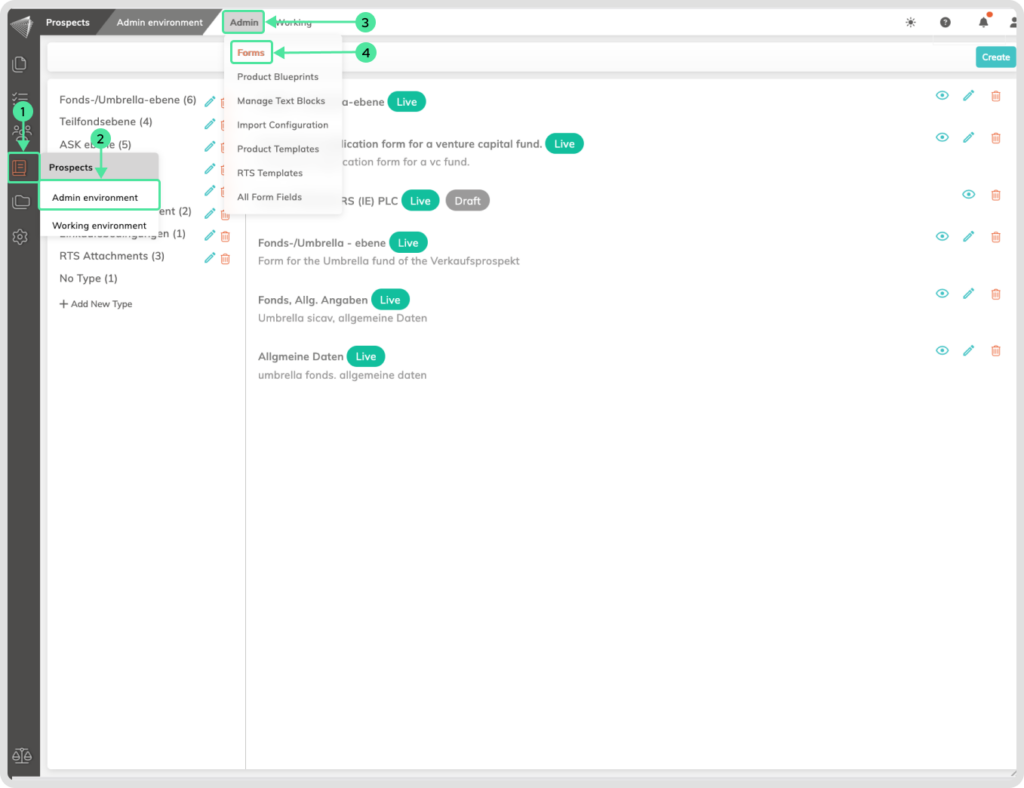
How to find the Forms?
- Go to the Prospect module
- Access the Admin Environment.
- Click on the menu ‘Admin’
- Choose the ‘Forms’ submenu
(This is also the default landing page within the Admin Environment).
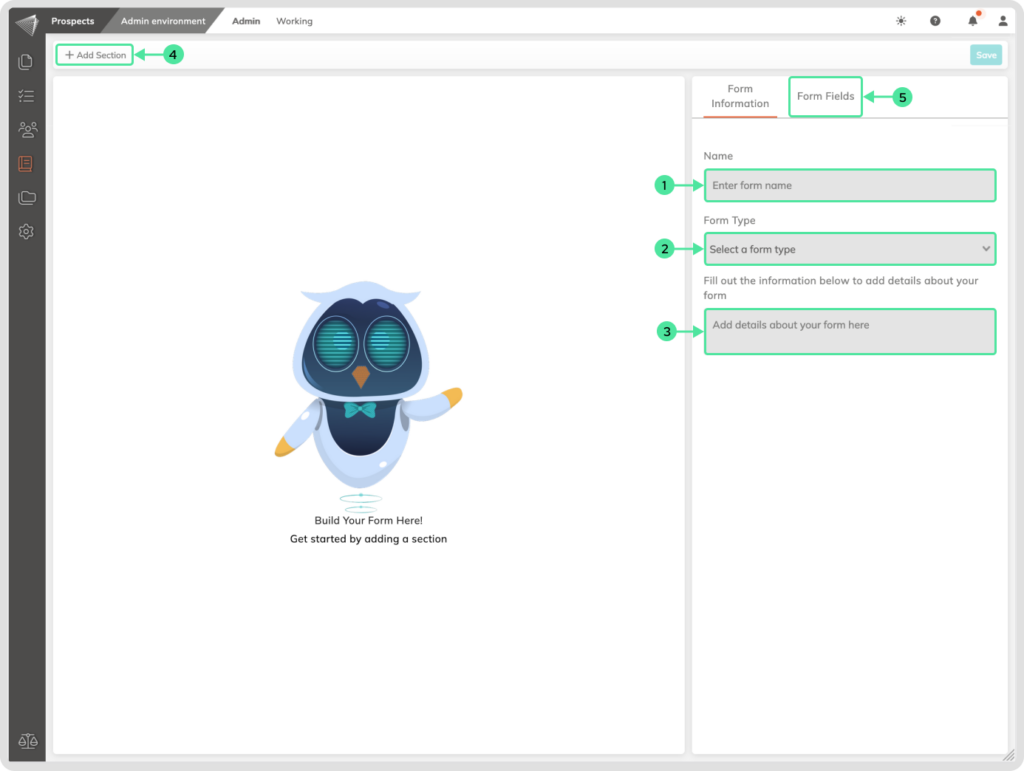
How to Create a Form?
Go to ‘Prospects‘ inside the Admin Environment, and click on ‘Create form‘. On the left side you will see an empty area. This is the area where you will structure your form. On the right side you will see the sidebar.
- Enter a suitable form name. The best are complete sentences that explain what this form is about
- Click on ‘Form type‘ and select the type that fits this form. The form types that you created will appear.
- Give the form a description. This could help you and other users to quickly know what form this is about.
- Click on ‘+Add section‘ on the left side, enter a suitable Section name and confirm their creation. You can create multiple Sections. Sections are here for structure and data hygiene.
- The next step is to add fields to the sections. Click on ‘Form Fields‘ in the right sidebar.
- Drag and drop form fields to their sections.
- If you would like to create a field from here, click on ‘Basic Fields‘ choose a field from the section, and drag and drop it to the right place. Then click on the Pencil icon on the field to edit it. Fill in the field information.
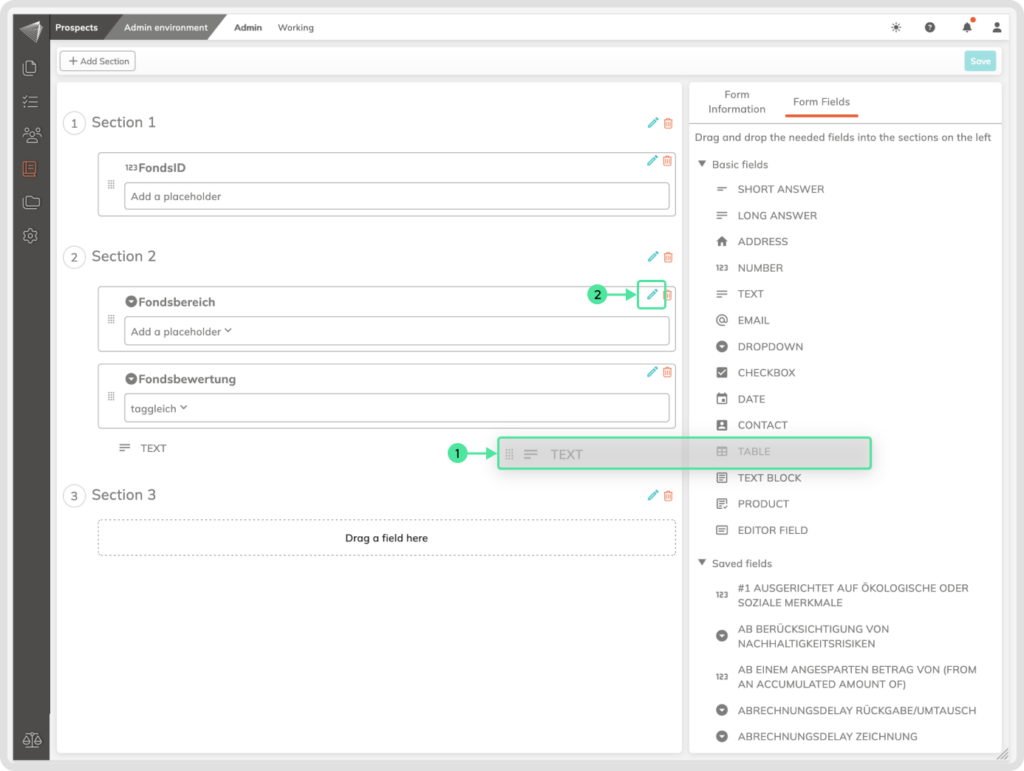
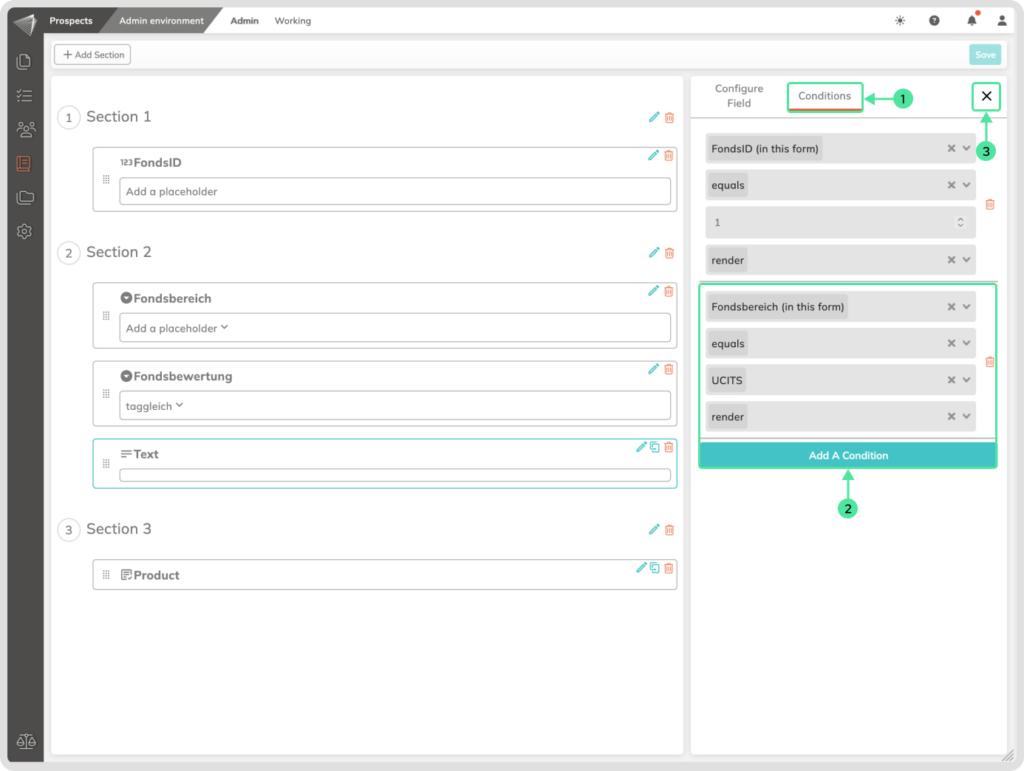
- Make the field Smart! Click ‘Conditions’ in the sidebar to set up rules that control when this field appears.
- Add conditional situations and set them up. You can even add multiple conditions for ultimate flexibility.
- Remember to close the sidebar before saving your new form. The ‘Save’ button will be available once you close the sidebar.
How to add Forms inside Blueprints?
Go to the Prospect module icon in the left-side menu. Select the ‘Admin Environment’ submenu. Select the Admin menu, and go to ‘Product Blueprints’. Select your Blueprint and click the ‘Edit Content’ icon.
- Click the ‘Add a Form’ button.
- Select an existing Form from the dropdown list (you can add multiple Forms).
- Click on the ‘Add A Form’ button to add it.
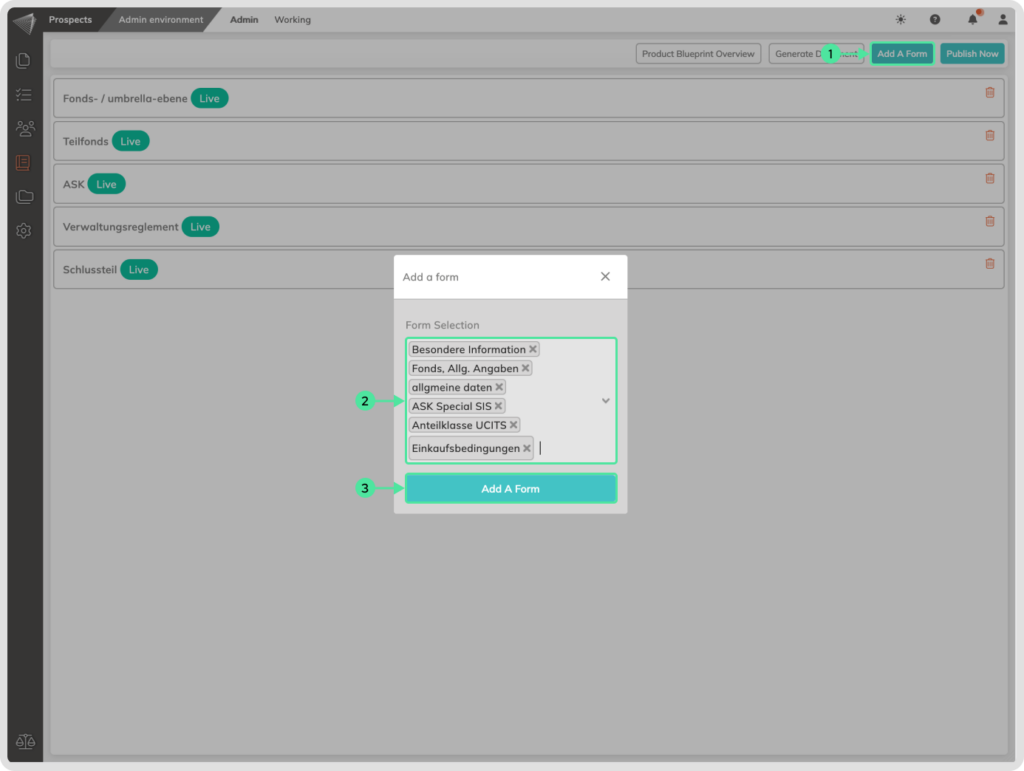
Click on the ‘Publish Now’ button to save the changes inside the Blueprint.
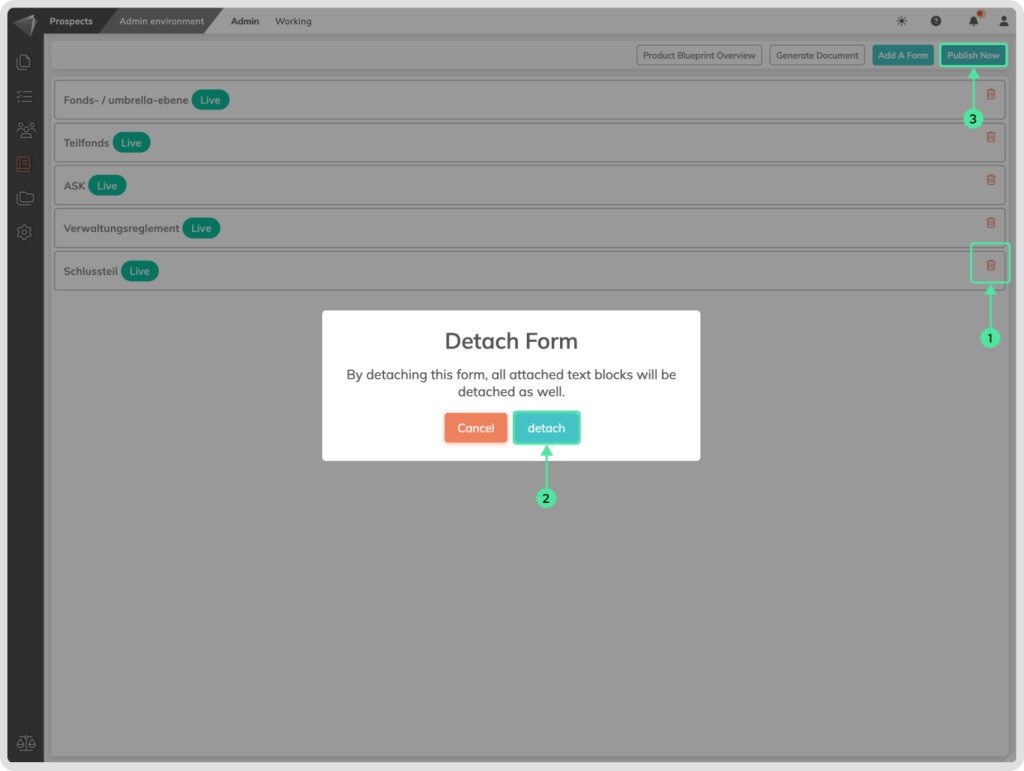
How to remove Forms from a Blueprint?
Go to the Prospect module icon in the left-side menu. Select the ‘Admin Environment’ submenu. Select the Admin menu, and go to ‘Product Blueprints’. Select your Blueprint and click the ‘Edit Content’ icon.
- To remove a Form from the Blueprint, click the ‘Delete’ icon (bin symbol) associated to the intended Form.
- Confirm the detaching step.
- Click the ‘Publish Now’ button to save the settings.
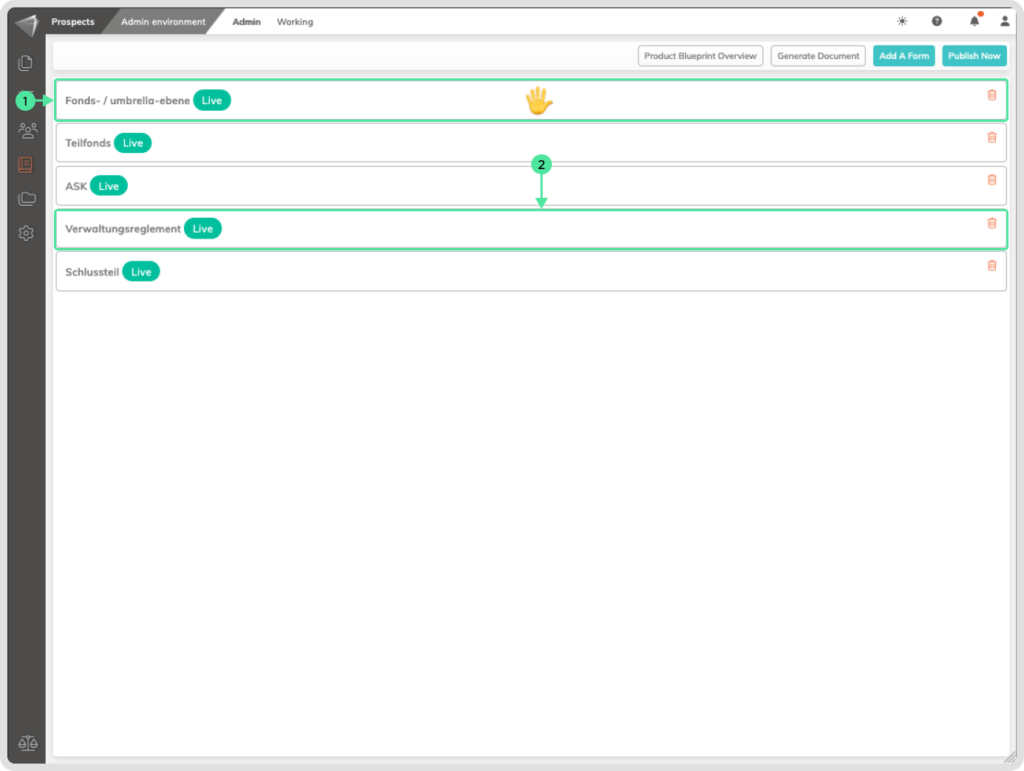
How to Rearrange Forms inside the Blueprint:
Go to the Prospect module icon in the left-side menu. Select the ‘Admin Environment’ submenu. Select the Admin menu, and go to ‘Product Blueprints’. Select your Blueprint and click the ‘Edit Content’ icon.
- Click and hold the Form you want to move.
- Drag it to the desired position, and Release the mouse click.
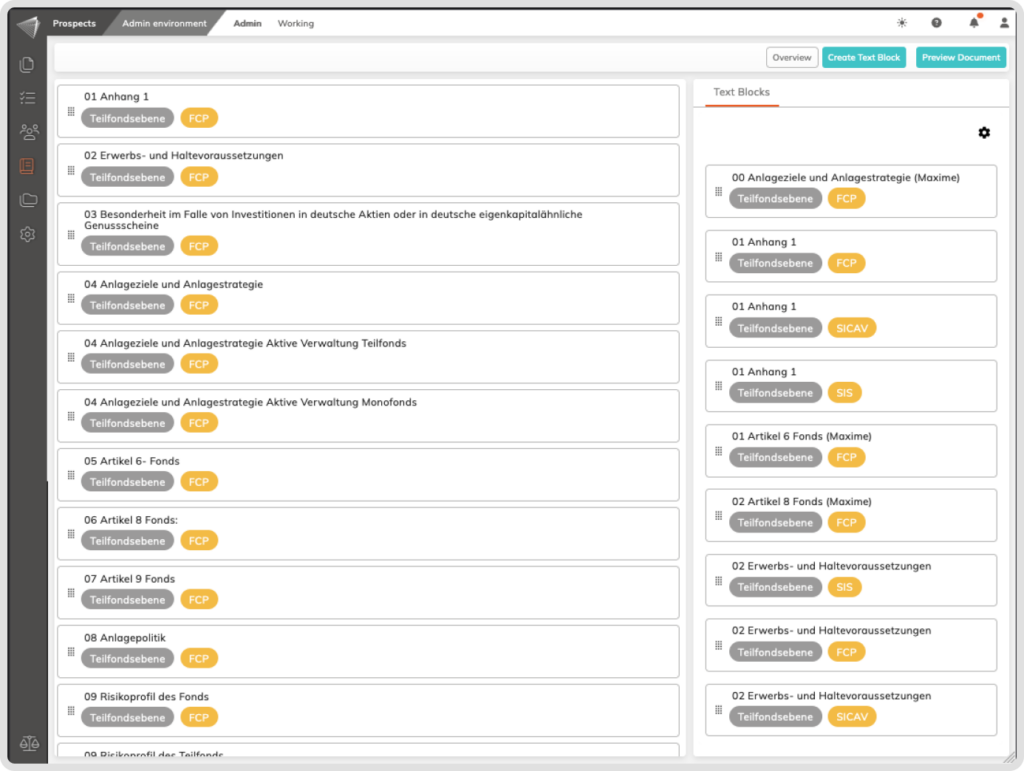
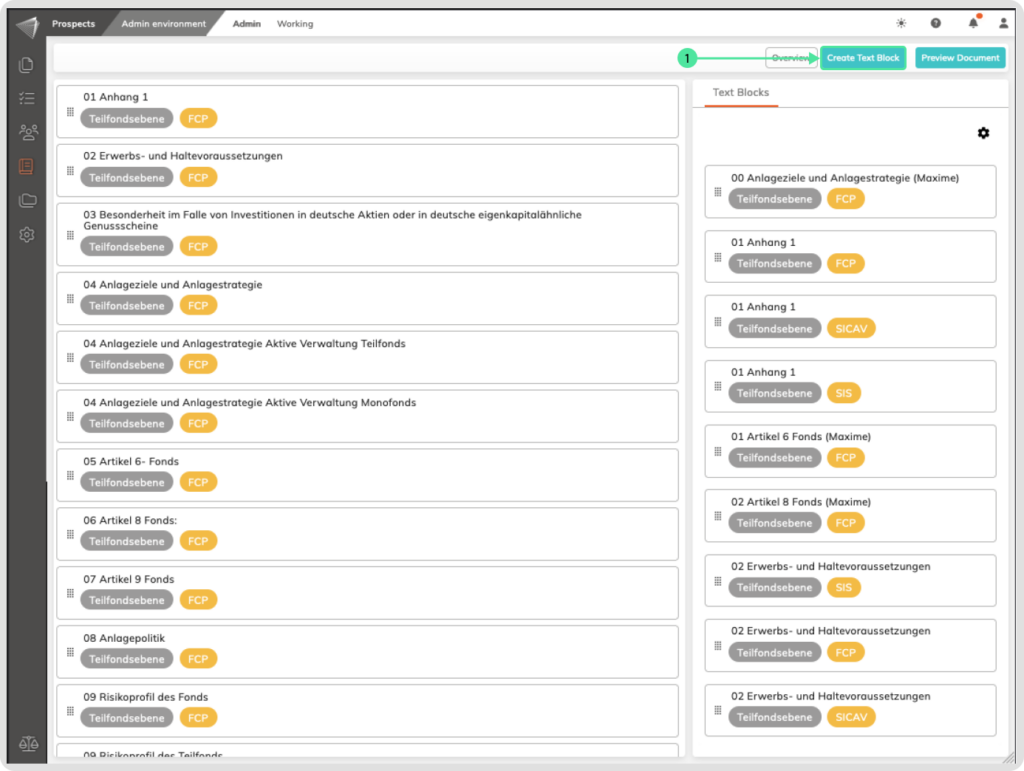
How to manage Text Blocks content inside Forms?
Accessing Text Blocks:
Go to the Prospect module icon in the left-side menu. Select the ‘Admin Environment’ submenu. Select the Admin menu, and go to ‘Product Blueprints’. Select your Blueprint and click the ‘Edit Content’ icon.
- Click on the Form that you want to view and edit its content.

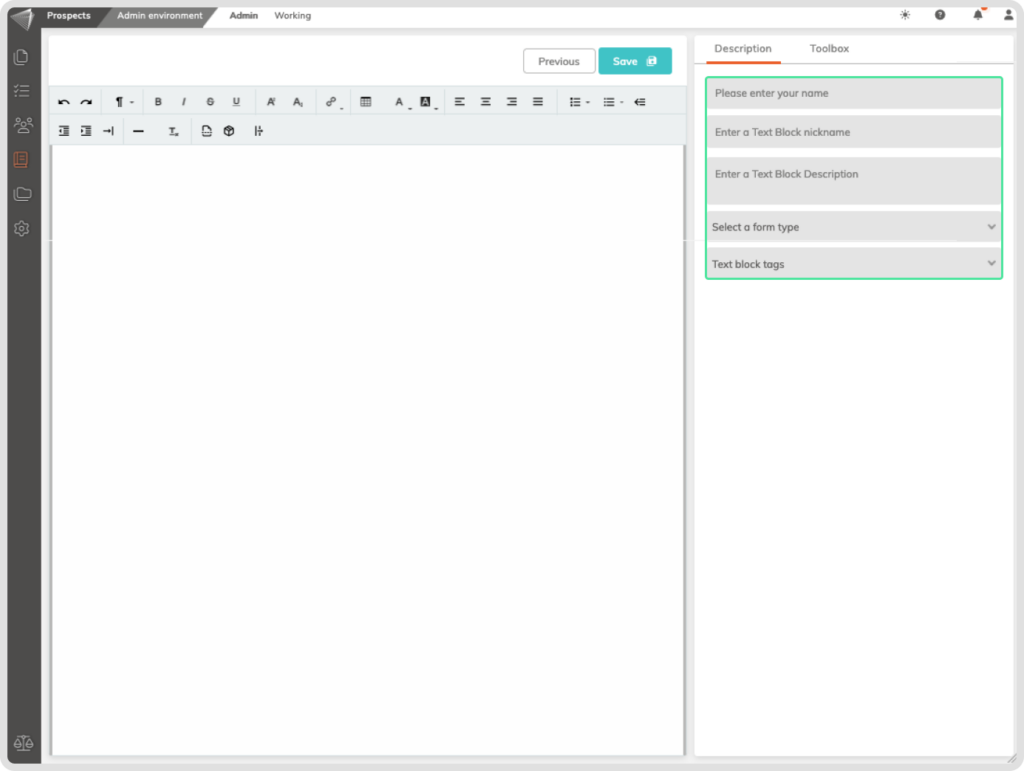
How to create a new Text Block inside the Forms:
Go to the Prospect module icon in the left-side menu. Select the ‘Admin Environment’ submenu. Select the Admin menu, and go to ‘Product Blueprints’. Select your Blueprint and click the ‘Edit Content’ icon.
- Click the ‘Create New Text Block’ button. Input your informations inside the Text Block and save the Text Block by clicking the ‘Save’ button.
How to Delete a Text Block from the Form?
Go to the Prospect module icon in the left-side menu. Select the ‘Admin Environment’ submenu. Select the Admin menu, and go to ‘Product Blueprints’. Select your Blueprint and click the ‘Edit Content’ icon. Click on the desired Form with the content.
- Select the Text Block.
- Click the Bin icon that appears on the Text Block.
- Confirm the deletion to remove the Text Block from the Form.
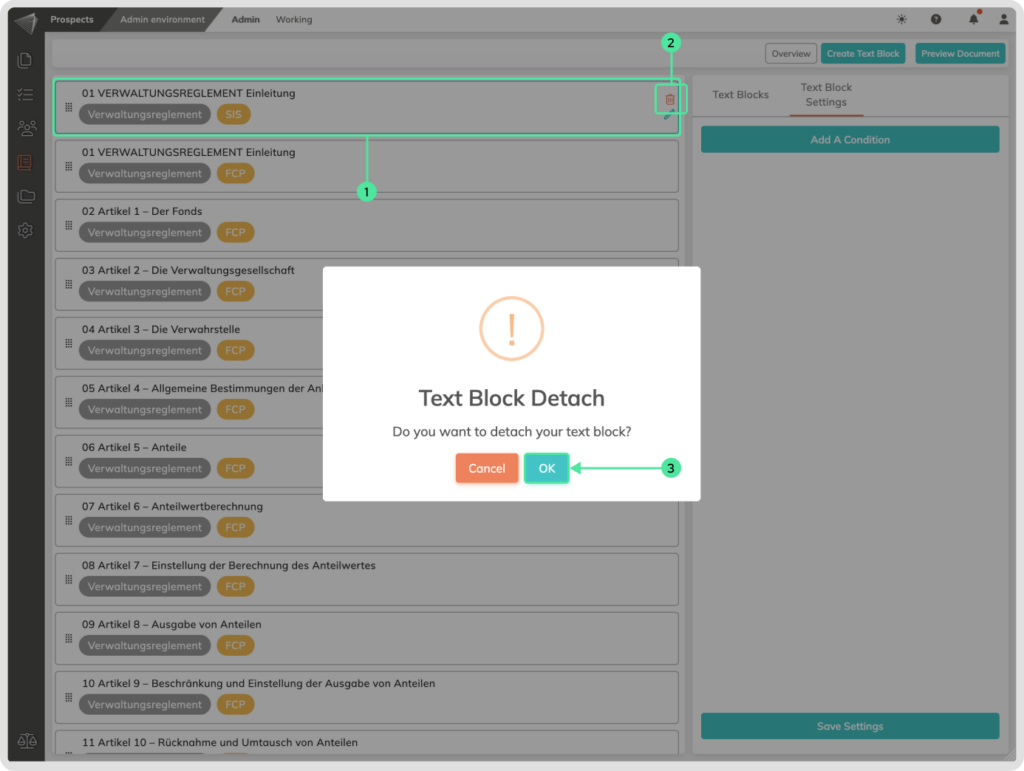
In order to Save this step click on the ‘Overview’ button and click on the ‘Publish Now’ button.
Adjusting Conditional Logic for Text Blocks inside Forms:
Go to the Prospect module icon in the left-side menu. Select the ‘Admin Environment’ submenu. Select the Admin menu, and go to ‘Product Blueprints’. Select your Blueprint and click the ‘Edit Content’ icon. Click on the desired Form with the content.
- Click on the existing Text Block to check for conditional logic.
- Select and/or modify conditions on the right side. This is a Form Fields that is used as a reference.
- Select an existing operator as a reference from the dropdown.
- Enter or choose the data that must be met for the Text Block to be applicable
- Specify whether the text block should be shown or hidden according to the user input.
- Save the Settings.
In order to Save this step in the Blueprint click on the ‘Overview’ button and click on the ‘Publish Now’ button.
How to add an existing Text Block to a Form inside a Blueprint?
Go to the Prospect module icon in the left-side menu. Select the ‘Admin Environment’ submenu. Select the Admin menu, and go to ‘Product Blueprints’. Select your Blueprint and click the ‘Edit Content’ icon. Select the desired Form to view its content.
- Select an existing Text Block from the right side to the left side to add it to the Form. (Click and hold)
- Move the mouse to the left and release the mouse click.
To save this step click on the ‘Overview’ button to access the Forms overview, and click ‘Publish Now’ to save the changes made in the Blueprint.
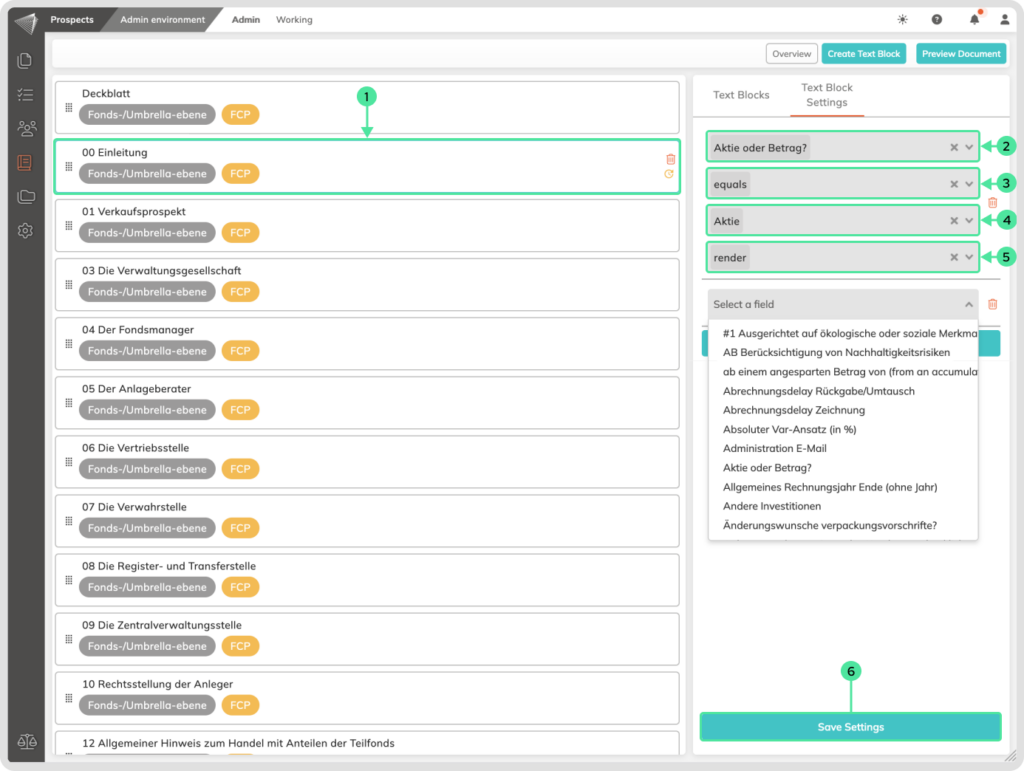
How to Add Conditional Logic on a Text Block?
To control what content is shown in a Product based on conditions, follow these steps:
Go to the Prospect module icon in the left-side menu. Select the ‘Admin Environment’ submenu. Select the Admin menu, and go to ‘Product Blueprints’. Select your Blueprint and click the ‘Edit Content’ icon. Select the desired Form to view its content.
- Click on the chosen Text Block to reveal the conditional function on the right side.
- Select the Form Field that will act as a reference for your condition.
- Choose an operator (e.g., equals, greater than, is, etc.) to define the condition.
- Input the specific value, text, date, or number that triggers the condition and Click outside the condition input field to access the Condition Setting selector for text-related Form Fields.
- Choose whether the text block should be rendered or not based on the user’s input matching the condition.
- You can add multiple conditions by clicking the ‘Add a Condition’ button.
- Save your settings.
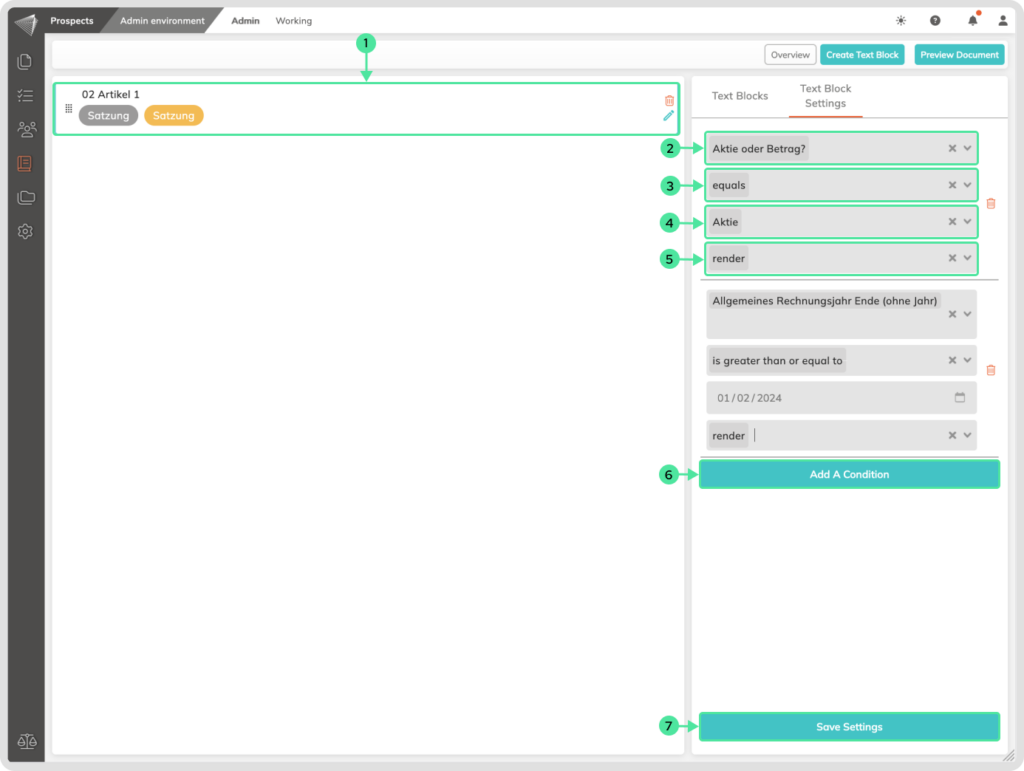
To save this step click on the ‘Overview’ button to access the Forms overview, and click ‘Publish Now’ to save the changes made in the Blueprint.
How to Make the Complete Table Repeatable within Forms?
To make the entire table repeatable within forms:
- Right-click on any cell inside the table where you want the table to be repeatable within forms.
- Select ‘Make Repeatable for Form’.

Version control Timeline
Version control is essential for maintaining the integrity of Forms over time, providing a historical record of changes, and the ability to revert to previous versions if needed.
How to View the content of the Form inside the Timeline?
Inside the Admin Environment of the Prospect module. Go to the Forms and click on the desired form where you want to see the Timeline. Click on the eye icon to view the content of a particular version.
How to go to an older Version?
If you need to revert to an earlier version, click on the delete icon at the latest version. Confirm the action, and the system will roll back the Form to that specific state.