The Procedures function allows you to create a standardized process for collecting signatures and approvals on various documents. These procedures can be built from a variety of starting points, including blank documents, pre-designed templates, PDFs, and even existing Word documents.
This guide will walk you through the three-step process of setting up a procedure:
Step 1 – Setup
Step 2 – Workflow
Step 3 – Documents
What it is
Procedures provide a structured approach to managing document workflows. You can define a sequence of steps, assign actions (like signing or reviewing) to each document, and specify who needs to complete each action. This ensures everyone involved in the process is aware of their role and contributes to a smooth and efficient document flow.
Who is it for
Procedures are beneficial for anyone who needs to collect signatures or approvals on documents in a consistent and organized manner. Here are some examples:
- Human Resources departments can use procedures for onboarding new hires, managing contracts, and handling performance reviews.
- Sales teams can create procedures for proposals, quotes, and customer agreements.
- Legal and compliance departments can utilize procedures for managing sensitive documents and ensuring adherence to regulations.
- Project managers can leverage procedures to streamline approvals for project deliverables and contracts.
Why Use Procedures
- Save Time: Create reusable procedures for frequently used documents, eliminating the need to start from scratch each time.
- Maintain Consistency: Guarantee all documents of the same type follow the same structure and content, minimizing errors and ensuring a professional look.
- Reduce Risk: Minimize the use of outdated information by employing up-to-date procedures and templates.
- Facilitate Collaboration: Establish a clear workflow for everyone involved, keeping everyone on the same page.
- Improved Efficiency: Streamline document creation and approval processes, allowing teams to focus on core tasks.
- Dynamic Personalization: Integrate forms into procedures to capture specific information during document creation, eliminating repetitive editing and ensuring accuracy.
By leveraging Procedures, you can create a more efficient and streamlined document management system within your organization.
Usage Example
Administration
An administration team needs to process multiple policy documents for review and approval by various department heads. Using Procedures, the team can create a workflow where each policy document is reviewed and signed by the necessary stakeholders in a sequential manner. This ensures all reviews and approvals are tracked and documented efficiently.
Human Resources
The HR department is onboarding new employees and needs to manage employment contracts, NDA agreements, and policy acknowledgments. With Procedures, HR can set up a workflow where each document is reviewed and signed by the new employee and the HR manager. This automates the onboarding process and ensures all required documents are completed accurately.
Legal
A legal team is drafting a contract that requires review by external legal counsel and internal stakeholders. Using Procedures, the legal team can upload the contract and set up a workflow for external review, internal review, and final signing. This ensures the contract is thoroughly reviewed and approved by all necessary parties before finalization.
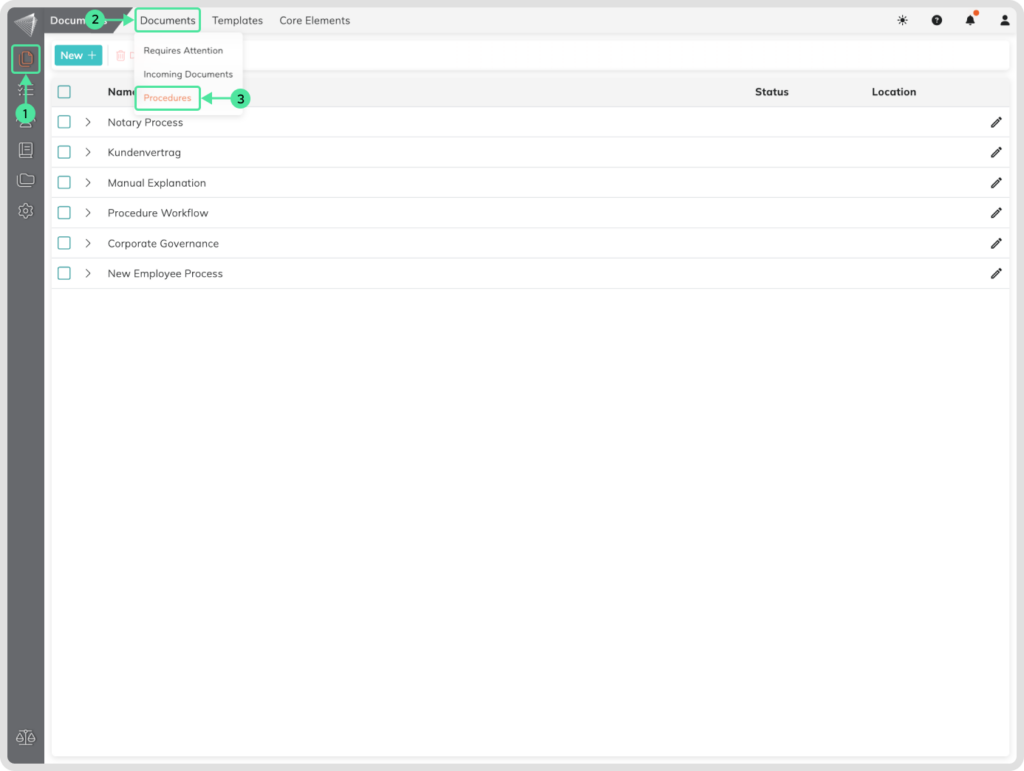
How to find the Procedures
- Go to the documents menu.
- Click on the documents.
- Select the Procedures.
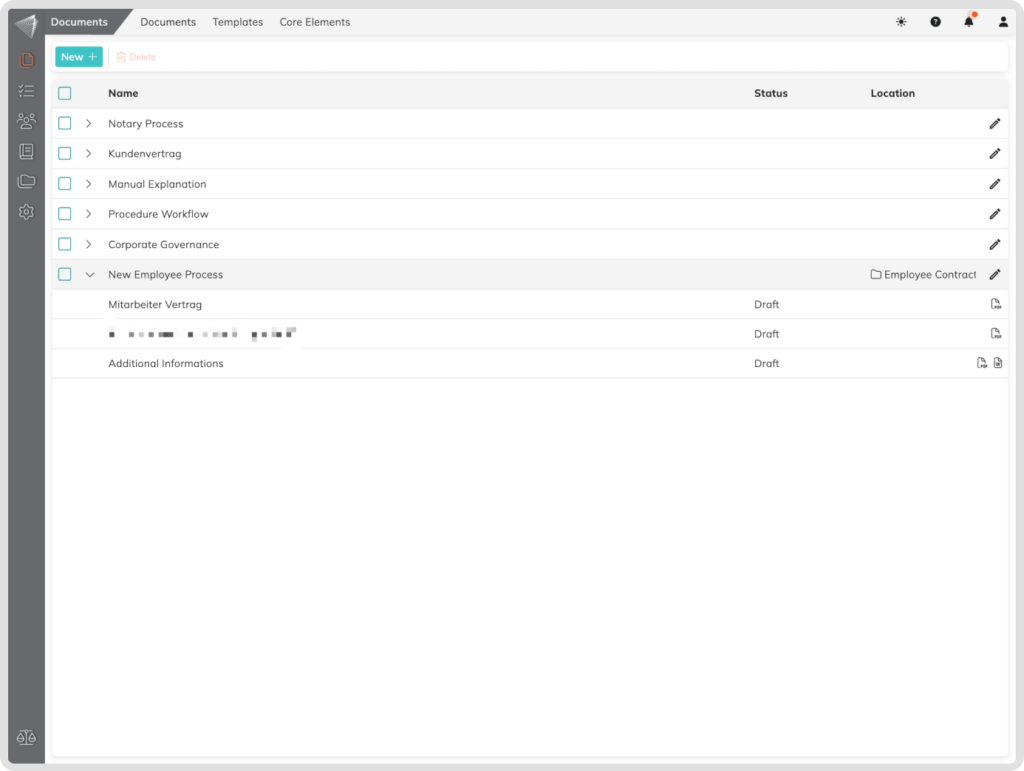
Index Page
The Procedures index page provides a central hub for managing all your procedures. Here, you can see:
- A list of your existing procedures: Quickly identify procedures you’ve created.
- Procedure status: Easily see if a procedure is in Draft, Out for Review, Reviewed, or Signed. The overall status reflects the most advanced stage of its documents.
- Document details: Click the arrow next to a procedure name to reveal the documents included and their individual statuses. This is hidden for procedures with only one document.
- Procedure folders: Find procedures organized by the folders you assigned them to.
Taking Action on Procedures:
- Open procedures: Click on the procedure name or arrow icon to view its details, including individual document statuses and download options (PDF or Word).
- Create new procedures: Click the “New +” button to get started with a fresh procedure.
- Edit procedures: Click the edit pen icon to modify existing procedures.
- Delete procedures: Select one or more procedures (except Signed procedures) and click the delete icon to remove them.
How to create a Procedure
Click on the New+ button and select the Procedure.
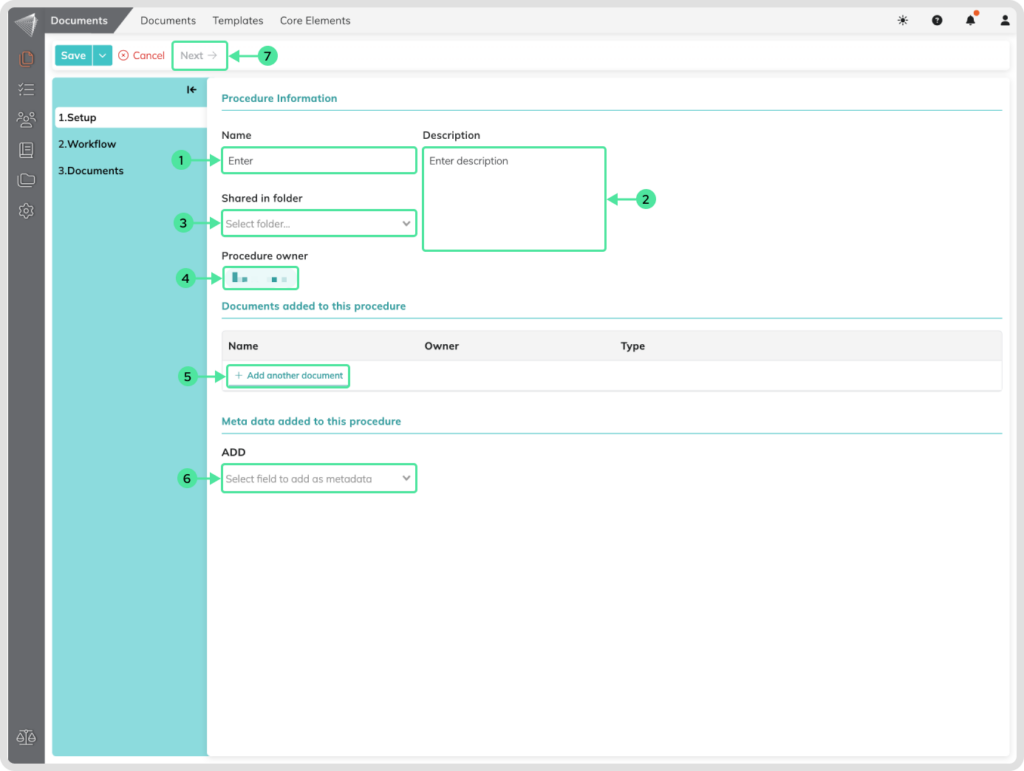
- Give your Procedure a name: This helps you and others easily identify the purpose of the procedure.
- Add a description (optional): Briefly describe the purpose or use case of this procedure for better clarity.
- Organize your procedures (optional): Select a folder to categorize your procedure for easier management.
- Assign an different owner (optional): Assign ownership to a specific team member if they’ll be managing this procedure.
- Choose your document source: Select how you’d like to build your procedure: Blank document, PDF, Document Template, or Word Upload.
- Add Metadata (Optional): Include helpful information for others using this function, like “Client Name” or “Related Contact”.
- Click Next to continue: Proceed to the next step of defining the workflow for your procedure.
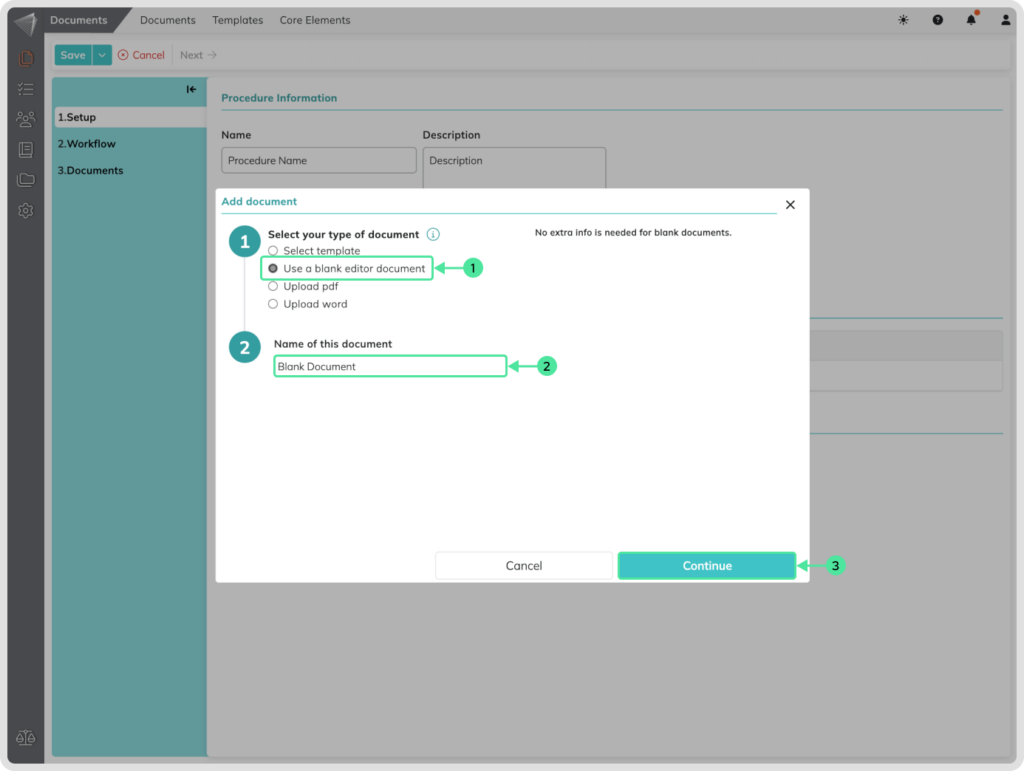
How to Create a Procedure from a Blank Document
This option allows you to build a procedure entirely from scratch. You have complete control over the document structure, content, and formatting. This is ideal for creating unique documents not covered by existing templates.
- Select the Blank Document: Click the checkbox next to the blank document.
- Assign a Document Name: Give to the document a specific name within the procedure. We recommend one that clearly describes the purpose of the document.
- Click “Continue” to Proceed: Once you’ve selected and named the document, click the “Continue” button to move on to the next step.
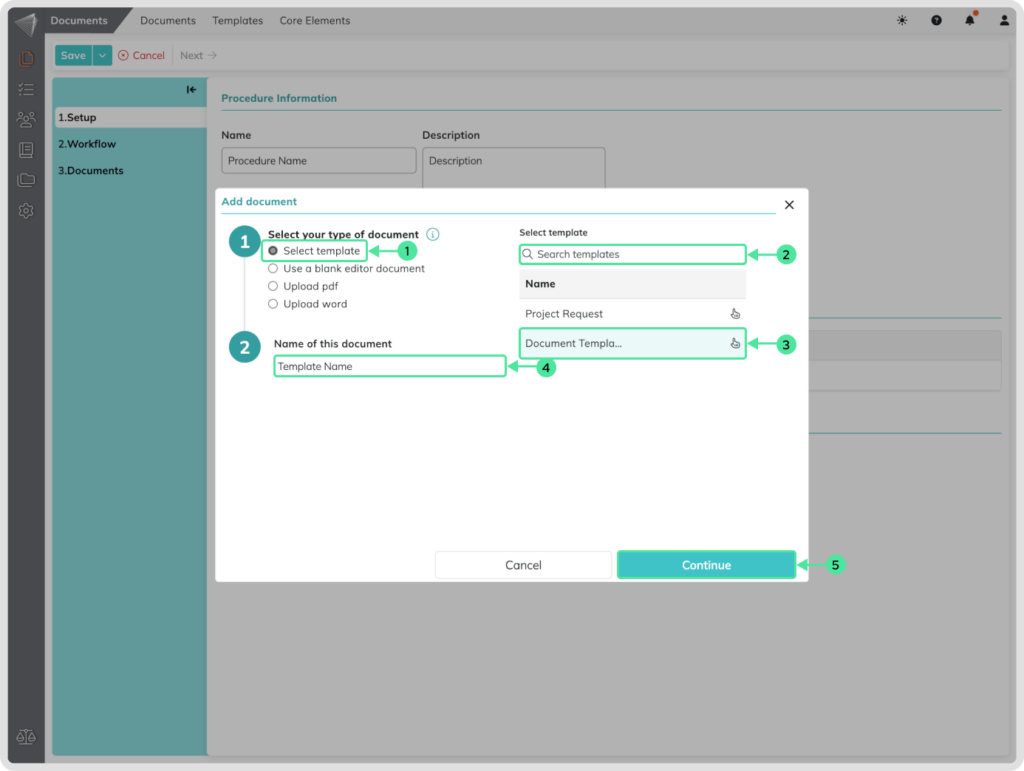
How to Create a Procedure from a Document Template
Pre-designed document templates provide a head start for creating procedures. These templates contain pre-defined sections, formatting, and placeholders for specific information. This method saves time and ensures consistency when creating similar documents.
- Choose the Document Templates: Tick the checkbox next to the document templates.
- Search a desired Template: Use the search bar to find specific templates containing forms. Only templates with forms will be listed in the search results.
- Select the Template: Choose the template you want to use by clicking on it.
- Name the Template: Assign a specific name to the template within the procedure for better organization.
- Click “Continue” to Proceed: Once you’ve selected and named the template, click the “Continue” button to move on to the next step.
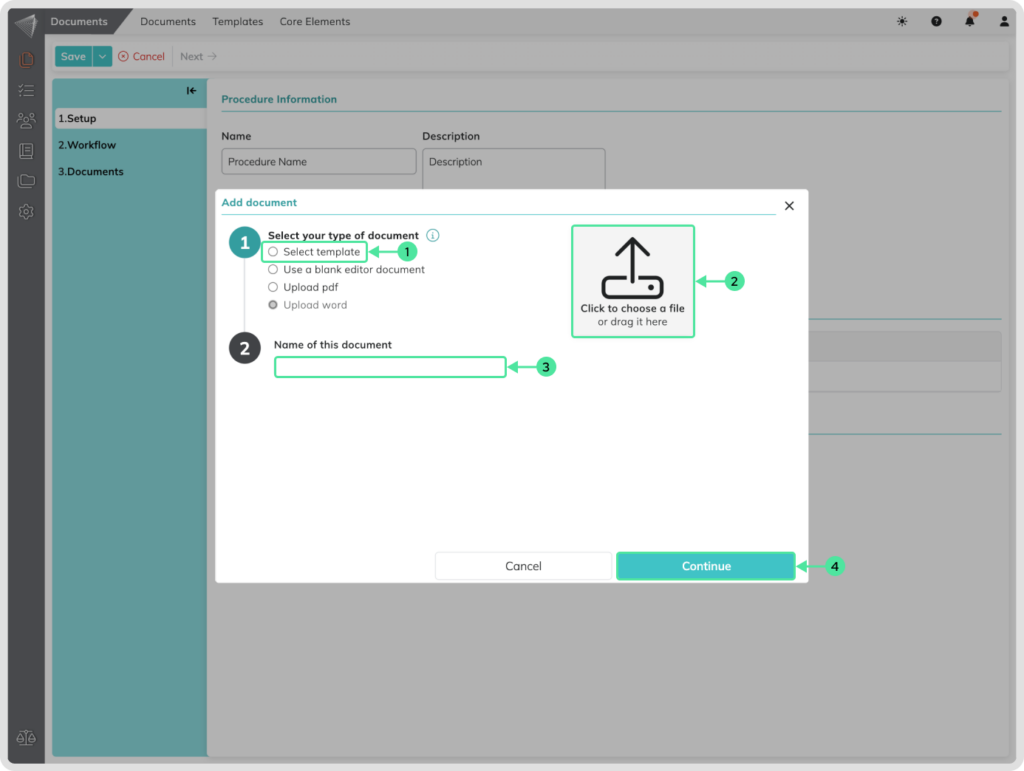
How to Create a Procedure from a Word Upload
If you already have a Word document you want to use in a procedure, you can upload it directly. This is a convenient way to integrate existing documents into your workflow. You can then add elements like signature fields and recipient assignments within the Procedures interface.
- Select the Word Document: Tick the checkbox next to the document upload function.
- Search for the Document: Click on the Image and search for the desired Word document on your computer. (Optional you can drag and drop it from your Desktop)
- Assign a Document Name: Give the document a specific name within the procedure for easier identification.
- Click “Continue” to Proceed: Once you’ve selected and named the document, click the “Continue” button to move on to the next step.
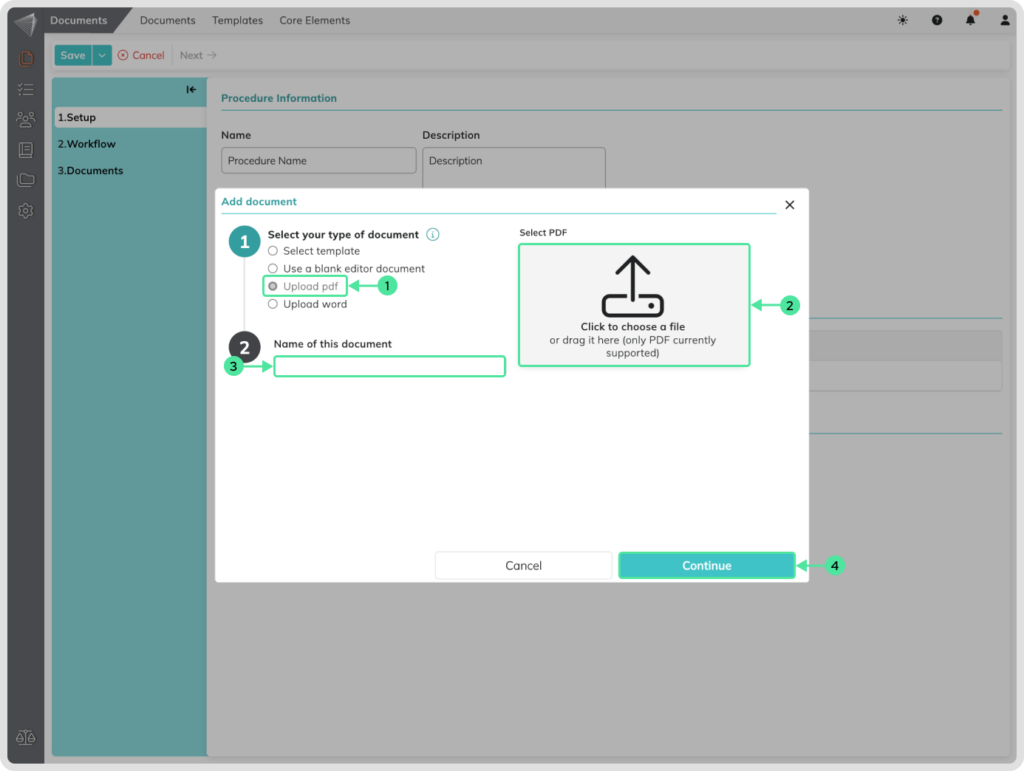
How to Create a Procedure from a PDF
For existing PDF documents, you can also leverage them as the foundation for a procedure. Procedures allow you to add interactive elements like signature fields and assign actions to specific users directly on the PDF document. This streamlines the approval process for existing PDF documents.
- Select the PDF Document: Tick the checkbox next to the PDF upload function.
- Search for the Document: Click on the Image and search for the desired PDF document on your computer. (Optional you can drag and drop it from your Desktop)
- Assign a Document Name: Give the document a specific name within the procedure for easier identification.
- Click “Continue” to Proceed: Once you’ve selected and named the document, click the “Continue” button to move on to the next step.
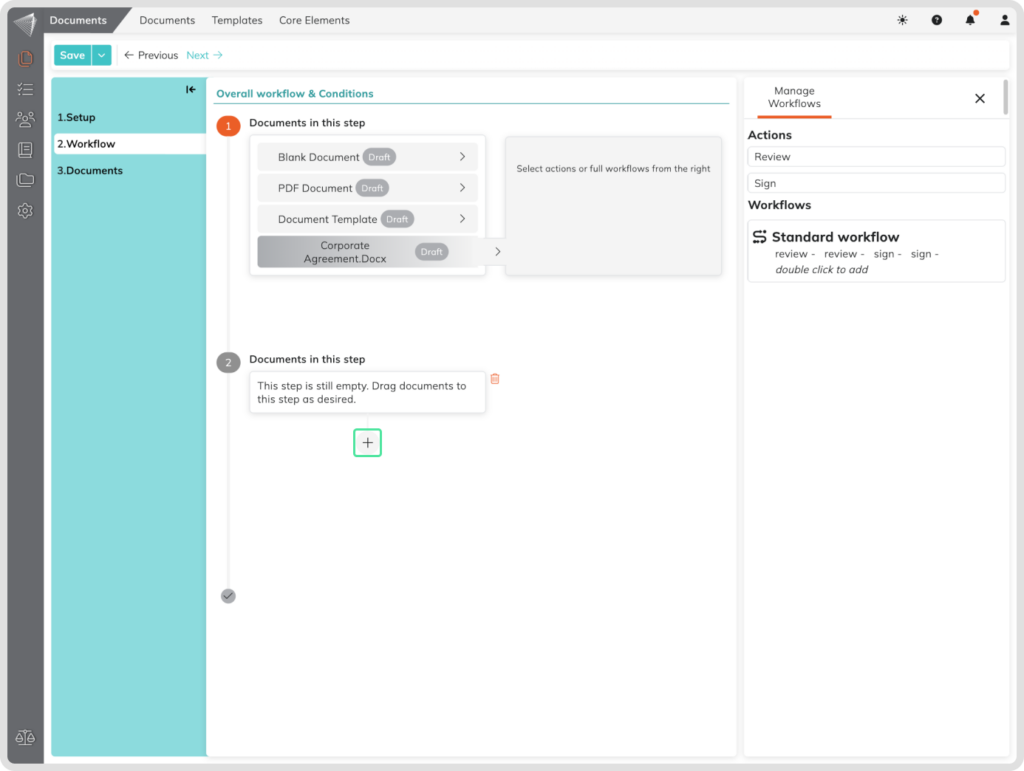
Workflows
Mapping out your Document Journey
The “Workflow” step in Procedures is where you define the exact path your documents will take to get reviewed, signed, and finalized. Think of it as the roadmap for your procedures, outlining the steps involved and who needs to be involved at each stage.
Click on the arrow next to the document name to open the menu for the action.
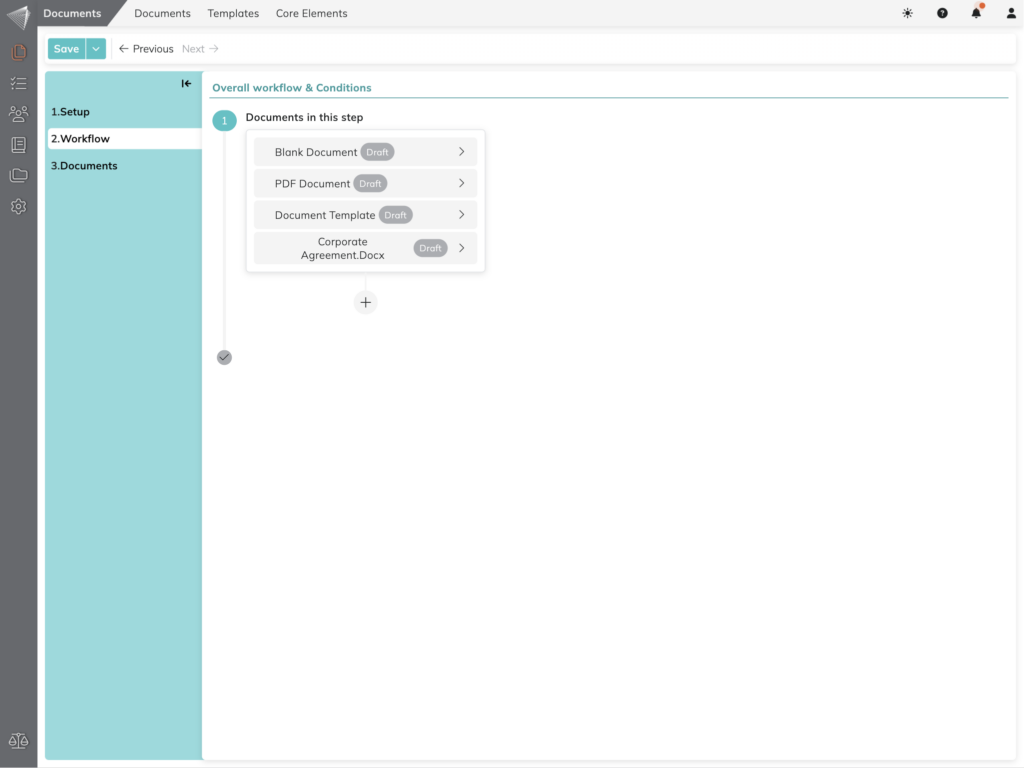
Set Up the Action Plan: For each document within your procedure, you can specify whether it needs a review or a signature. This clarifies what action each participant needs to take. Just double-click on the action name to add it to the documents.
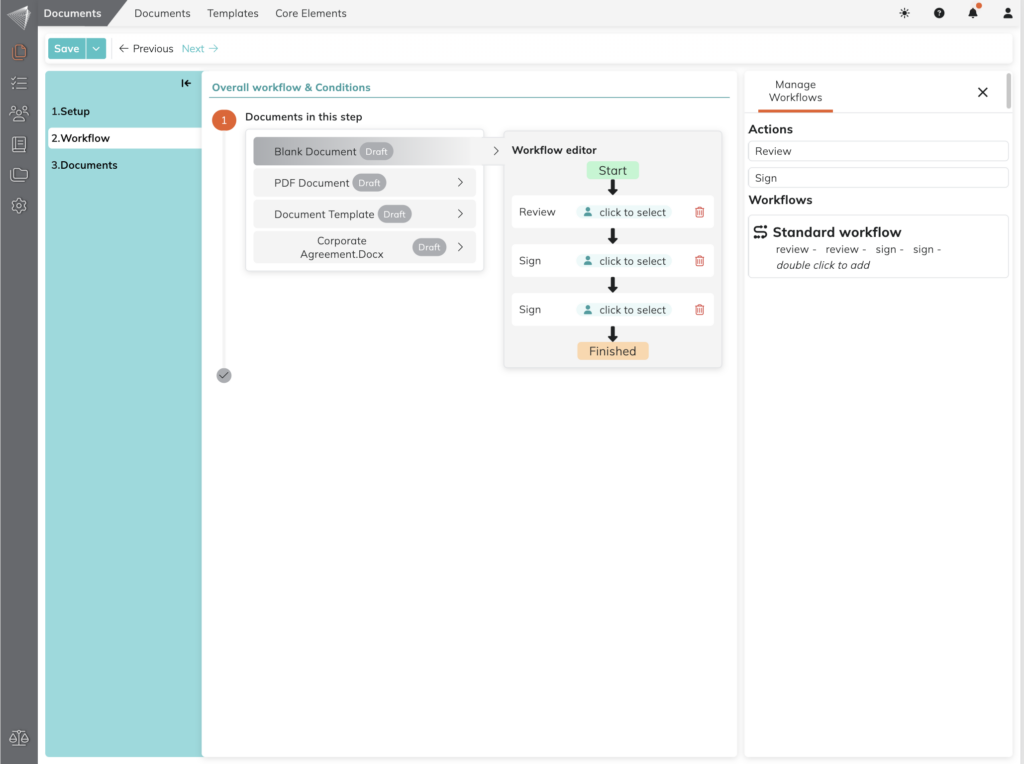
Determine the Order: Define the sequence in which actions need to happen. Do you want reviews or signatures to occur one after the other (sequentially) or can they happen simultaneously (in parallel)?
Simply set up the path of actions you need by double-clicking in the action and assigning Receiver to them.
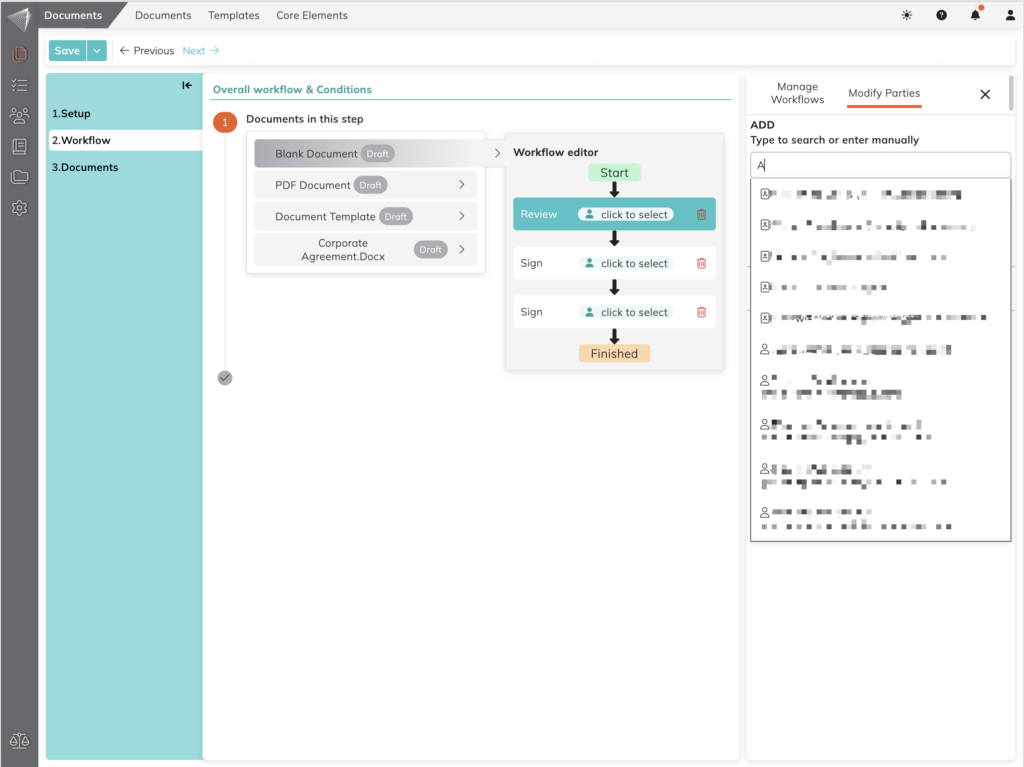
Assigning External Reviewers and Signers
Procedures allow you to collaborate with individuals outside and inside of your organization for document review and sign-off. Here’s how to involve external users:
Adding External Recipients:
- Email Address Entry: In the dedicated section for assigning reviewers and signers, enter the name and the email address of the desired external user.
- Guest User Designation: These external recipients will be treated as “Guests” within your procedure.
Action Selection:
- Reviewer or Signer: Just like with internal users, choose whether the external recipient needs to review or sign the document.
Communication and Security:
- Email Notifications: Once assigned, the external user will receive an email notification with a secure link to access and review/sign the document. They won’t require a separate account within the system.
- Document Security: Permissions for external users are limited to the specific document they’re assigned to. They won’t have access to other procedures or sensitive information within your organization.
Adding Multiple External Users:
Similar to internal colleagues, you can add multiple external reviewers or signers as needed for a single document or throughout the entire workflow.
Benefits of External Collaboration:
- Streamlined Process: Extend your approval process beyond your organization without the need for complex account creation for external users.
- Improved Efficiency: Collaborate with external partners, clients, or vendors efficiently by involving them directly within your procedures.
- Enhanced Security: Maintain secure access to your documents by granting limited permissions to external users only for the specific documents they need to review or sign.
Assigning Internal Reviewers and Signers
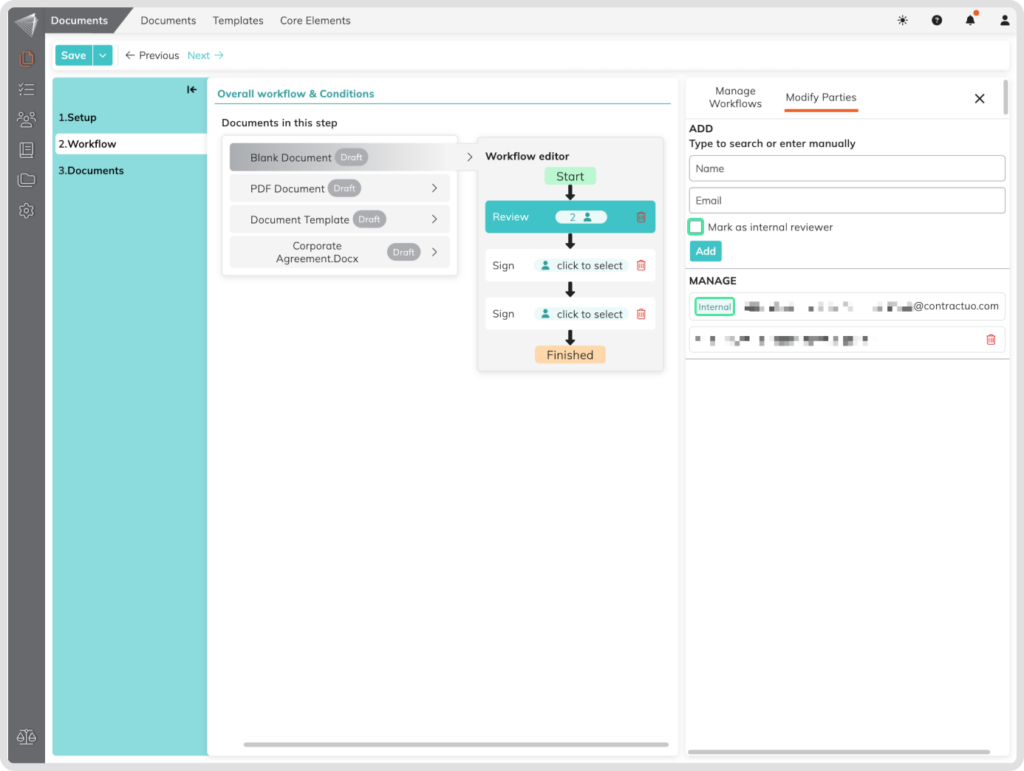
Define who needs to take action on each document within your procedure. You can type in the E-Mail for external users. Receivers can also be internal reviewers who provide feedback or internal signers who give final approval. Simply tick the dedicated checkbox and use the search bar to find the specific colleagues from your organization you want to involve.
For each document, simply tick the checkbox next to “Internal Reviewer” or “Internal Signer” depending on the action.
Once you’ve selected the action and ticked the checkbox for the Internal Review or Signer, use the search bar provided to find the specific colleagues you want to involvve. Start typing their name and the system will suggest relevant options from your organization.
Choose the desired coworker from the search results by clicking on their name. You can add multiple reviewers or signers as needed to complete the approval process.
By using these steps, you can efficiently assign the appropriate roles within your organization, ensuring the right people are involved in reviewing and signing your documents.
Manage Multi-Party Approvals: Need multiple people to sign off? Workflow allows you to set up the process so everyone signs in the designated order, or all in the same process.
Involve Yourself in the Process (Optional):
Procedures allow you to include yourself as a signer within the document workflow, if needed. You can easily do this by clicking the dedicated “Add Myself as Signer” button. This functionality provides flexibility in assigning signing responsibilities.
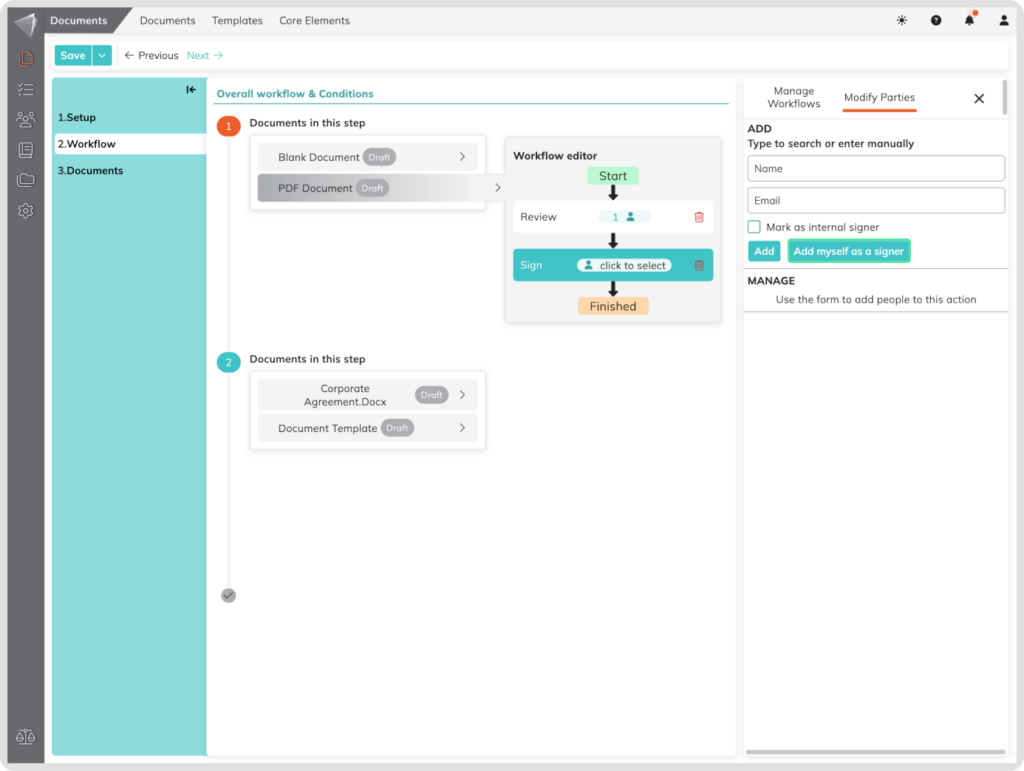
Containers
Managing complex procedures with numerous documents? Containers offer a way to visually group related documents, improving workflow clarity. Simply click the “plus” icon to add a container. Then, drag and drop existing documents into the container to organize them. By utilizing containers within the “Workflow” step, you create a more intuitive path for your documents, ensuring everyone involved understands their role and the overall process flows smoothly. (Click “Next” to proceed to the third step.)
Documents
Setup your Procedure documents
The Documents step provides a centralized hub for managing all the documents within your procedure. Here’s what you can see and do:
Document Overview:
- Document Name: Easily identify each document by its designated name.
- Type: Quickly understand the document type (e.g., Blank Document, Document Template, Word Upload, PDF Upload).
- Status: Stay informed about the current status of each document (e.g., Draft, Out for Review, Reviewed, Signed).
- Last Modified: View the timestamp indicating the last time a document was edited.
Editing and Previewing:
- Edit Icon: Modify the content of most document types (Blank Documents, Word Uploads, PDF Uploads with limitations) using this icon.
- Note: Document Templates initially have a Product Fill Icon, the Edit Icon will be included once the document template has been filled and saved.
- Eye Icon (Optional): Preview the content of documents already containing information without accidentally modifying them using this icon. (Availability may depend on the platform).
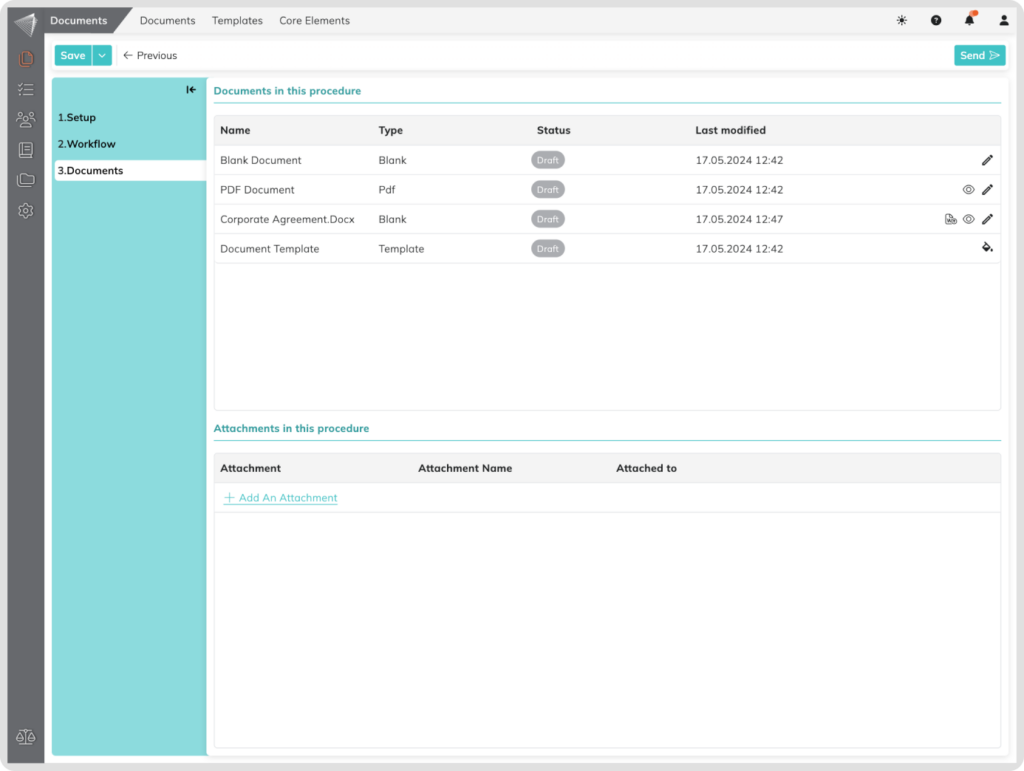
Attachments:
- Procedure Level: Expand your procedure’s information by attaching additional files (e.g., spreadsheets, images) by clicking the designated option.
- Specific Documents: Attach relevant files directly to specific documents within the workflow for enhanced organization.
- Customize your attachments Name: Hover over the attachment name and an Edit Icon will be displayed. Click on it to be able to change the attachment name.
Document Types:
Blank Documents:
- Content Creation: Edit the document directly within the platform using a built-in editor. This allows you to add text, formatting, and structure.
- Interactive Features: Enhance your document with signature fields for sign-off points and Smart Fields to capture specific information during the workflow (e.g., automatically populate dates or department names).
- Additional Capabilities: Further enrich your document with pre-defined Text Blocks (e.g., disclaimers) and relevant Metadata (keywords) for easier categorization and search. Add comments on the document level.
Document Templates:
- Edit and Adapt: Modify the existing template content to fit your specific needs. This may involve adding or removing text, adjusting formatting, or inserting tables.
- Interactive Features: Just like with blank documents, you can include signature fields and Smart Fields for a dynamic and interactive document.
- Additional Capabilities: Similar to Blank Documents, you can include Text Blocks, Metadata and Comments for improved organization and searchability.
Word Uploads:
- Content Editing: Modify the content of your uploaded Word document using a compatible editor within the platform. Verify also if all your content is properly uploaded.
- Interactive Additions: Similar to Blank and Document Templates, you can incorporate signature fields and Smart Fields.
- Additional Capabilities: Enhance your uploaded Word documents with Text Blocks, Metadata and Comments for further customization and organization.
PDF Uploads:
- Interactive Additions: Enhance your PDF documents by adding user-specific fields like Name, Date, and Signature fields. You can also include comments for additional feedback.
- Content Editing Limitation: It’s important to note that directly editing the actual content of a PDF document within Procedures is not possible.
- Additional Capabilities: While editing content directly isn’t available, you can still include Comments for enhanced communication and utilize Metadata for categorization and search purposes.
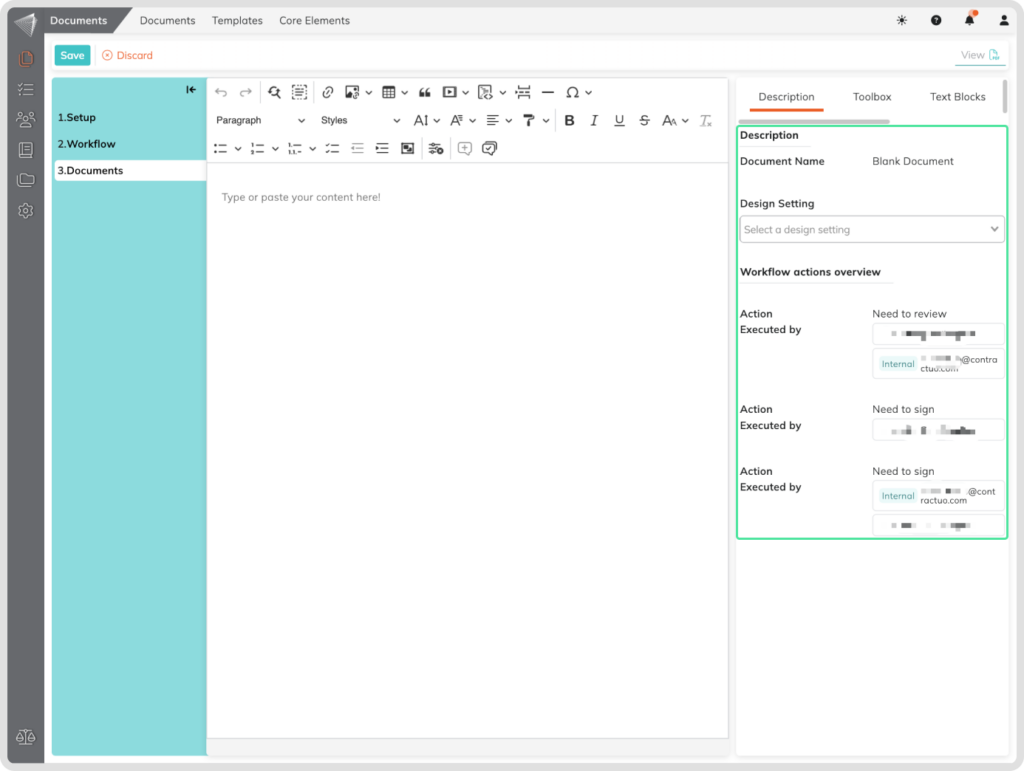
Sidebar menu inside documents
Description:
Here is what you will see in the Document Description:
- Document Name: Easily identify each document by its designated name.
- Involved Persons: See a clear list of individuals assigned to review or sign each document.
- Assigned Actions: Quickly understand the action required for each person (e.g., Review or Sign).
- Design Settings (Optional): For documents created from Blank, Document Templates, or Word Uploads, you can optionally customize their design using available settings.
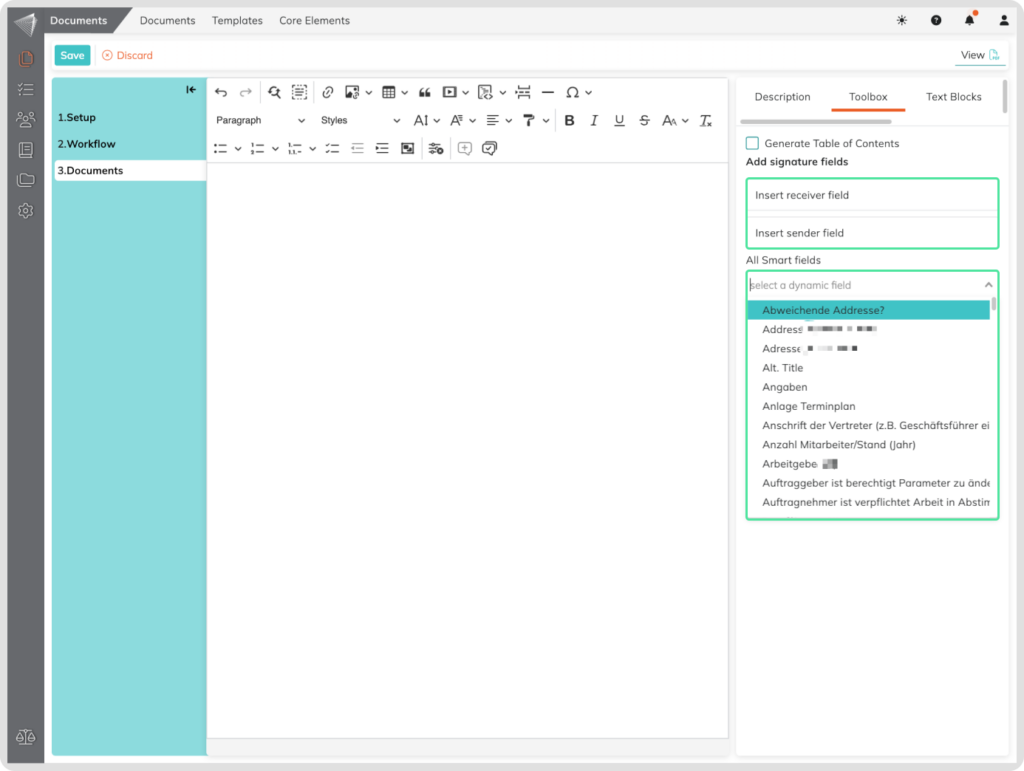
Toolbox:
The Toolbox empowers you to enhance your documents with interactive elements that streamline the workflow. Here’s what you can add:
Signature Fields:
- Sender and Receiver: Designate specific signature locations for both the sender and recipients of the document. This ensures all necessary approvals are captured electronically.
- Smart Fields: Embed automatic Name and Date fields for signers. This eliminates the need for manual entry and guarantees accuracy. You can also add a FreeText field, where you can add any text information you need (Only in PDF documents). If you need more information about the Smart Fields click here.
Table of Contents (Only for editor based documents):
- Enable Easy Navigation: If your document has defined headers, you can add a Table of Contents for convenient navigation. Simply tick the dedicated checkbox and click the button that appears.
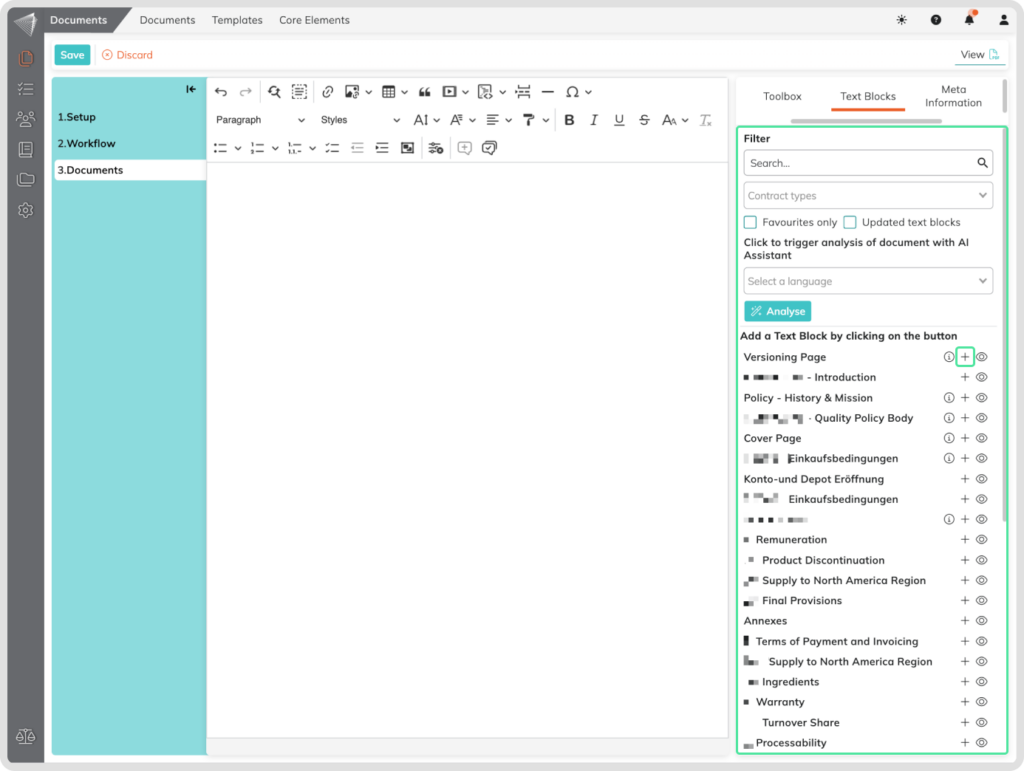
Text Blocks:
- Pre-Defined Content Snippets: Procedures allow you to add reusable text blocks containing frequently used information (e.g., disclaimers, instructions). These blocks can be easily inserted into any document that has a editor within your procedure by click on the associated Plus icon at the Text Block, saving time and ensuring consistency. If you need more information about the Text Blocks click here.
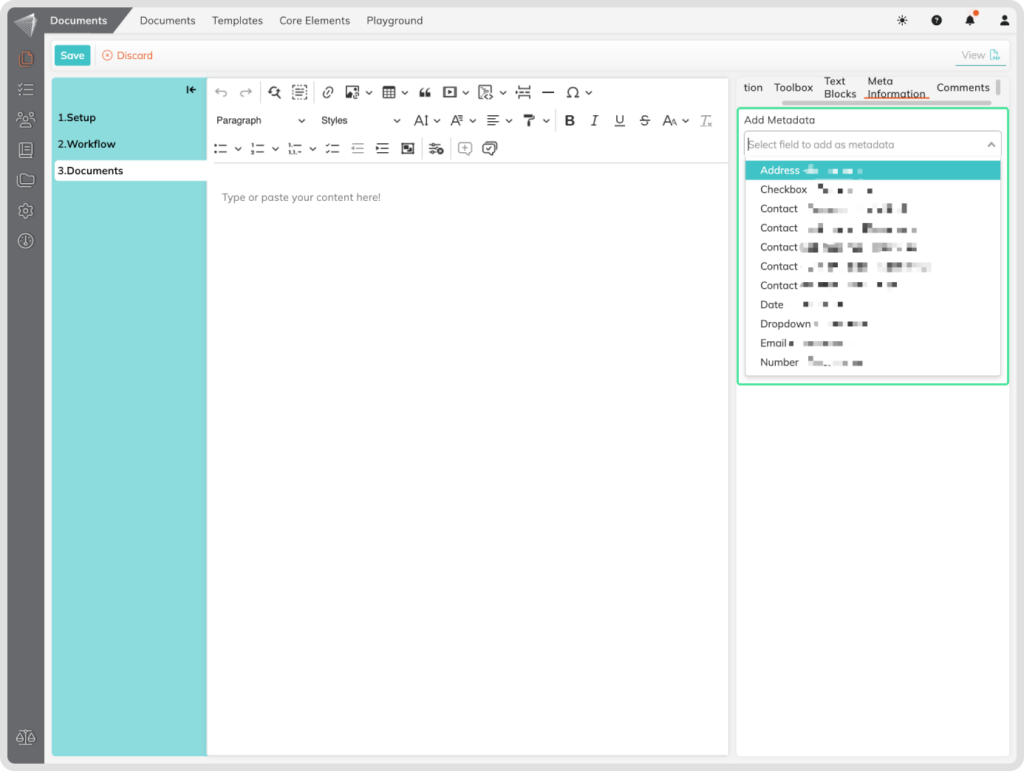
Metadata:
- Enhanced Organization Communication with Metadata: Adding relevant metadata to your documents helps internal communication. You can save specific information that doesn’t appear in the final document but can help your organizational communication. Select from the Sidebar menu named Meta Information your desired Smart Field that you want to use as a metadata field and add the information to it. A fields can be selected once, but multiple fields can be added.
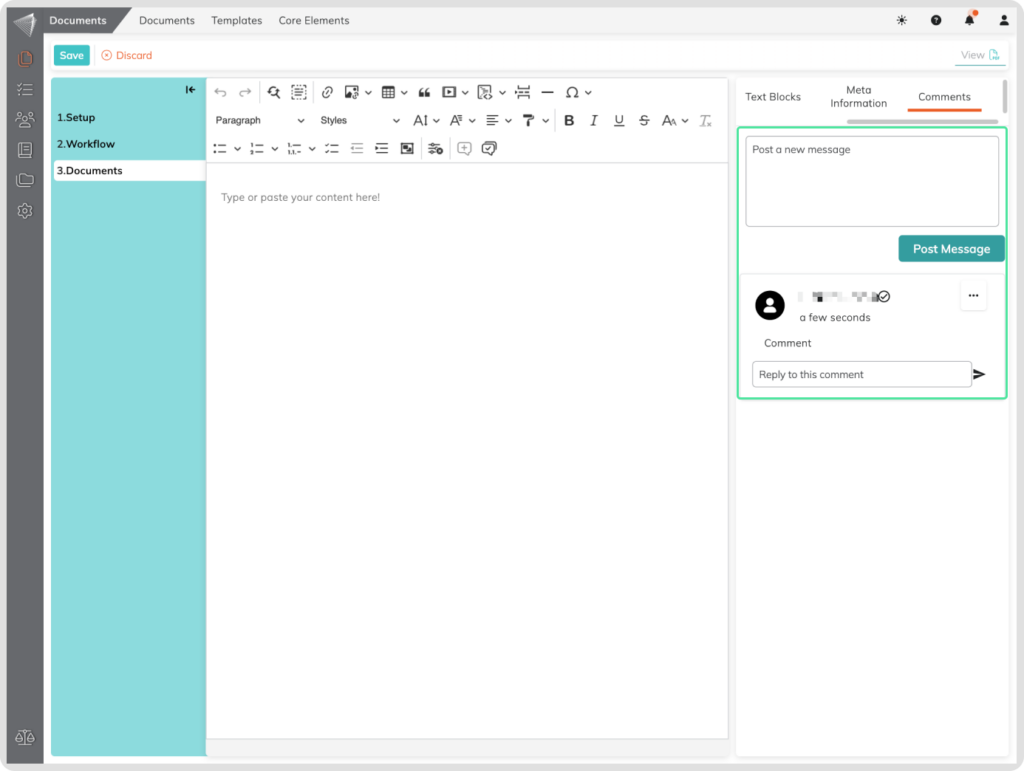
Comments:
- Streamlined Communication: Facilitate communication within your workflow by adding comments on the documents level. You can clarify information, request feedback, or provide additional context for other users involved in the procedure. You can add also subcomment to existing ones.
Following Up on Procedures:
Once you send out a procedure, the status of the first document will automatically change to “OUT.”
Staying Informed:
- Status Updates: You’ll receive notifications whenever a document within the procedure is Signed, Reviewed, or Rejected. This keeps you informed about the progress and any potential roadblocks.
- Rejection Management: If a document is rejected, you can easily modify it within Procedures and then resend it for approval.
Resending Options:
- Modifications and Resubmission: Only rejected and draft documents can be edited and resent. Once a document is sent out for review or signing purposes and isn’t rejected, it cannot be resent again.
Once the current document is positively completed (signed or reviewed), the system automatically sends the next document in line to the designated recipient, as long as you’ve configured a sequential workflow in Step 2 (Workflow).